SECTION 2
GENERAL
Looking at the controls
MZ-B10
This section is extracted from instruction manual.
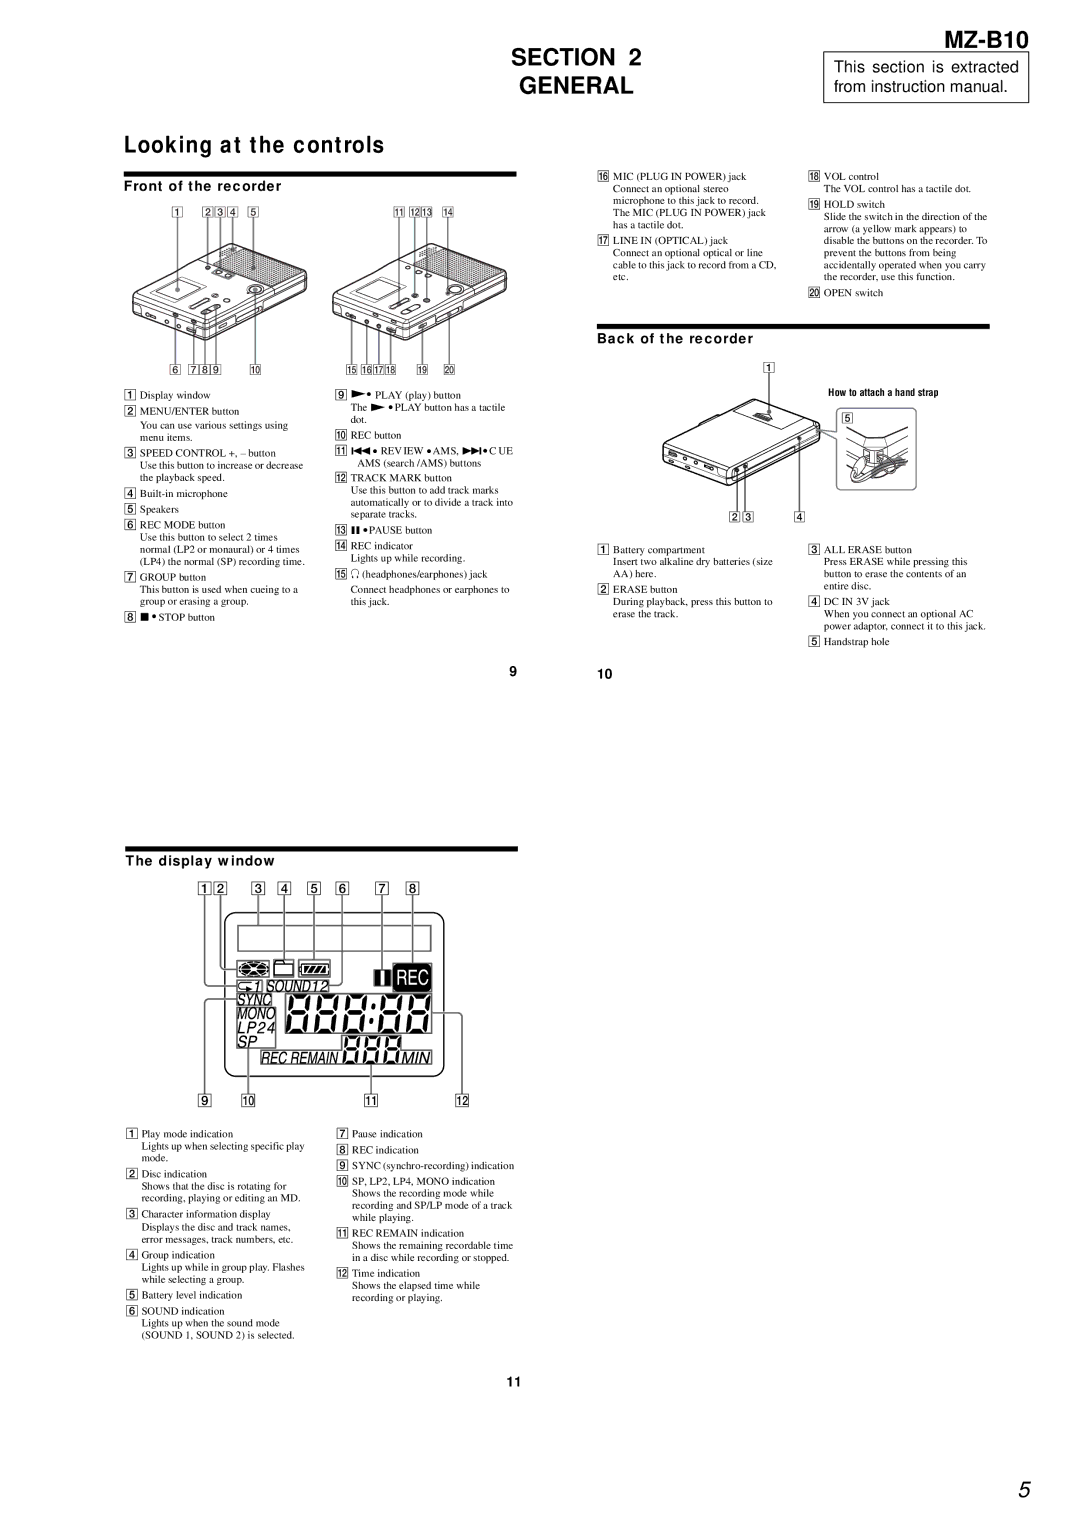
Front of the recorder
1 234 5 | qa qsqd qf |
P MIC (PLUG IN POWER) jack | R VOL control | |
Connect an optional stereo | The VOL control has a tactile dot. | |
microphone to this jack to record. | S HOLD switch | |
The MIC (PLUG IN POWER) jack | ||
Slide the switch in the direction of the | ||
has a tactile dot. | ||
arrow (a yellow mark appears) to | ||
| ||
Q LINE IN (OPTICAL) jack | disable the buttons on the recorder. To | |
Connect an optional optical or line | prevent the buttons from being | |
cable to this jack to record from a CD, | accidentally operated when you carry | |
etc. | the recorder, use this function. | |
| T OPEN switch |
Back of the recorder
6 789 q;
A Display window
BMENU/ENTER button
You can use various settings using menu items.
CSPEED CONTROL +, – button
Use this button to increase or decrease the playback speed.
D
ESpeakers
FREC MODE button
Use this button to select 2 times normal (LP2 or monaural) or 4 times (LP4) the normal (SP) recording time.
GGROUP button
This button is used when cueing to a group or erasing a group.
Hx• STOP button
qg qhqjqk | ql w; |
IN• PLAY (play) button
The N • PLAY button has a tactile dot.
JREC button
K.• REV IEW • AMS, >• C UE AMS (search /AMS) buttons
LTRACK MARK button
Use this button to add track marks automatically or to divide a track into separate tracks.
MX • PAUSE button
NREC indicator
Lights up while recording.
Oi (headphones/earphones) jack
Connect headphones or earphones to this jack.
1
How to attach a hand strap
5
23 | 4 |
A Battery compartment | C ALL ERASE button |
Insert two alkaline dry batteries (size | Press ERASE while pressing this |
AA) here. | button to erase the contents of an |
B ERASE button | entire disc. |
| |
During playback, press this button to | D DC IN 3V jack |
erase the track. | When you connect an optional AC |
| power adaptor, connect it to this jack. |
| E Handstrap hole |
910
The display window
12 3 4 5 6 7 8
9q;
A Play mode indication
Lights up when selecting specific play mode.
B Disc indication
Shows that the disc is rotating for recording, playing or editing an MD.
C Character information display Displays the disc and track names, error messages, track numbers, etc.
D Group indication
Lights up while in group play. Flashes while selecting a group.
E Battery level indication
F SOUND indication
Lights up when the sound mode (SOUND 1, SOUND 2) is selected.
qa qs
G Pause indication
H REC indication
ISYNC
JSP, LP2, LP4, MONO indication Shows the recording mode while recording and SP/LP mode of a track while playing.
KREC REMAIN indication
Shows the remaining recordable time in a disc while recording or stopped.
LTime indication
Shows the elapsed time while recording or playing.
11
5