Manuals
/
Star Micronics
/
Computer Equipment
/
Printer
Star Micronics
LC-500
user manual
Appendix B Character Sets
Models:
LC-500
1
60
72
72
Download
72 pages
16.26 Kb
57
58
59
60
61
62
63
64
Troubleshooting
Specification
Install
Code list
Connector Signals
Problem Possible Cause
Buffer clear & All reset
Printer Setup
FF command / Eject direction
Adjusting the dot alignment
Page 60
Image 60
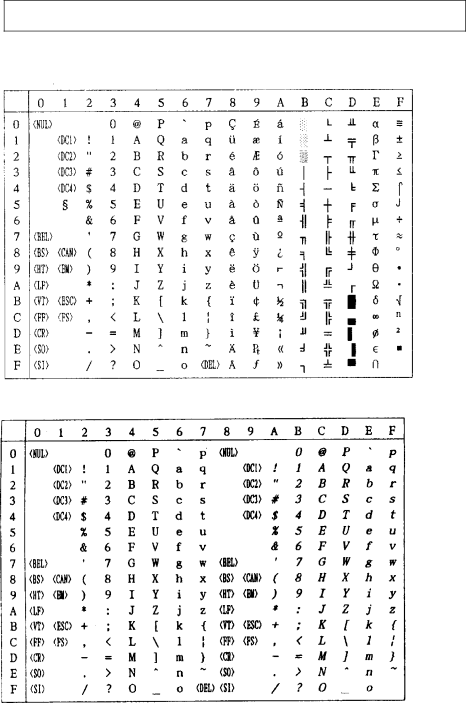
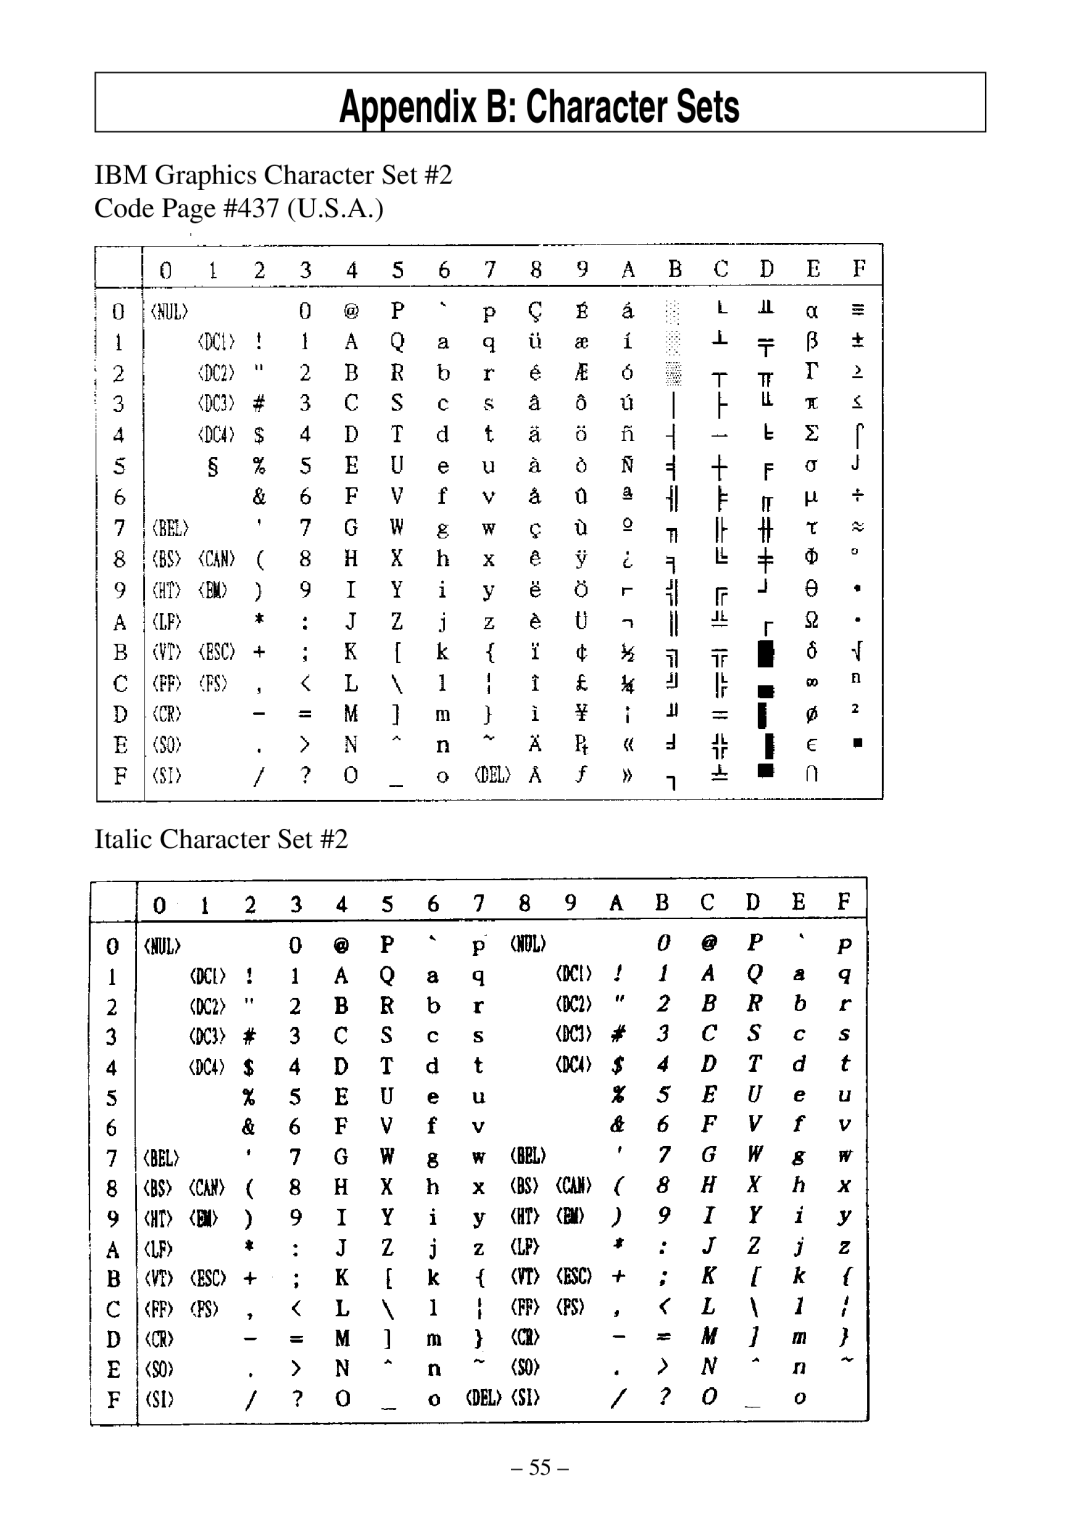
Appendix B: Character Sets
IBM Graphics Character Set #2
Code Page #437 (U.S.A.)
Italic Character Set #2
– 55 –
Page 59
Page 61
Page 60
Image 60
Page 59
Page 61
Contents
LC-500
EC Council Directive 89/336/EEC of 3 May
Contents
Control Codes List
Printer Setup
Choosing a place for the printer
Unpacking the printer
Printer Components
Installing the paper guide
Opening the printer cover
Removing the printer cover
Connecting the Power Cord and turning the power on and OFF
Installing the ribbon cassette
Set the adjustment lever to the highest position
Knob
Connecting to your computer using the parallel cable
Removing the ribbon cassette
Ferrite Core Installation
You can also run the power cord under the printer
Paper Handling
Selecting paper types
Cut-sheet paper
Fanfold paper
Loading cut-sheet paper
Paper Type Weight Per Sheet Thickness Recommended
Control panel Paper
Printing on cut-sheet paper
Loading fanfold paper
Adjustment lever
Pin tractor Sheet guides
Page
Printing on fanfold paper
Fanfold paper
Parking fanfold paper
Unparking fanfold paper
Power
Control Panel Operations
Switching between on-line and off-line
Control panel functions in on-line mode
Print mode selection
Tear-off function fanfold paper
Panel lock mode
Panel macro
Control panel functions in off-line mode
Line feed
Set/Park/Eject
Form feed
Auto loading position change mode
Micro paper feed
Buffer clear & All reset
Set top of form TOF
Using the EDS Mode
About EDS Mode settings
Entering the EDS Mode
Selecting a switch
Changing a switch setting
Printing the current EDS settings
Selecting a EDS number
EDS-1
Printer mode
Character table / IBM character set
EDS-2
Quiet mode
Auto CR with LF
Auto LF with CR
Saving Control Panel Status
Multi-part mode
75% Compress mode
FF command / Eject direction
Eject paper at Power on
Print direction command
Print direction
CR centering at top of form
CR wiping at top/bottom
EDS-3
International character set
Code
Length Cut-sheet paper
EDS-4
Length Fanfold paper
Control Codes List
ESC/P mode
RAM ESC
OCR B
Troubleshooting
Short test
Long test
Hexadecimal dump
Adjusting the dot alignment
May come out looking like one of the following
Troubleshooting guide
Problem Possible Cause
Problem
Printer’s air vents are blocked or obstructed
Problem Possible Cause
Program
Appendix a Specifications
Printing System
Paper
Connector Signals
Parallel Interface
Appendix B Character Sets
IBM Graphics Character Set #1 Italic Character Set #1
Code Page #737
Code Page #851
Nordic Russian
Code Page #869
Code Page #1001 Arabic Code Page #3002
Code Page #3012
CS2
Code Page #3845
International Character Set
Appendix C. Control Panel Operation Guide
Head Office European Office
Top
Page
Image
Contents