QP Series
EMC
List of Standards of Conformity
TEC Thermal Printer
Meanings of Each Symbol
Safety Summary
Request Regarding Maintenance
Precautions
Table of Contents
5 2 T S 1 2 Q P P a C
Accessories
Introduction
Applicable Model
MSI, ITF, NW-7, CODE39, CODE93, CODE128
Specifications
General Specifications
Printing Specifications
Take-up block and strip block
Paper LABEL/TAG Specifications
Ribbon Specificatins
Option
Front View Rear View
Appearance
FRONT/REAR View
Operation Panel
OFF
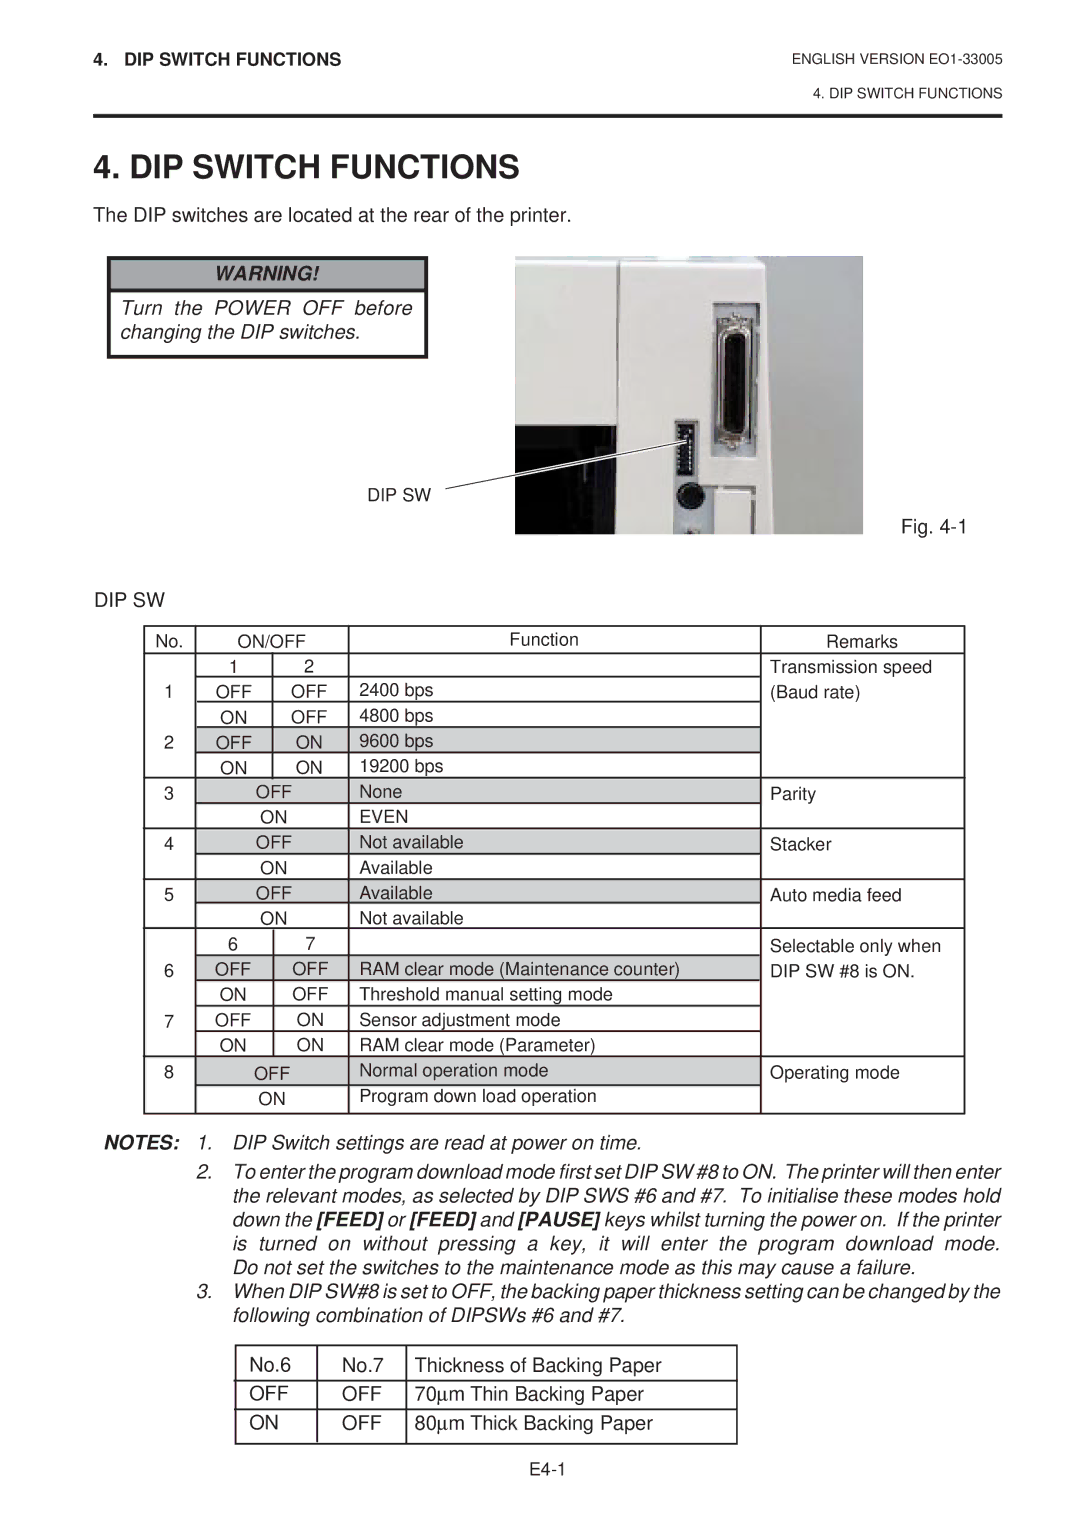
DIP Switch Functions
DIP SW
Interface Cables
SET UP Procedure
Setting UP the Printer
Requirements for Operation
Connecting the Power Cord and Cables
Installation Procedure
Installing the Supply Holder Unit
Loading the Ribbon
Guide Wheel E7-2
Loading the Paper
E8-2
Cutter Module Paper Outlet
Batch type
Top Cover
Strip type
Power OFF Power Online Error
Threshold Setting
CARE/HANDLING of the Paper and Ribbon
Cleaning
General Maintenance
Covers
Removing Jammed Paper
Cleaning the Cutter Unit
Assembling is reverse order of removal
Cleaning the Strip Unit
Error type Problem Solution
Troubleshooting
Problem Solution
Cutter Error
Appendix
Ascii Code Chart Font Sample Barcode Sample
ON-LINE LED
Error LED
Power LED
Index
Serie B-450-QP
Résumé des précautions
Explication des symboles
Précautions
Au sujet de la maintenance
F12
Table DES Matieres
F10
F11
∙ B-452-TS12-QP ∙ B-452-TS12-QP-PAC Description du modèle
Accessoires
Le modèle PAC contient également les accessoires suivants
Modele Applicable
105.7 mm 4.16 pouces
Specifications Generales
Specifications DE Limpression
Unit mm
Specifications DU Papier ET DES Etiquettes
Specifications DU Film
Options
Vue Avant Vue Arrière
VUE Générale
VUE AVANT/ARRIERE
Panneau DE Controle
Dorsal fin 70 μm
Utilisation DES DIP Switchs
Les dip switchs sont situés à larrière de limprimante
Epaisseur du dorsal
Câbles Interface
Préparation Dinstallation
Installation
Conditions Dopération
Connexion DU Secteur ET DES Cables
Procédure Dinstallation
Installation DU Support Rouleau
Avertissement
Chargement DU Film
Roue Guide F7-2
Chargement DU Papier
Guides Papier Rouleau Papier Levier de Blocage des
Papier
Impression Par Lot
Impression avec pré-décollage
Réglage DES Seuils
Power on Power Online Error
10. Précautions DE Stockage DES Consommables
Nettoyage
Entretien DE L’IMPRIMANTE
Capots
Appuyez sur le levier douverture pour ouvrir le capot
Enlever LE Papier Coincé
Nettoyage du massicot
Pour le remontage, suivez à lenvers les étapes précédentes
Nettoyage de lunité de pré-décollage
12. Dépistage DES Pannes
Type derreur Problème Solution
Problème Solution
Appendice
Interface série
Réglage des seuils Réglage manuel des seuils Résolution
Dépistage des pannes 12-1
Interface parallèle
QP Serie
Zusammenfassung sicherheitsregeln
Bedeutung der Symbole
Wartungshinweise
Vorsichtsmaßnahmen
G12
Inhaltsverzeichnis
G10
G11
Zubehör
Einführung
Modellbezeichnung
Gewicht Kg ohne Etiketten und Farbband
Spezifikationen
Drucker Spezifikationen
Druck Spezifikationen
LAN-QM
Papier ETIKETT/KARTON Spezifikationen
Farbband Spezifikationen
Optionen
Bedienfeld
Überblick
VORDER-/RÜCKSEITE
70 μm Trägerpapier
DIP Switch Funcktionen
DIP Switch Bank
Nr.6 Nr.7 Stärke der Tragerpapiers
Schnittstellenkabel
Einrichten DES Druckers
Voraussetzungen FÜR DEN Betrieb
Druckvorbereitung
Installation DES Papierabrollers
Installation DES Druckers
Einsetzen DES Farbbandes
G7-2
Einsetzen DES Papiers
Druckkopfblock
Drucker im kontinuierlichen Druck-Modus
Spenden
Sensoranpassung durchzuführen
Power Online Error AUS
Sensoranpassung FÜR Vorgedruckte Etiketten
Setzen Sie die DIP-Schalter, um eine manuelle
Verwenden Sie nur Materialien, die von TEC zugelassen sind
Hinweise ZU Papier UND Farbband
Reinigung
Wartung
11.2 Gehäuse
Reinigung der Messereinheit
Beseitigen Eines Papierstaus
Reinigung des Spendemoduls
Abb Das Zusammensetzen geschieht in umgekehrter Reihenfolge
Fehlermeldung Ursache Lösung
Fehlermeldungen
Messerfehler
Problem Lösung
Ascii Tabelle Muster-Schriftarten Muster-Barcodes
Anhang
Stichwortverzichnis
Manual de instrucciones
Significado de cada símbolo
Mantenimiento
Compromiso de Mantenimiento
Precauciones generales
S12
Indice
S10
S11
∙ B-452-TS12-QP ∙ B-452-TS12-QP-PAC Descripción del modelo
Introducción
Descripción DEL Modelo
Accesorios
Especificaciones DE Impresión
Especificaciones
Especificaciones Generales
Opciones
Especificaciones DE Papel ETIQUETA/CARTULINA
Especificaciones DE LA Cinta
Panel DE Operaciones
Vista General
Vista Frontal Y Posterior
80 μm de grosor
Funciones DE LOS Microinterruptores DIP SW
Grosor del papel soporte
70 μm de grosor
Cables de Conexión
Proceso DE Instalación
Requerimientos DE Funcionamiento
Conexión
Conexión DE LA Alimentación Y Cables
Instalación DE LA Unidad DE Soporte DE Papel
Colocación DE LA Cinta
Rueda Guía S7-2
Colocación DEL Papel
Bloque de impresión S8-2
Módulo de corte Salida de papel Papel
Modo Continuo
Modo Dispensado
Manual del umbral
Ajuste DEL Umbral DEL Sensor
Impresora apagada
Precaución
CUIDADOS/MANEJO DEL Papel Y ALA Cinta
Limpieza
Mantenimiento General
Cubiertas
Limpieza de la unidad de corte
Eliminar EL Papel Atascado
Tipo de error Problema Solución
Solución DE Errores
Cortador
Problema Solución
Papel atascado en el cortador
Monte, en orden inverso, la partes extraídas
Limpieza de la Unidad de Dispensado
Solución DE Errores
Problema Solución
Ejemplo de Códigos de Barras
Apéndice
Caracteres de código Ascii Ejemplo de Fuentes
Índice
Gebruikershandleiding
Samenvatting veiligheid
Betekenis van de symbolen
Raadgeving betreffende het onderhoud
Voorzorgen
N12
Inhoudstafel
N10
N11
Toebehoren
Inleiding
Omschrijving VAN HET Typenummer
Eigenschappen VAN DE Druk
Beschrijving
Algemene Eigenschappen
Opties
Eigenschappen VAN HET Papier ETIKETTEN/GEMARKEERD Papier
Eigenschappen VAN HET Lint
Bedieningsbord
Uitzicht
VOOR- EN Achterzijde
80 μm dikke papierdrager
Functies DIP-SCHAKELAAR
Dikte papierdrager
70 μm fijne papierdrager
Interface kabels
Instellingsprocedure
Voorzieningen
Instelling VAN DE Drukker
Aansluiting VAN Voedingsnoer EN Kabels
Installatie VAN DE Drukker
Installatie VAN DE Mediaeenheid
Wees voorzichtig, de drukkop kan zeer heet worden
HET Laden VAN Linten
Oprol wiel N7-2
Plaats de rolhouders tegen beide zijden van de papierrol
HET Laden VAN Papier
Opmerking Zorg ervoor dat de rolhouders lichtjes roteren
Plaats de papierrol met rolhouders op de mediaeenheid
Sequentieel type
= B Sluit de hoofdkap. Het papier is geladen
Afpeltype
Knippert
Instelling VAN DE Voedingsholte Threshold
Voozorgen EN Behandeling VAN HET Papier EN Linten
Reiniging
Algemeen Onderhoud
Kappen
Duw op de knop van de snijmeskap en haal de kap eraf
Papieropstopping
Reiniging van de snijmodule
Monteer in omgekeerde volgorde
Reiniging van het afpelmechanisme
De drukkop is te heet Zet de druk af en verlaag de
HET Oplossen VAN Fouten
Foutmelding Probleem Oplossing
Het papier is op Laad nieuw papier → Druk op de Pause toets
Probleem Oplossing
Cutter ER
ROR
Ascii Code Tafel Font voorbeelden Barcode voorbeelden
Voedingsnoer
Drukkopreiniger 11-1
Laagladen van een programma Linten 7-1 Mediaeenheid 2-1
Afpelmodule Papier
Manuale Utente
Significato dei simboli
Nota per la sicurezza
Requisiti per la manutenzione
Precauzioni
I12
Sommario
I10
I11
Nome Modello
Accessori
II PAC include i seguenti accessori
Introduzione
Specifiche DI Stampa
Specifiche Tecniche
Specifiche Generali
LAN LAN-QM
Carta
Nastro
Componenti Opzionali
Pannello DI Controllo
Vista Generale
Vista ANTERIORE/POSTERIORE
80 μm di spessore
Funzioni DEI Microinterruttori
Spessore della carta di supporto
70 μm di spessore
Cablaggi
Setup Della Stampante
Setup
Requisiti Operativi
Connessione DEL Cavo DI Alimentazione E DI Trasmissione
Installazione Della Stampante
Installazione DEL Portarotolo
Caricamento DEL Nastro
Guida nastro I7-2
Inserire le flange su entrambi i lati del rotolo di carta
Caricamento Della Carta
Gancio
Nota Assicurarsi che il rotolo giri senza inceppamenti
Modulo taglierina Uscita carta Carta
Modalità batch
Modello con spellicolatore
Acceso Spento Lampeggiante
Regolazione Sensibilita Sensore Carta
Cura E Manutenzione DI Carta E Nastro
Pulizia
Manutenzione Generale
Pulizia DI Carrozzeria E Pannelli
Pulizia del modulo taglierina
Rimozione DI Etichette Inceppate
Riassemblare in ordine inverso a quello di rimozione
Pulizia del gruppo di spellicolamento
Toshiba TEC
Risoluzione DEI Problemi
Problema Soluzione
TEC
I13-1
Indice