Welcome to NeatWorks
Getting Started What do I need to know?
Using the Quick Scan Center
Using the Inbox
Page
Page
Creating a New Folder
Choosing an Existing Folder
File Selected Using NeatWorks Folders
What is a folder?
Working with Folders
What can I do with folders?
Selecting Grid Rows
Viewing Multiple Folders Simultaneously
Editing Cells in a Folder
Adding Comments to a Folder
Deleting a Folder
Clearing Folder Rows
Creating Expense Reports
Creating a New Expense Report
Splitting a Receipt Across Multiple Folders
Moving a Split Receipt to Another Folder
For more information, see the following
Page
Page
Page
Page
How do I import and export folders?
Importing Folders
Emailing a Folder
To email a folder
Click Continue
Exporting to a NeatWorks File
Save Exporting to Excel
Creating an Excel Map
To specify an existing template file
To create a new template file in MS Office
Page
All Mappings button
Page
Exporting to an Excel Map
Exporting to CSV Comma Separated Values
Page
Exporting QIF Files to Quicken 2004 and Earlier
Selected Receipts radio button Click Continue
Exporting QIF Files to Quicken 2005 and Later
Exporting a QIF File from NeatWorks
Setting Up a Cash Account in Quicken
Choose This account is not held in a financial institution
Selected Receipts radio button
Exporting OFX Files to MS Money
Choose File Import QIF
Tips for Working with QIF Files
From the Toolbar, choose Export OFX MS Money
Exporting to QuickBooks
If you chose QuickBooks Direct
If you chose QuickBooks iif
Running Folder Reports
Using the Report Window Toolbar
Running a Report
Page
Saving a Report
Can I personalize columns and fields?
Showing and Hiding Grid Columns
Information Tabs
Moving Columns
Resizing Column Widths
Modifying a Column or Field Name
From the Toolbar, choose Personalize Column/Field Names
Understanding and Modifying the User Profile
Working With Receipts
How do I scan a receipt?
To Open a Folder
Create or Select a Folder
To Create a New Folder
Verify Data and Add a Vendor Name
Using the Image Adjuster
Step a Rotate Your Image
Step B Manually Crop the Image
Step D Save Changes to the Receipt Image
Best Practice for Using the Image Adjuster
Step C Lighten or Darken the Image
Working with Receipt Images
Rotating the Receipt Image
Click Review and File
Zooming In or Out of a Receipt Image
Importing an Image as a New Receipt
Viewing a Receipt in Full Screen Mode
Changing the Order of Multiple Scanned Images
From the Toolbar, choose Import Import as New Receipt
Printing a Receipt Image
From the Toolbar, choose Import Image to Current Receipt
Combining Receipts
Deleting a Receipt Image
Saving a Receipt as a Graphic File
Emailing Receipts
How can I work with receipt rows?
Selecting Receipt Rows
Editing Receipt Row Cells
Adding Comments to Receipts
Adding a New Receipt Row
Moving a Receipt Row to Another Folder
Moving a Receipt Row to the Document Organizer
Deleting a Receipt Row
How do I use the Search feature?
Viewing Receipts Together from Multiple Folders
Finding Missing Key Data in Folders and Receipts
To learn how to use search, see the following topics
Searching for a Keyword To search for text
Page
Searching with the Wildcard
To conduct a wildcard search
Receipts
Business Cards
Documents
Selected Receipts button
Can I print, sort, and split receipts?
Printing and Clearing a Receipt Row
Column Options
Formatting Options
Sorting Receipt Rows
Multiple Sort Order
Sort Receipts
Splitting a Receipt into Multiple Transactions
Page
How do I import and export receipts?
Importing Receipts
Page
How do I run a receipt report?
On the toolbar, select Reports Receipt Reports
Saving a Report
Can I edit vendor names and other lists?
Overview of Vendor Names and lists
Adding an Item to a List
Editing an Item in a List
Deleting an Item in a List
Showing and Hiding Columns
From the Toolbar, select Personalize Column/Field Names
Page
Page
Understanding and Modifying User Rules
Understanding the Attached Column Icons
Assigning Tax Categories
Using the Business Card Organizer
Exploring the Business Card Organizer Window
How do I scan a business card?
How can I work with contacts?
Selecting a Contact Row
Editing Contact Information
To edit contact information in the Contacts Grid
Adding a Contact without Scanning a Business Card
Deleting a Contact
Working with Deleted Contacts
Sort Contacts
Printing a Contact
Adding an Action Item for a Contact
Adding a Note for a Contact
Continue
Marking a Contact as a Quick Contact
Emailing a Contact
Marking an Action Item as Complete
Zooming a Business Card Image
Saving Contact Information
Rotating a Business Card Image
Viewing a Business Card Image in Full Screen
Deleting a Business Card Image
Saving a Business Card Image as a Graphic File
How do I find my contacts?
Using Find Contacts
Page
How do I import and export contacts?
From the Toolbar, choose Export Contact File
Exchanging Contacts with other NeatWorks Users
To import contacts from a NeatWorks file
Choosing to Sync With Plaxo or MS Outlook
Outlook
Contacts to Sync headings
Syncing Contacts with Plaxo
With Plaxo
Syncing Contacts with MS Outlook
Specify the Direction of Sync
Specify the Contacts to Sync
Choose Select From Frequently Used Fields Categories
NeatWorks to Outlook Field Mappings
Exchanging Contacts Using vCards
100
101
Showing/Hiding Contacts Grid Columns
102
Personalizing the Business Card Organizer
From the Tools menu, choose Show/Hide Columns Grid Columns
Using the Document Organizer
103
104
Exploring the Document Organizer Window
105
What can I do with my document images?
Rotating a Document Image
Zooming a Document Image
Viewing a Document in Full Screen Mode
106
Importing an Image as a New Document
Importing Additional Images into a Document Row
107
From the Toolbar, choose Import Image as New Document
From the Toolbar, choose Import Image to Current Document
108
Click Delete Current Image
109
Deleting a Document Image
Saving a Document as a Graphic File
How do I set up document folders?
110
How can I work with document rows?
Viewing Documents Together from Multiple Folders
111
Selecting Document Rows
Editing Document Row Cells
112
Adding Comments to Document Rows
Adding a New Document Row
113
Moving a Document Row to Another Folder
Moving a Document Row to the Receipt Organizer
114
Deleting a Document Row
Sorting Document Rows
115
Where can I find my saved documents?
116
Clearing Documents Rows
117
Finding Missing Key Data in Folders and Documents
Selected Documents button
118
Can I personalize document columns and fields?
119
120
121
122
Sharing Documents with other NeatWorks Users
123
How do I import and export documents?
From the Toolbar, choose Export Document Folder File .ntf
124
Exporting Documents to other Format Types
Using the Tax Organizer
125
Importing Documents
126
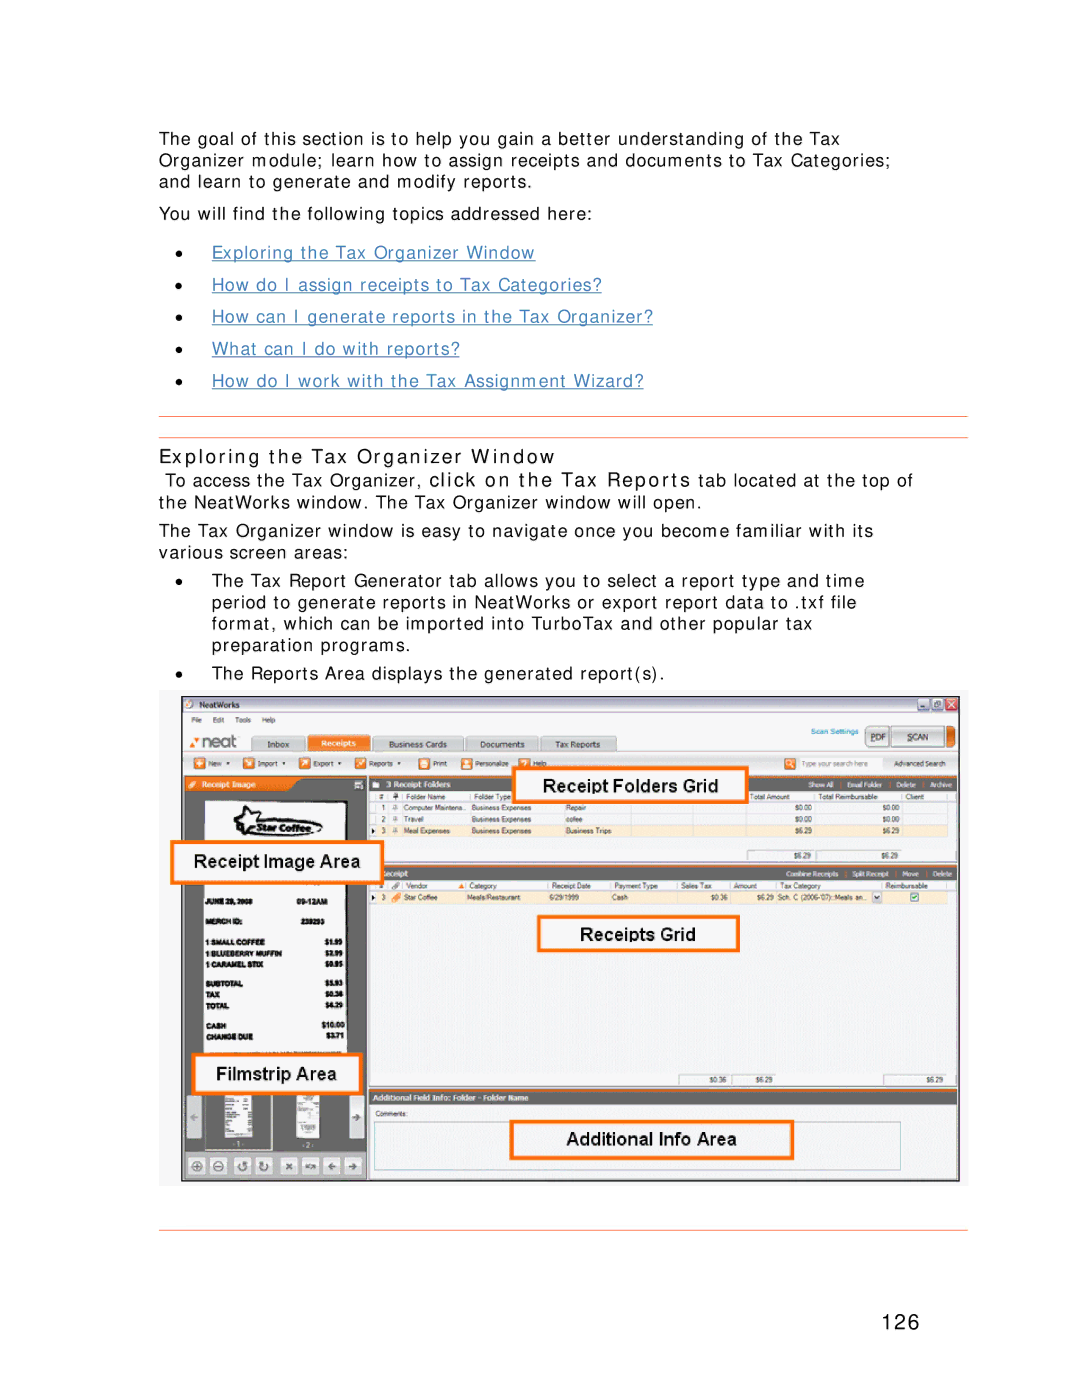
Exploring the Tax Organizer Window
127
How do I assign receipts to Tax Categories?
128
Showing and Hiding Tax Categories
129
Viewing Quick Tips and Additional IRS Information
130
Adding Comments
How do I generate tax reports?
131
What can I do with tax reports?
Zooming a Report
132
Navigating in a Report
Enter
Click the View Receipts from report button
133
Viewing Corresponding Receipts
Viewing Corresponding Documents
PrintingTa Selected ReportT
134
ViewTDocuments from reportT button again
ExportingTor Printing Multiple ReportsT
135
DatabaseTBackup OptionsT
BackupsTT.TTT
BackingTUp and Restoring the DatabaseT
BackingTUp the Database ManuallyT
SchedulingTAutomatic Database BackupsT
136
Toolbar.TTT
137
RestoringTthe DatabaseT
From the Toolber, choose T Export Receipt Folder File.T
138
Check Backup File Version.TTT
ScannerTMaintenanceT
CalibrationTT
CleaningTT
139
CalibratingTthe Neat ADF ScannerT
CleaningTthe Neat ADF Scanner T
140
CalibrateT.T
141
142
CalibratingTYour ScannerT
To calibrate in NeatWorks, do the followingT
143
Click CalibrateT.T
How do I clean the scanner?
To clean with the alcohol cleaning paperT
144
AdditionalTResourcesT
ITlove the alcohol cleaning paper--where can I get more?T
145
ScanningTand Imaging TroubleshooterT
146
ExampleTT SolutionTRecalibrateT
SolutionsTT
DescriptionTT
SolutionT
WhereTcan I find support and get updates?T
147