External controller functions
External Controller
1 |
| 2 | 3 | 4 | 5 | 6 |
|
|
7 | 8 | 9 | 10 | 11 12 13 14 | 15 | 16 17 | 18 | |
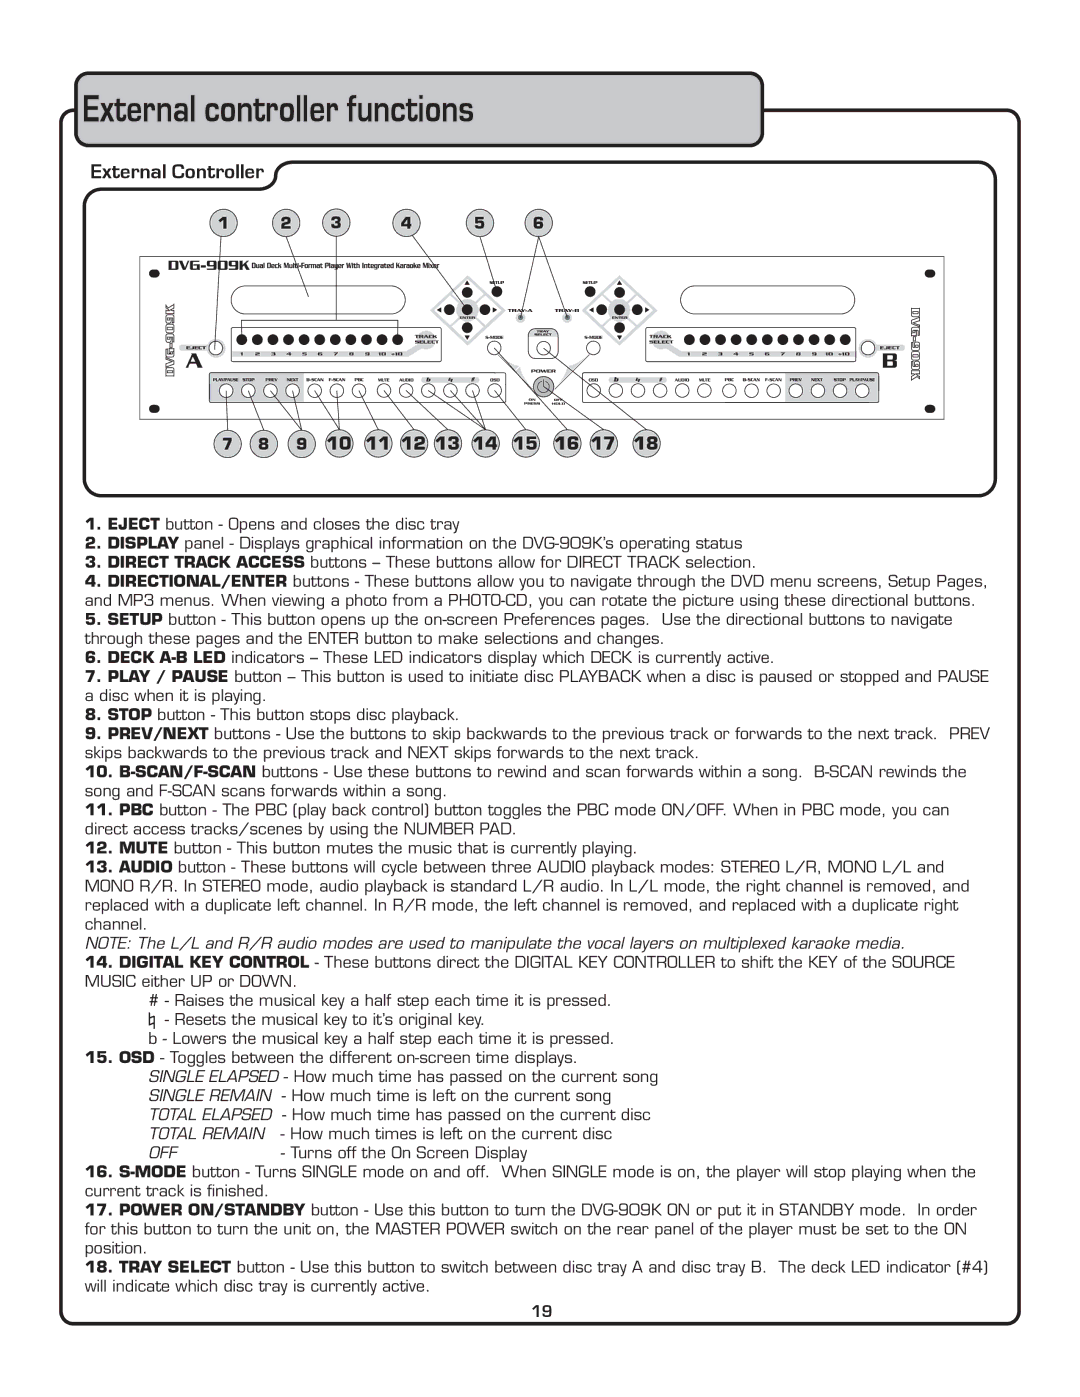
1.EJECT button - Opens and closes the disc tray
2.DISPLAY panel - Displays graphical information on the
3.DIRECT TRACK ACCESS buttons – These buttons allow for DIRECT TRACK selection.
4.DIRECTIONAL/ENTER buttons - These buttons allow you to navigate through the DVD menu screens, Setup Pages, and MP3 menus. When viewing a photo from a
5.SETUP button - This button opens up the
6.DECK
7.PLAY / PAUSE button – This button is used to initiate disc PLAYBACK when a disc is paused or stopped and PAUSE a disc when it is playing.
8.STOP button - This button stops disc playback.
9.PREV/NEXT buttons - Use the buttons to skip backwards to the previous track or forwards to the next track. PREV skips backwards to the previous track and NEXT skips forwards to the next track.
10.
11.PBC button - The PBC (play back control) button toggles the PBC mode ON/OFF. When in PBC mode, you can direct access tracks/scenes by using the NUMBER PAD.
12.MUTE button - This button mutes the music that is currently playing.
13.AUDIO button - These buttons will cycle between three AUDIO playback modes: STEREO L/R, MONO L/L and MONO R/R. In STEREO mode, audio playback is standard L/R audio. In L/L mode, the right channel is removed, and replaced with a duplicate left channel. In R/R mode, the left channel is removed, and replaced with a duplicate right channel.
NOTE: The L/L and R/R audio modes are used to manipulate the vocal layers on multiplexed karaoke media.
14.DIGITAL KEY CONTROL - These buttons direct the DIGITAL KEY CONTROLLER to shift the KEY of the SOURCE MUSIC either UP or DOWN.
#- Raises the musical key a half step each time it is pressed.
- Resets the musical key to it’s original key.
b - Lowers the musical key a half step each time it is pressed.
15.OSD - Toggles between the different
SINGLE ELAPSED - How much time has passed on the current song
SINGLE REMAIN | - How much time is left on the current song |
TOTAL ELAPSED | - How much time has passed on the current disc |
TOTAL REMAIN - How much times is left on the current disc | |
OFF | - Turns off the On Screen Display |
16.
17.POWER ON/STANDBY button - Use this button to turn the
18.TRAY SELECT button - Use this button to switch between disc tray A and disc tray B. The deck LED indicator (#4) will indicate which disc tray is currently active.
19
