Wayne-Dalton 9700 Winding Springs, it is recommended that, leather gloves be worn while, hands

Models: 9700

1 32
Download 32 pages 17.33 Kb
Page 20
Image 20
Winding Springs

21


Winding Springs


Tools Needed:


WARNING


Ratchet Wrench

it is recommended that

5/8” Socket

leather gloves be worn while

winding the TorqueMaster®


3” Extension

Plus springs. Failure to wear

Gloves

gloves may cause injury to

hands.


Step Ladder

Double check to ensure the counterbalance


cable is aligned in the first and second groove


of the cable drum (Step 20).

3” Extension

End Bracket

Marks

Ratchet with

5/8” socket

RECOMMENDED SPRING TURNS

Door Height

Spring Turns


6’-6”

15


6’-10”

15-1/2


7’-0”

16


7’-3”

16-1/2

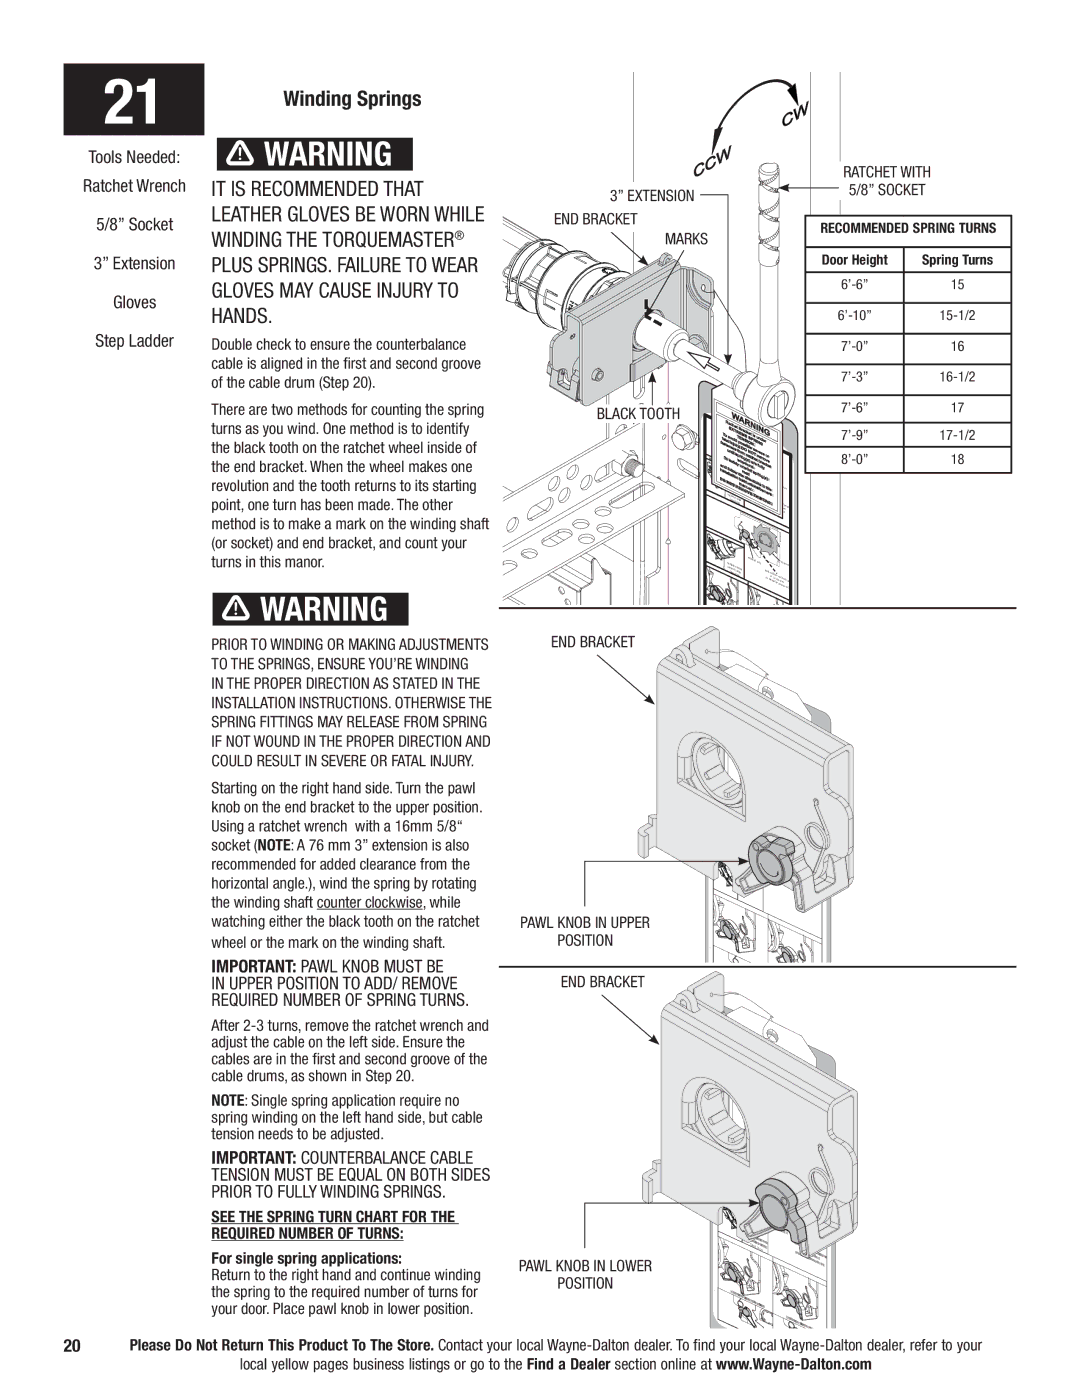
There are two methods for counting the spring

turns as you wind. One method is to identify

the black tooth on the ratchet wheel inside of

the end bracket. When the wheel makes one

revolution and the tooth returns to its starting

point, one turn has been made. The other

method is to make a mark on the winding shaft

(or socket) and end bracket, and count your

turns in this manor.

WARNING

Black tooth

Use


the

se


thisl


abel


Ra WA


chet

Br


EX


TR

E


ac


To

a


ME

S


s

un


TE

NS

PR


r


fatalvoid


IN

der


side


in


po


IO

N.

G


of


fasten

jury, ssib


u

e

rs


D

O

le

se


fro

N


ntil


OT

ve


s


m


re

re

or


Tos


prin

ra)tc


w


g(s


het


mov


a


afel


nw


a


b

e


yu

ou


re


rack


nd

fol


n


nd.


fully


et


inst


lo

w


re

ad

ds


a


the


pri


D


llatio

dir


ng


O


n


(s)


NO


instr

ec


Rm

uc


tions


T


an


tion


in


e


E

M


al.

s/ow


Drum


u


th


OV

E T


ne


Ratchet


H

IS T


CablePawl and


Drum


AG.


Ratchet


DISENGA


Drum


GED

SIDE

VIEW


DISENGAGED


UND

ERN

ATH


VIEW


Ratchet

Pawl


Cable


No

space


Drum


between


UPPE


Ratchet


Space


PawlDrum


betwe


R POSCable


and


en R


ITION


and


non-in

Cableengagematchet


dicates

Drum

Pawl


LOWER


ent


POS


ITION


7’-6”

17


7’-9”

17-1/2


8’-0”

18

Prior to winding or making adjustments

to the springs, ensure you’re winding

in the proper direction as stated in the

Installation Instructions. Otherwise the

spring fittings may release from spring

if not wound in the proper direction and

could result in severe or fatal injury.

Starting on the right hand side. Turn the pawl

knob on the end bracket to the upper position.

Using a ratchet wrench with a 16mm 5/8“

socket (NOTE: A 76 mm 3” extension is also

recommended for added clearance from the

horizontal angle.), wind the spring by rotating

the winding shaft counter clockwise, while

watching either the black tooth on the ratchet

wheel or the mark on the winding shaft.

IMPORTANT: pawl knob must be

in upper position to add/ remove

required number of spring turns.

After 2-3 turns, remove the ratchet wrench and

adjust the cable on the left side. Ensure the

cables are in the first and second groove of the

cable drums, as shown in Step 20.

NOTE: Single spring application require no

spring winding on the left hand side, but cable

tension needs to be adjusted.

IMPORTANT: Counterbalance cable

tension must be equal on both sides

prior to fully winding springs.

See the Spring Turn chart for the

required number of turns:

For single spring applications:

Return to the right hand and continue winding

the spring to the required number of turns for

your door. Place pawl knob in lower position.

End Bracket


t


Pawl


S


Pa

een


UPP


betw


Spac


ER PO

Cable

wl

and


ITION

Drum


non-


icates

e D

rum

Pawl

Pawl Knob in Upper


LO

WER


engagement


Position

he


POSITI


ON


Ratc t


Pawlin

Upper

tio


Posi

n


End Bracket


n

wl


UPP

betwee


wl

and


ER PO Cable


T

Drum


ION


non-


Pawl Knob in Lower


WER POS

wl


g


LO


agement

Position


ITION


he


Ratc

t


Pawlin


Upper


Posi


tion


UPPER


he


POSIT

ION


Ratc

t

Pawl

in


SIDE VIE


LowerPos


20Please Do Not Return This Product To The Store. Contact your local Wayne-Dalton dealer. To find your local Wayne-Dalton dealer, refer to your

local yellow pages business listings or go to the Find a Dealer section online at www.Wayne-Dalton.com

Page 20
Image 20
Wayne-Dalton 9700 Winding Springs, it is recommended that, leather gloves be worn while, winding the TorqueMaster, hands