Philips DPM 9400 user manual Example Linked Keywords

Page 26

DPM 9400 - User Manual

6.Repeat steps 2 and 3 from above.

7.Confirm the barcode input for Keyword 2.

This concludes the mandatory barcode input. You can now start to record your dictation.

For more information on the DPM Barcode Scanner Module 9284, refer to the documentation delivered with the product.

Linked Keywords

When the Linked Keywords setting is enabled in SpeechExec Dictate and the DPM has been configured with this setting, you can transfer sets of Keyword strings to the DPM. These sets can then be selected on the DPM and assigned to a dictation file.

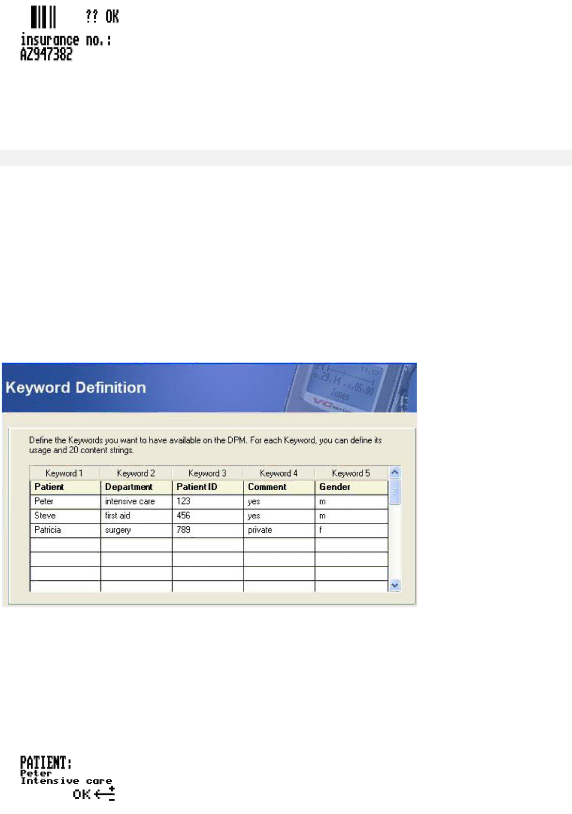
A Keyword set is the sum of all content definitions which have been made in SpeechExec Dictate in the same row (see below). The name of the Keyword set is taken from the usage definition of Keyword 1; this name is also displayed on the DPM when you enter the DPM menu. The usage definitions of any other Keywords are ignored.

Example: Linked Keywords

The usage definition of Keyword 1 is patient; the content definitions of the Keyword 1 column are patient names. Keyword 2 is the department, Keyword 3 the patient ID, Keyword 4 a comment, Keyword 5 the patient's gender. In this example, a Keyword set thus combines all of this patient data.

The Keyword Definition tab in SpeechExec Dictate is as follows:

This defines the following Keyword sets:

Keyword set 1 = Peter, intensive care, 123, yes, m

Keyword set 2 = Steve, first aid, 456, yes, m

Keyword set 3 = Patricia, surgery, 789, private, f

After this configuration has been transferred to the DPM, the Keyword sets can be selected on the DPM as follows:

1.Press the Jog Dial for about two seconds to access the DPM menu. The Keyword set name (taken from the usage definition of Keyword 1) is displayed. If a Keyword set has already been assigned previously, two of the content definitions of the currently assigned set are also displayed, for example:

22

Image 26 Contents
DPM Copyright Declaration of ConformityTable of Contents Appendix Troubleshooting the DPM Index Introduction DPM featuresPackage contents Introducing the DPM DPM graphicLCD display Status indication bar BatteriesRecharging the batteries Memory card Getting StartedActivating the DPM Formatting the memory cardStart screen Full memory cardDPM menu Accessing the DPM menuDisplay appearance Assigning Keywords Setting the date and time DPM 9400/00User-defined labels Additional information Setting the date and time DPM 9400/52Setting the recording format Voice-activated recording Setting the microphone sensitivityDPM device beep Backlight on/offDisplaying the recording time Power Save modeChanging the contrast Reformatting the memory cardBasic Operations Recording DPM 9400/00Recording DPM 9400/52 Finishing a dictation EOL and PriorityPlayback Recording mode Insert/OverwriteAdjusting the volume Removing EOL and Priority from a dictationDPM 9400/00 Fast Forward and Fast RewindDeleting DPM 9400/52Deleting a file Recording format Standard Play/Long Play mobileVoice-activated recording Standard Play SP 13.7 kbit/sSkip Forward and Skip Back Deleting index marks Advanced OperationsInserting index marks Additional infomationEntering user-defined labels Assigning KeywordsContent Example Assigning KeywordsScanning barcode information into Keywords Example Barcode scanningLinked Keywords Example Linked KeywordsRecording spoken instructions in Overwrite mode Recording spoken instructionsDeleting spoken instructions Recording spoken instructions in Insert modeTransferring data between DPM and PC Mandatory user input Appendix Troubleshooting the DPM PC sound system is not functioning Recharging batteries is not possibleIndex INS/OVRPage DPM 9400/52 Workflow management
Related manuals
Manual 34 pages 38 Kb