|
| REW | FF |
STANDBY/ON |
|
|
|
|
|
| TV PROG/ |
| TIMER |
| JOG |
VIDEO(MONO)L |
|
| SHUTTLE |
REC LINK | TV PROG |
|
REC | LINK |
|
1 2 3
2
4 5 6
7 8 9
0 | 4 |
SP/LP
1 | ? |
3
NOTES:
![]()
![]()
![]()
![]()
![]()
![]()
![]()
![]()
![]()
![]()
![]()
![]()
![]() 23
23![]()
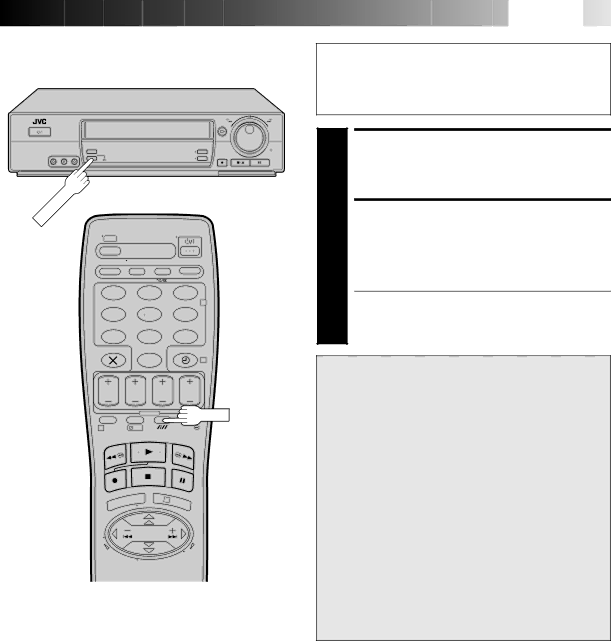
Before performing the following steps:
●Make sure the satellite receiver is connected to the recorder's AV2 IN/DECODER connector. (☞ pg. 22)
●Programme the timer on the satellite receiver.
●Insert a cassette with the safety tab in place.
SET TAPE SPEED
1 Press SP/LP (
 ) on the remote control to set the tape speed.
ENGAGE AUTO SATELLITE
PROG REC MODE
2 Press and hold REC LINK for about 2 seconds. The indicator lights up and the recorder turns off automati- cally.
●To disengage the Auto Satellite Prog Rec mode, press REC LINK. The indicator goes off.
●If the recorder's power is off, it is not possible to engage the Auto Satellite Prog Rec mode.
ATTENTION
●Be sure not to turn on the satellite receiver before the programme is executed; otherwise, the recorder will start recording when the satellite receiver's power is turned on.
●If you have connected another appliance other than a satellite receiver to the AV2 IN/DECODER connector, be sure not to engage the Auto Satellite Prog Rec mode; otherwise, the recorder will start recording when the connected appliance's power is turned on.
●Auto Satellite Prog recording and
●When you press and hold the recorder's REC LINK button to engage the Auto Satellite Prog Rec mode, if the REC LINK indicator does not light but instead blinks quickly even though your satellite receiver's power is off, Auto Satellite Prog Recording will not work properly with that satellite receiver*.
If this is the case, perform "Express Timer Programming" (☞ pg.14) to
*Some satellite receivers output signals even if the power is off. Auto Satellite Prog Recording is not possible with those satellite receivers.
●Auto Satellite Prog recording is possible with the AV2 IN/DECODER connector only.
●When the Auto Satellite Prog Rec mode is engaged or the recorder's power is turned off after Auto Satellite Prog recording is finished, the recorder will not enter the Timer mode even though "AUTO TIMER" is set to "ON".
●After Auto Satellite Prog recording, the number of recorded programmes will not be displayed on the front display panel for the Instant ReView function (☞ pg. 21).
●For timer programming of the satellite receiver, refer to the instruction manual of the satellite receiver.
●Auto Satellite Prog recording is not possible if your satellite receiver does not have a timer.
●The REC LINK indicator blinks while Auto Satellite Prog recording is in progress.
●Pressing the recorder's ![]()
![]()
![]() button while Auto Satellite Prog recording is in progress turns off the recorder's power and disengages the Auto Satellite Prog Rec mode.
button while Auto Satellite Prog recording is in progress turns off the recorder's power and disengages the Auto Satellite Prog Rec mode.
●If there is more than one satellite programme you wish to record with Auto Satellite Prog Recording, it is not possible to set a different tape speed for each; the tape speed selected in step 1 will apply to all the programmes for Auto Satellite Prog recording.
●The B.E.S.T. system (☞ pg. 18) does not work while Auto Satellite Prog recording is in progress.
●Just Clock (☞ pg. 39) does not work when the Auto Satellite Prog Rec mode is engaged.
●Depending on the type of satellite receiver, the recorder may not record a short portion at the beginning of the programme or may record slightly longer than the actual length of the programme.
●If you engage the Auto Satellite Prog Rec mode when the satellite receiver's power is on, the recorder will not start Auto Satellite Prog recording even though the REC LINK indicator blinks. When the satellite receiver shuts off once and is turned back on again, the recorder starts recording.
●You can also record a programme from your cable system in the same way if the system has a timer and is connected to the recorder's AV2 IN/DECODER connector.