Toshiba 27A34 appendix Labeling channels

Page 21

Labeling channels

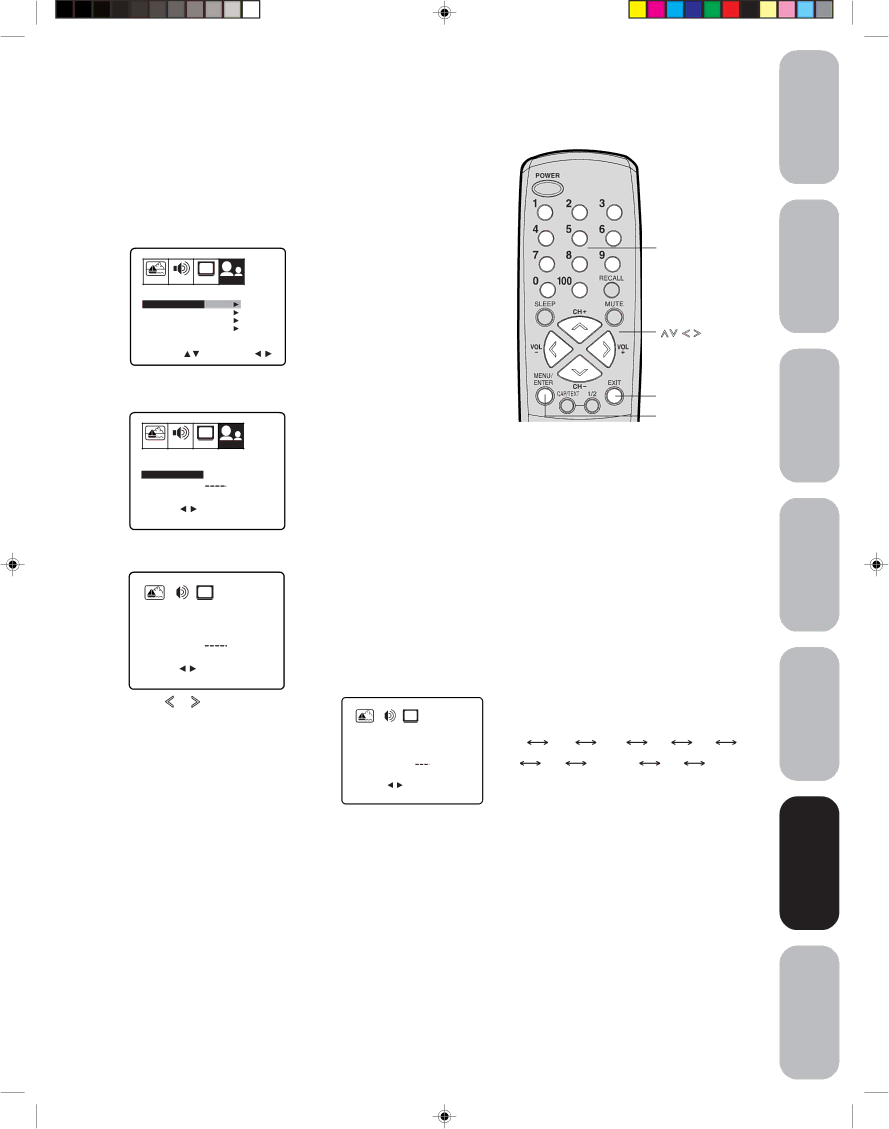
Channel labels appear over the channel number display each time you turn on the TV, select a channel, or press the Recall button. You can choose any four characters to identify a channel.

To create channel labels:

1.Select a channel you want to label.

2.Press MENU, then press or until the OPTION menu appears.

3.Press or to highlight CH LABEL.


CH

PICTURE AUDIO

SETUP OPTION

LANGUAGE

ENGLISH

CH LABEL

START

FAVORITE CH

START

V-CHIP

START

LOCK

START

ON/OFF TIMER

OFF

COLORSTREAM DVD

SELECTSTART

4.Press or to display the CH LABEL menu. SET/CLEAR will be highlighted.


CH


PICTURE

AUDIO

SETUP

OPTION

CH LABEL : CH 12


SET/CLEAR

SET CLEAR

LABEL


SELECT


SET

ENTER

END

EXIT


5.Press or to highlight SET.

6.Press or to highlight LABEL.


CH


PICTURE


AUDIO


SETUP

OPTION


CH LABEL : CH 12


SET/CLEAR


SET


LABEL


SELECT


SET


ENTER


END


EXIT


7. Press


or


to enter a character in


the first space. Press the button


CH


repeatedly until the character you want

PICTURE


AUDIO


SETUP

OPTION


appears on the screen. Press ENTER.


CH LABEL : CH 12


SET/CLEAR


SET


8. Repeat step 7 to enter the rest of the


LABEL


A


characters.


SELECT


SET


ENTER

If you would like a blank space in the


END

EXIT


label name, you must choose an

empty space from the list of characters; otherwise, a dash will appear in that space.

9.Repeat steps 1-8 for other channels. You can assign a label to each channel.

10. Press EXIT to clear the screen.

To erase channel labels:

1. Select a channel with a label.

2. Press MENU, then press or until the OPTION menu appears.

3. Press or to highlight CH LABEL.

4. Press or to display the CH LABEL menu. SET/CLEAR will be highlighted.

5. Press or to highlight CLEAR.

6. Press ENTER.

7. Repeat steps 1-6 to erase other channel labels.

21

Channel

Numbers

Exit

Menu/

Enter

Note:

The character will change as below.

0

• • •

9

A

• • •


Z

SPACE

+


Safeguards

Toshiba

your TV

Remote Control

your TV

Features

Important

Welcome to

Connecting

Using the

Setting up

Using the

TV’s

Appendix

3N42501B[E] (P14-25)

21

24/2/04, 10:57 AM

Image 21
Contents 27A34 Child Safety Important Safety Instructions Care Using the Lock menu Adjusting the channel settingsAuto power off Exploring your new TV Selecting a location for the TVExploring your new TV Welcome to ToshibaSelecting a location for the TV TV front panelConnecting a VCR Connecting your TVWith component video compatible components Stereo VCRFor Subscribers to Basic Cable TV Service Connecting a cable converter boxTo satellite DVD player / Satellite Receiver Connecting a DVD player/satellite receiver and a VCRStereo VCR DVD player with ColorStreamConnecting two VCRs Connecting a camcorderConnecting an audio amplifier Installing the remote control batteries Using the remote controlLearning about the remote control To install the batteriesChanging the on-screen display language Setting up your TVTo select a language PressChanging channels Adding channels to the TV’s memoryProgramming channels automatically Adding and erasing channels manuallyAdjusting the channel settings Using the TV’s featuresSwitching between two channels Programming your favorite channelsTo select your PIN code and access the V-Chip menus Using the V-Chip parental control featureSelecting a PIN code To clear your favorite channelsPress or to display the V-CHIP menu Blocking programs by ratingsTo change your PIN code Press Exit to return to normal viewingMpaa Ratings Youth TV RatingsTV Ratings To use the V-Chip to block programs by rating Using the Lock menu Blocking unrated movies or programsLocking channels To set up the video lock Setting the game timerTo set up the game timer Locking video inputLabeling channels Setting the ON/OFF timer Setting the clockSetting the on timer To set the clock Example 830 AMSetting the off timer To adjust the picture quality Specifying the ColorStream settingTo select the input mode Watching video inputUsing the closed caption feature Setting the sleep timerAdjusting the sound quality Adjusting the soundTo adjust the sound quality Muting the soundUnderstanding the Power Return feature Auto power offUsing the surround sound feature Using the StableSound featureTroubleshooting ProblemSolution Input 1V p-p, 75 ohm, negative sync Input 0.286V p-p burst signal, 75 ohmVideo 1V p-p, 75 ohm, negative sync ColorStream component video InputFor 27 Standard Non FST Pure Television Models Limited United States WarrantyFor additional information, visit TCL’s web site Limited Canada WarrantyService#&Centers#!!$%% Bienvenue SŽcuritŽ des enfants Instructions importantes sur la sŽcuritŽ Entretien Installation de votre téléviseur Utilisation de la télécommandeImportantes mesures de sécurité Bienvenue chez Toshiba Branchement de votre téléviseurBienvenue chez Toshiba Choix d’un emplacement pour votre téléviseurExploration de votre nouveau téléviseur Panneau avant du téléviseur Panneau arrière du téléviseurBranchement de votre magnétoscope Branchement de votre téléviseurTéléviseur Magnétoscope StéréoCâble du réseau de câblodistribution Branchement d’un convertisseur pour le câbleLecteur DVD / Démodulateur StéréoLecteur DVD avec ColorStream Branchement d’un caméscope Branchement de deux magnétoscopesBranchement d’un amplificateur audio Vous aurez besoin de Un ensemble de câbles A/V standardsUtilisation de la télécommande Placement des piles dans la télécommandeApprendre à utiliser la télécommande Choix de la langue d’affichage Installation de votre téléviseurPour sélectionner une langue Appuyez sur Ou pour mettre en surbrillance LangueMémorisation de nouveaux canaux Ajout et suppression des canaux en mode manuelModification des canaux Programmation automatique des canauxRéglage des canaux Utilisation des fonctionsPassage d’un canal à l’autre Programmation de vos chaînes préféréesPour sélectionner un code d’accès Se servant de la caractéristique PUCE-V contrôle parentalPour supprimer vos chaînes préférées Appuyez sur ou pour mettre en surbrillance EffaceBlocage des programmes par un système de classification Appuyez su ou pour afficher le menu PUCE-VPour changer votre code d’accès Classification Mpaa Classification Youth TVClassification TV Option Appuyez sur Menu puis sur ou pour afficher le menuPour utiliser le menu Bloc Blocage des films ou programmes non classifiésPour bloquer les canaux Réglage de la Minuterie Jeux Blocage VideoAppuyez sur Ou pour afficher le menu S-TIT Canal Attribution d’un nom aux différentes chaînesAutres chaînes. Vous pouvez affecter Pour supprimer les noms des chaînesPour régler l’heure de mise sous/hors tension Réglage de l’horlogePour régler l’heure de mise hors tension Réglage de la qualité de l’image Pour choisir le mode d’entréeRegarder une image provenant d’une source d’entrée vidéo Spécifier le réglant ColorStreamUtilisation de la fonction sous-titrage Programmation de l’arrêt différé SleepCoupure du son Réglage du sonSélection des émissions stéréo/SAP Réglage de la qualité du sonComprendre la fonction du mode mémoire Mise en mode veille automatiqueUtilisation de la fonction son ambiophonique Utilisaton de la fonction StableSoundProblème Solution AnnexeDépannage Entree S-VIDEO SpécificationsApplicable aux téléviseurs 27 po standards non FST Pure Garantie limitée destinée aux États-UnisGarantie limitée destinée au Canada Comment bénéficier des services couverts par la garantieGarantie limitée d’un 1 an sur les pièces Guide de l’utilisateurImprimé en Thaïlande