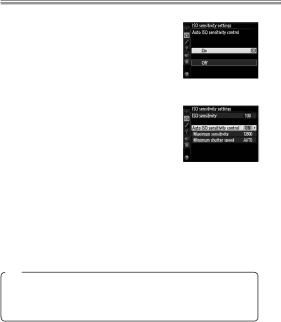
Nikon Camera manual Tips

Page 20

Taking Photographs

Reducing Noise and Blur: Auto ISO Sensitivity Control When On is selected for ISO sensitivity

settings > Auto ISO sensitivity control in the shooting menu, the camera au- tomatically adjusts ISO sensitivity if op- timal exposure can not be achieved at the value selected by the user.

Auto ISO sensitivity control can be fine- tuned using the following options.

Maximum sensitivity: Choose the maxi- mum value available for auto ISO sen- sitivity control (200–Hi 4). The mini- mum is ISO 100.

Minimum shutter speed: In exposure modes eand g, sensitiv- ity will only be adjusted if shutter speed would otherwise be slower than this value (¼,000–1 s or Auto). If Auto is selected, the camera will adjust the threshold for auto ISO sensitivity control according to the focal length of the lens.

Tips

We recommend that you use matrix metering (L) and choose exposure mode e or g. Exposure compensation can be used.

16

Image 20
Contents Setting Guide Table of Contents Movies Autofocus TipsFirst-Time Users Taking Photographs Dynamic-Area AF Improving Camera ResponseContinuous-Servo AF AF-C ACustom Settings Custom Settings Banks Select Add itemsMy Menu, highlight Add items and press Add itemsLens Vibration Reduction VR DPlayback MenuSettings by Subject SituationSee also Lock-onTion ReleaseTaking Photographs AF-area mode TionTion and camera Lock-onSituation Settings by Subject Matching Settings to Your Goal Frame rates may drop at settings other than OFFReducing Camera Blur Vibration Reduction Situation Preserving Natural Contrast Active D-Lighting Quick Setting Selection Shooting Menu Banks Shooting Menu BanksExtended Menu Banks Shooting Menu Bank SelectionStandby Timer Finding Controls in the Dark Button BacklightsReducing Noise at High ISO Sensitivities DescriptionTips Live view Release modeReducing Shutter Noise Quiet and Silent Release Choosing a Setting Optimizing White BalanceChoosing a Color Temperature Ubutton Sub-command dial Rear control panelPreset Manual White Balance Check the results Choosing a White Balance PresetMeasure white balance Varying White Balance White Balance Bracketing Choose the number of copiesSelect a bracketing increment Programs with increments of 1 are shown belowFrame a photograph, focus, and shoot Cancelling Bracketing White Balance BracketingCopying White Balance from a Photograph Select a destinationChoose Select image Highlight Select image and pressUsing the Copied Value Copy white balanceCreating a Multiple Exposure Record from 2 to 10 exposures in a single photoMultiple exposure icon n Adjust gainSelect Auto gain and choose from the following options Interrupting Multiple Exposures Copying Pictures Between Memory Cards Tilt Keeping the Camera Level Virtual HorizonMonitor Pitch ViewfinderRoll Resizing Photographs for Upload Resize Resized CopiesChoosing the Number of Focus Points Focusing with the AF-ON ButtonAutofocus Tips Taking Photographs Subject not in focus Point dynamic-area AF 3D-tracking Auto-area AF AF-Area ModeAF-area modes are described below Description Sor at the center of the display, 4 line Focus Point Selection and ApertureOn either side Focus Point Selection and Camera Orientation Digits of the lens serial number Adjusting Autofocus to the Lens AF Fine-TuneOff Turn AF tuning off Checking Focus Focus Tracking with Lock-On Movies Headphones Before FilmingSound External MicrophonesMovie Settings Frame Size, Frame Rate, and Movie QualityImage Area Destination ISO Sensitivity RangeStarting Movie Live View Select movie live view Rotate the live view selector toStart live view Press the abuttonExposure Mode White BalanceChoosing a Focus Mode Using AutofocusTo focus using autofocus Choosing an AF-Area Mode Tripod Mode Lens Vibration Reduction VRAdjusting Settings During Live View Information Display Checking Focus Subject TrackingFilming Movies Starting and Ending RecordingEditing Movies Choose the interval Time-Lapse MoviesTime-Lapse Movies Choose the shooting time Start shootingInterrupting Time-Lapse Photography Selecting Start Off for Time-lapse photographyTime Lapse Photography Output Resolution Hdmi OutputAdvanced Output display size 100% Live view on-screen display OffHdmi Recording Page First-Time Users Customizing the Command Dials Custom Setting f10 Customize Command DialsReversing Indicators Custom Setting f13 Reverse IndicatorsAdjusting Monitor Brightness Choosing the Primary SlotSensor Reduced brightnessMetering Page CS SB####