Kramer Electronics VS-1616SDI user manual Null-modem adapter

Page 18

Installing the SDI Video Matrix Switcher

2.Set DIP 7 OFF (enabling Null-modem adapter use2) on the VS-1616SDIunit.

6.4.1.4Connecting to a DB9 COM Port without a Null-modem Adapter

To connect the PC’s DB9 COM port to a VS-1616SDIunit, without using

aNull-modem adapter:

1.Connect a flat cable1 between the PC’s DB9 COM port and the RS-232 IN DB9 port on the VS-1616SDIunit.

2.Set DIP 7 ON (disabling Null-modem adapter use2) on the VS-1616SDIunit.

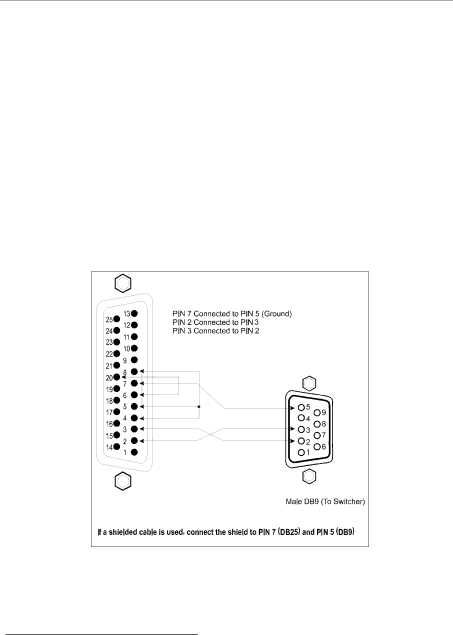
6.4.1.5Connecting to a DB25 COM Port

To connect the PC’s DB25 COM port to a VS-1616SDIunit:

1.Connect the PC’s DB25 COM port to the RS-232 IN DB9 port on the VS-1616SDIunit, as Figure 7 illustrates:

Female DB25 (From PC)

PIN 20 connected to PIN 6

Connect PINS 4, 5 and 8 together

Figure 7: Connecting a PC (with a 25-pin connector) without a Null-modem Adapter

2.Set DIP 7 ON (disabling Null-modem adapter use2) on the VS-1616SDIunit.

1 Straight one-to-one uncrossed connections with at least the 3 wires pins # 2, # 3 and # 5 2 See section 6￿ .3

14

KRAMER: SIMPLE CREATIVE TECHNOLOGY


Image 18
Contents Model Contents Upgrading Flash Memory Figures TablesIntroduction Getting StartedOverview Overview Your SDI Video Matrix Switcher Operating a Single MachineVS-1616SDI 16x16 SDI Video Matrix Switcher Feature Function Installing the SDI Video Matrix Switcher Configuring a Standalone SDI Video Matrix SwitcherAssembling a System of Interconnected Switchers Setting the Dipswitches Assembling a System of Interconnected SwitchersSetting the Machine # Understanding the System Mode Connecting a Control Interface Keyboard LockedConnecting a PC to Four Switchers Connecting with a Null-modem Adapter Null-modem adapter Illustrates the RS-485 line that connects An RS-485 Control Interface Setup Configuring the Sync Connecting the Keyboard ExtensionOperating Your SDI Video Matrix Switcher Using the Startup DisplayUsing the Front Panel Buttons Default Startup Status Display SequenceOut # Where x is the output number Out # From in # yAll OUTs Out # Reset Clearing Several Outputs Reset ALL connections Reset ALL ? Press Take to executeEnter Setup number Store this Setup ?Use two digit # # xy Using the Menu Command Sequence Setup # xy Load ?Sequence of Menu Commands Locking and Unlocking the Front Panel Choosing the System Modes Follow the System Yes TAKE, next MenuChoosing the Switching Method Setting Understanding the Switching Method Settings Switching Method setting Yes TAKE, next Menu NoVIS 2 EXT 3 INT#1 4MTX ExternalChoosing the Extended Keyboard Setting STO/RCL mode Setting the STORE/RECALL Keyboard ModeSTORE/RECALL setting Yes TAKE, next Menu Changed At onceChoosing the Communication Setting Setting the IR Remote Control Choosing the Auto Store Current Setup Identifying the MachineOutkey 1 Current status Factory default Choosing the Initial ResetInitial Reset Yes TAKE, next Menu Reset to factory default Press Take to executeConnecting the PC to the RS-232 Port Upgrading Flash MemoryUpgrading the Firmware Ready for receiving Start transmission from PC Program replaced16608D Technical Specifications Hex CodesHex Table for the VS-1616SDI Video Matrix Switcher #, i# Ascii Protocol GeneralAscii Protocol Description ExampleOK!! or Error Page 2900-002063 REV