Trek 9i, 11i To install the computer on the stem, Make sure the com- puter cannot be bounced off

Page 8

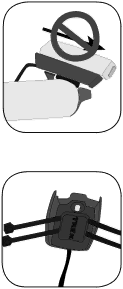
Figure 5- Make sure the com- puter cannot be bounced off.

Figure 6- Nylon tie threaded through computer base

Check that the computer base cannot be rotated around the handlebar, and that the computer cannot slide backwards on the computer base (Figure 5).

To install the computer on the stem

1.Insert the rubber friction pad into the computer base, aligned along the computer base.

2.Insert two nylon ties through the computer base (Figure 6).

3.Place the base on the stem and tighten the nylon tie.

4.Slide the computer into the computer base until the front of the computer and computer base line up.

5. Check that the computer base cannot be rotated around the stem and the computer cannot slide backwards on the computer base.

6.Tighten the nylon ties and trim the excess length.

Installation

Image 8
Contents Trek Incite 9i Copyright Trek Bicycle Corporation 2006 All rights reservedContents Safety and general guidelines Watch the road when ridingFunctions Function ExplanationCAD Mount InstallationStem mount Handlebar Speed sensor To install the computer on handlebar 31.8mm bars large clamp 25.4mm and 26.0mm small clampTo install the computer on the stem Make sure the com- puter cannot be bounced offTo install the wheel magnet Placing the magnetAttaching the computer wire To attach the computer wire0mm To install the sensorSensor can be rotated around the fork about 45 degrees Tighten the nylon ties and trim the excess length Figure Easy setup ReSet Using the buttons To set the unitsSet ModeTemperature icon display To set the odometerMH and KMH interchange on the screen Computer returns to the start screenTo set wheel size Wheel Select icon appears on the screenWheel size appears Wheel size changesCycle Mode to TRP To select the wheel for useTo set Clock 12 or 24 flashes24 interchange on the screen Hour changesMax setting ReStarts at ‘0’ To ReStart set the Trip data to zeroChanging mode Using the computer in wet weatherAdditional information Removing the computer from the computer baseTroubleshooting Replacing the battery To replace the battery‘cross’ on the bat- tery points up Replacing the Battery Be careful to avoid losing the rubber O-ring sealTo set the computer Setting custom wheel sizeSelecting the custom value 4-digit number Left-hand digit flashes To measure rollout for wheel size Measuring rollout for wheel sizeThis warranty does not cover Limited WarrantyThis warranty covers