JVC RX-DV3RSL manual MP3 Disc Playback, Basic Operations, Load an MP3 disc, then press

Page 52

MP3 Disc Playback

This unit can play back MP3 files on a CD-R or CD-RW. We call such a disc “MP3 disc” in this instruction.

Before using the remote control, press DVD to change the remote control operation mode for the MP3 disc operations.

Turn on your TV and select the correct input mode on the TV.

If “ ” appears on the TV when you press a button, the disc cannot accept an operation you have tried to do.

What is MP3?

MP3 is an abbreviation of Motion Picture Experts Group 1 (or MPEG-1) Audio Layer 3. MP3 is simply a file format with a data compression. By using MP3 format, one CD-R or CD-RW can contain about 10 times as many songs as a regular CD can.

Disc structure

On an MP3 disc, each song (material) is recorded as a file. Files are usually grouped into a folder. Folders can also include other folders, creating hierarchical folder layers.

This unit simplifies the hierarchical construction of a disc and manages files and folders by “tracks” and “groups.”


Up to 99 groups

Group 1


Group 2


Track 1


Group 3


Track 2


Group 4


Group 5


Up to 150 tracks

This unit can recognize up to 150 tracks per group and up to 99 groups per disc (up to 14,850 tracks in total). Since the unit ignores the tracks whose numbers are exceeding 150 and the groups whose numbers are exceeding 99, they cannot be played back.

If there are any type of files other than MP3 files in a folder, those files are also counted in the total file number.

Notes:

MP3 discs (either CD-R or CD-RW) require a longer readout time than normal discs. (It depends on the complexity of the folder/file configuration.)

When making an MP3 disc, select ISO 9660 Level 1 or Level 2 as the disc format.

This unit supports “multi-session” discs (up to 5 sessions).

This unit cannot play “packet write” discs.

This unit can play MP3 files only with the following file extensions: “.MP3,” “.Mp3,” “.mP3,” and “.mp3.”

ID3* tags cannot be shown on the display.

*An MP3 file can contain file information called “ID3 Tag” where its album name, performer, track title, etc. are recorded. There are two versions—ID3v1 (ID3 Tag version 1) and ID3v2 (ID3 Tag version 2).

It is recommended that you make each MP3 file at sampling rate of 44.1 kHz and at bit rate of 128 kbps. The unit cannot play back the files made at bit rate of under 64 kbps.

If both MP3 files and JPEG files are recorded on a disc, set the MP3/JPEG setting in the PICTURE menu to “MP3.”

(See page 54.)

Some MP3 discs may not be played back because of their disc characteristics or recording conditions.

Notes:

The following functions are not available to MP3 disc playback: Program playback, random playback, fast-forward/reverse playback, on-screen bar, and choice menus

Some tracks on an MP3 disc are skipped and may not be played back normally.

Basic Operations

You can also use the buttons on the front panel if they have the similar names as those on the remote control.

Before using the remote control, press DVD to change the

remote control operation mode.

TV DIRECT

STB

VCR

DVD


TV/VIDEO

REW/(

TUNING

9/FF

REPEAT

SLEEP

FM MODE

STROBE


TV/STB CH

SOUND

EFFECT

CENTER


1

2

3

DIGEST

TOP MENU TA/NEWS/INFO

MENU

( PTY

PTY SEARCH

PTY9

CHOICE


ENTER


ON SCREEN


RETURN

DISPLAY

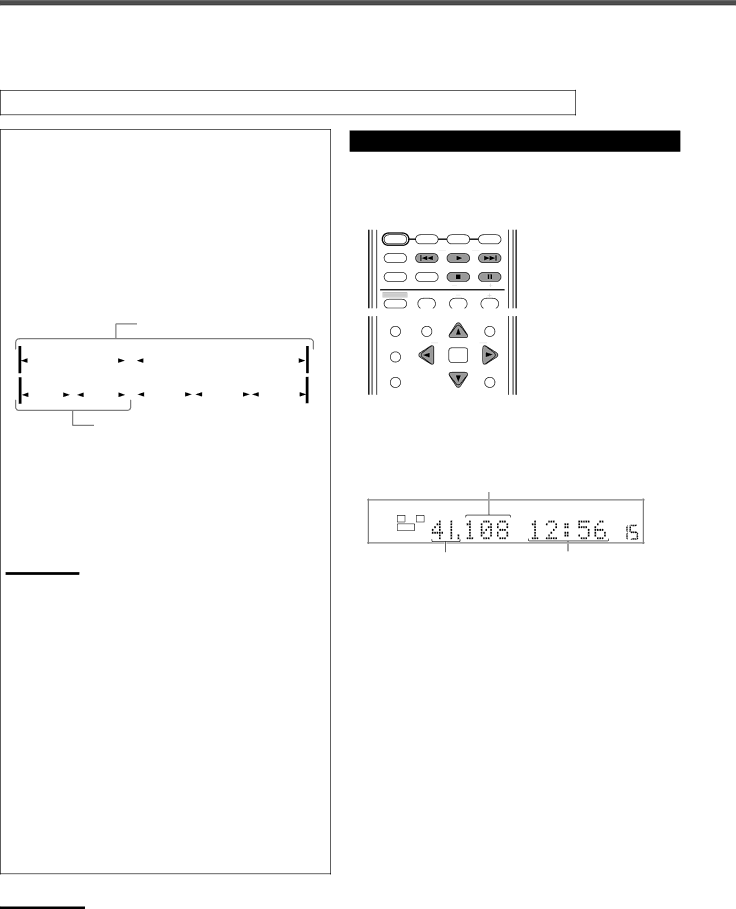
7Starting playback

Load an MP3 disc, then press 3.

The unit starts playback. The MP3 CONTROL screen appears on the TV (see page 48).

Current track number

DIGITAL AUTO


AUTO SURROUND

SPK.

L

R

VOLUME


SUBWFR

Current group number

Elapsed playing time


(minutes:seconds) of the current


track during playback

When all tracks in a group have been played, the unit plays tracks in the next group.

7Stopping playback temporarily

Press 8.

To start playback again

Press 3.

7Selecting groups or tracks

To skip groups forward

Press cursor 3.

To skip groups backward

Press cursor 2.

To skip tracks forward

Press ¢ or cursor as many times as required.

To skip to the beginning of the current track

Press 4 once.

To skip tracks backward

Press 4 or cursor 5 as many times as required.

7Stopping playback completely

Press 7.

47

Image 52
Contents RX-DV3RSL If in DOUBT-CONSULT a Competent Electrician RX-DV3RSL Important for Laser Products Above ALL Table of Contents Adjust button 27 Parts IdentificationFront Panel DisplayRemote Control Parts IdentificationChecking the Supplied Accessories Before Installation Putting Batteries in the Remote ControlGetting Started Connecting the FM and AM Antennas Getting StartedAM antenna connection FM antenna connectionConnecting the Speakers Connecting the subwoofer speakerConnecting the front, center, and rear speakers Speaker Layout DiagramConnecting Audio/Video Components About connecting cables/cordsFor Scart connections For audio connectionsCassette deck/CD recorder connection Digital connectionScart connection VCR STB AudioVideo RGB Audio OUTVCR STB Set Top BoxFor TV and video format For T-V LinkTurn On the Power Adjust the VolumeBasic Operations Select the Source to PlayTurning Off the Power with the Sleep Timer Turning Off the Sounds TemporarilyChanging the Display Brightness Activating TV DirectInput mode On the remote controlWhen DVD is selected as the source, you can also Basic OperationsAttenuating the Input Signal Activating the Recording ModeInput ATT indicator Changing the Source NameBasic DVD Player Operations Open the Disc TrayLoad a Disc Start PlaybackSelect Surround Mode Stop Playback Turn Off the Power into StandbyActivate Realistic Sound Field Press Surround ON/OFFTuning into Stations Manually Using Preset Tuning Tuner OperationsSelecting the FM Reception Mode Using the RDS Radio Data System To Receive FM Stations What information can RDS signals provide?Tuner Operations Operation ButtonsSearching for a Program By PTY Codes Switching to Broadcast Program Your Choice Temporarily CaseNews AffairsInfo SportOperating Procedure Basic SettingsOperation Buttons ¶ For subwoofer YESBasic Settings Set the appropriate digital terminal settingDigital input Digital in terminals-DGT Low frequency effect attenuator-LFEAuto surround-AUTO SR Auto mode-MODEOn the display Manual Select the source manuallySound Adjustments Press AdjustPress Control 3 or 2 to adjust Front speaker balance Adjustment itemsAdjusting sound from the remote control Front speaker output balance -BAL balanceTone-BASS and Treble DAP effect level-EFFECTCreating Realistic Sound Fields Dolby SurroundDTS Digital Surround DAP Digital Acoustic Processor modesReflections from behind Early reflections Direct sounds All Channel StereoPossible × Impossible Creating Realistic Sound Fields Activating Surround ModeSelecting Surround Modes Adjusting Surround Mode Using Remote Control Adjust the soundAdjust the speaker output levels as follows For using test toneDVD Player Operations Disc InformationPlayable Disc Types Discs you can play Disc TypePlayback Control function PBC Disc structureMenu-driven playback Using the On-screen Bar Contents of the on-screen bar with the pull-down menuDVD Player Operations Press on ScreenBasic Operation through the On-screen Bar Press on Screen twicePress Enter Changing the Time IndicationLocating a Desired Scene from Disc Menu Press TOP Menu or MenuFrom the DVD menu From the VCD/SVCD menu with PBCSelecting a View Angle-ANGLE Press AnglePress Angle repeatedly to select the desired view angle Press and hold Angle for a few secondsChanging the Languages-SUBTITLE Press SubtitlePress Audio Press Audio repeatedly to select the desired audio languagePress Audio repeatedly to select the desired audio channel Selecting the audio channelFor VCD For SvcdPlaying from a Specified Position on a Disc Use the number buttons 0-9 to enter the timeLocating a desired chapter-Chapter Search Locating a desired position-Time SearchPress cursor 5/∞/3/2 to move to the desired scene Press DigestLocating a desired scene-DIGEST Special Picture Playback Press cursor 3 or 2 repeatedly to select VFP mode Repeat steps 2 to 4 to adjust other parametersChanging the VFP setting-VFP To adjust the appearance of the pictureProgram Playback and Random Playback Repeat to program the next stepsPlaying back in the desired order Playing back tracks in random orderRepeating a current title, chapter, or all tracks Repeat PlaybackRepeating a desired part Basic Operations MP3 Disc PlaybackLoad an MP3 disc, then press Operations through the MP3 Control Screen Press RepeatSlide-show Playback Jpeg Disc PlaybackLoad a Jpeg disc, then press Operations through the Jpeg Control Screen Press Menu orOperation Buttons Configuration of Choice Menu Choice Menu OperationsPress Enter to finish the setting Press ChoicePress cursor ∞ or 5 repeatedly To move to on Screen Press cursor ∞ or 5 repeatedly to select the desired optionChoice Menu Operations Language menuPicture menu AutoAudio menu MP3Jpeg MAXSPK. Setting menu Rear SpeakerSubwoofer ReturnOthers menu Select this to deactivate itSetting Parental Lock Restricting Playback by Parental LockNew setting is stored Changing the setting of Parental LockReleasing Parental Lock temporarily Country/Area codes list for Parental Lock Glossary for DVD Player Operating JVC’s Audio/Video Components Operating Audio ComponentsSound control section Amplifier CD recorderTV Return Operating Video ComponentsREW Changing the Preset Signal Codes Operating Other Manufacturers’ EquipmentRelease STANDBY/ON TV Try to operate your TV by pressingEnter manufacturer’s code using Number buttons 1-9Release STANDBY/ON STB Try to operate your STB by pressingOperating Other Manufacturers’ Equipment Enter the manufacturer’s codeRelease STANDBY/ON VCR Try to operate your VCR by pressingMaintenance Cleaning DiscsCleaning the Unit General NotesTroubleshooting GenaralFor DVD Player Troubleshooting For TunerFor MP3 For JpegSpecifications AmplifierFM tuner IHF AM tuner0602NHMMDWJEM