Names and Functions of Parts
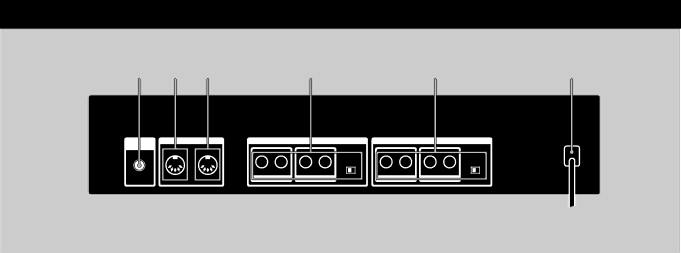
Rear panel
1 | 2 | 3 | 4 | 5 | 6 |
1 LCD CONTRAST knob
Use to adjust the contrast of the display on the front panel.
2 MIDI OUT/THRU terminal
For sending and/or relaying MIDI command signals from the processor to other components. To switch between OUT and THRU, see pages 17~18.
3 MIDI IN terminal
Input for MIDI command signals. Use a commercially available MIDI cable to connect this terminal to another component's MIDI OUT (or THRU) terminal.
4 OUTPUT jacks (1~4)
Standard output jacks for channels 1, 2, 3, and 4. Connect to and amplifier or mixer (etc.).
Jacks are divided into two groups: GROUP A (1 (L) and 2 (R)) GROUP B (3 (L) and 4 (R))
Output level selector
Use to set the output level of the OUTPUT jacks to match the input level of the connected equipment. You can select a +4 dBu or
This setting effects all jacks (1, 2, 3, and 4).
5 INPUT jacks (1~4)
Standard input jacks for channels 1, 2, 3, and 4. Connect to mixer, CD player, or keyboard (etc.). Jacks are divided into two groups:
GROUP A (1 (L/MONO) and 2 (R))
GROUP B (3 (L/MONO) and 4 (R))
When inputting a monaural signal, use the 1 or 3 (MONO) jacks. The signal is sent to both of the channels in the respective group.
Input level selector
Use to set the input level of the INPUT jacks to match the output level of the connected equipment.
You can select a +4 dBu or
6 AC power cord
Connect to an AC power outlet.
7GB