Craftsman 919.19541 owner manual Installation, To Add Oil, Air Compressor Location

Page 12

To Add Oil

Drain tank to release air pressure

before removing the oil fill cap or oil drain plug.

1.Place unit on a level surface.

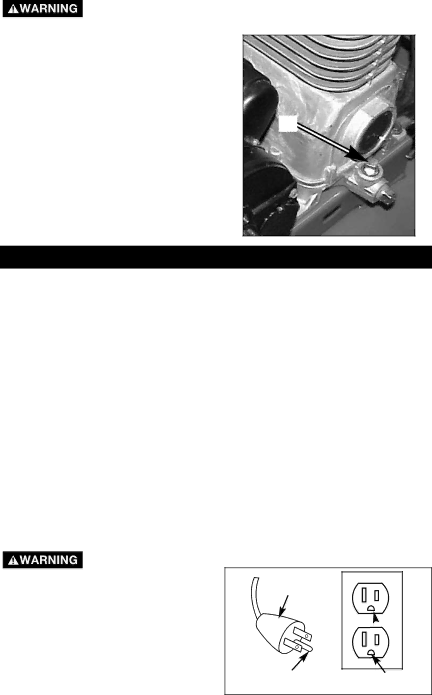
2.Remove oil fill plug (A) and slow- ly add compressor oil until it is even with the top of the oil fill hole. NOTE: Do not allow oil to be lower than 3/8" (6 threads) from the top at any time. When filling the crankcase, the oil flows very slowly into the pump. If the oil is added too quickly, it will overflow and appear to be full.

NOTE: Crankcase oil capacity is approximately 16 fluid ounces.

3. Replace oil fill plug.

A

INSTALLATION

Air Compressor Location

Locate the air compressor in a clean, dry, and well ventilated area.

The air compressor should be located at least 12" away from the wall or other obstructions that will interfere with the flow of air.

The air filter and flywheel must be kept clear of obstructions which could reduce air flow to the air compressor.

The air compressor requires fresh air flow for proper cooling.

DO NOT ALLOW THE COM- PRESSOR TO GET WET.

GROUNDING INSTRUCTIONS

RISK OF ELECTRI- CAL SHOCK. In

the event of a short circuit, ground- ing reduces the risk of shock by providing an escape wire for the electric current. This air compres- sor must be properly grounded.

The portable air compressor is equipped with a cord having a grounding wire with an appropriate grounding plug (see following illustra- tions). The plug must be used with an outlet that has been installed and grounded in accordance with all local codes and ordinances.

1.The cord set and plug with this unit contains a grounding pin. This plug MUST be used with a grounded outlet.

IMPORTANT: The outlet being used must be installed and grounded in accordance with all local codes and ordinances.

2.Make sure the outlet being used has the same configuration as the grounded plug. DO NOT USE AN ADAPTER. See illustra- tion.

Plug

Grounding Pin


Grounded


Outlets


D24910

12- ENG

Image 12
Contents AIR Compressor Sears, Roebuck and Co., Hoffman Estates, IL 60179 U.S.ATable of Contents Specification Table Safety Guidelines DefinitionsImportant Safety Instructions Hazard What Could HappenAttachments & Accessories Hazard Never operate the compressor with Belt can cause serious injury if theyFire, Inhalation, Damage to Vehicle Surfaces Accessories AccessoriesGlossary Duty CycleAssembly Contents of CartonTools Required for Assembly To Install HandleTo Assemble Wheels Assemble Rubber FeetTo Add Oil To Pump Installation To Add OilAir Compressor Location Before removing the oil fill cap or oil drain plugExtension Cords Voltage and Circuit ProtectionOperation Know Your Air CompressorHow to Use Your Unit How to Stop Before First Start-upBreak-in Instructions Pressure Release Valve Check ValveHow to Start Before Each Start-UpMaintenance Customer ResponsibilitiesTo Check Safety Valve To Drain TankOil ChangingAir Filter Inspection Replacement Motor Pulley/Flywheel AlignmentAir Compressor Pump Intake and Exhaust Valves Service and Adjustments To Replace or Clean Check ValveOutlet Tube Pressure Relief Tube Nuts Nuts Check Valve Screwdriver Open position nothing is visiblePressure Switch Replacement MotorTo Replace Regulator To Replace Belt Regulator ArrowWing Nut Storage Troubleshooting Problem Cause CorrectionPressure reading Minal box area Problem Cause Correction Contenido GarantíaDefiniciones DE Normas DE Seguridad Modelo Nº 919-195410Resultar en lesiones menores o ModeradasInstrucciones Importantes DE Seguridad Guarde Estas InstruccionesAgregados Y Accesorios Tros de acuerdo a los códigos eléctricos Advertencia Riesgo DE Quemaduras ¿QUÉ Puede OCURRIR? Advertencia Riesgo DE Operación Insegura ¿QUÉ Puede OCURRIR? Glosario AccesoriosCiclo DE Servicio AccesoriosEnsamblado Contenido de la cajaHerramientas necesarias para el ensamble DesempaqueEnsamble de las ruedas Ensamble de las patas de cauchoPara agregar aceite a la bomba TuercaInstalación Para agregar aceiteUbicación del compresor de aire EnchufeCables de extensión eléctrica Protección del voltaje y del circuitoOperación Conozca su compresor de aireCómo utilizar su unidad Antes del primer arranqueInstrucciones para el asentamiento Cómo detenerlaAntes de cada puesta en marcha Cómo poner en marchaMantenimiento Responsabilidades del clienteCómo verificar la válvula de seguridad AceiteCómo drenar el tanque VerificaciónFiltro de Aire Inspección y reemplazo Polea y volante AlineaciónServicio Y Ajustes Para reemplazar o limpiar la válvu La de retenciónTubo de salida Tuercas TuercasVálvula reguladoraMotor Para volver a arrancarPara reemplazar el regulador Interruptor de presión ReemplazoCambio de la correa Regulador FlechaTuerca mariposa Almacenaje Guía DE Diagnóstico DE Problemas Problema Causa CorrecciónOperación. Nota Ajuste la presión Retire y limpie, o reemplace 57- SP D24910 D24910 58- SP 59- SP D24910 Get it fixed, at your home or ours