Sherwood RD-7503 manual Connecting Speakers, Surround back speakers, Front Bi-Amp Connections

Page 9

RD-7503(A)2008.11.41:45PM페이지9

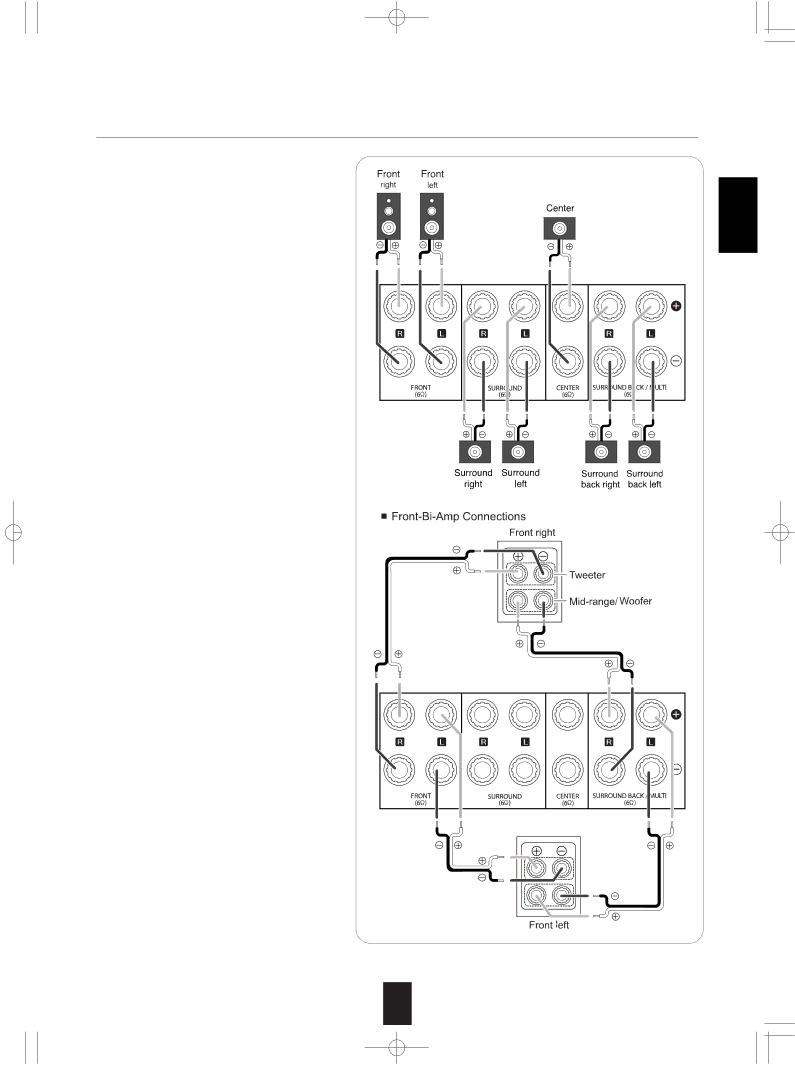
6. CONNECTING SPEAKERS

Be sure to connect speakers firmly and correctly according to the channel(left and right) and the polarity (+ and -). If the connections are faulty, no sound will be heard from the speakers, and if the polarity of the speaker connection is incorrect, the sound will be unnatural and lack bass.

For installing the speakers, refer to "Speaker placement" on page 10.

After installing the speakers, first adjust the speaker settings according to your environment and speaker layout. (For details, refer to

"SETTING THE SPEAKER /ROOM EQ SETUP" on page 51.)

Surround back speakers

When using only one surround back speaker, you should connect it to SURROUND BACK/ MULTI LEFT channel.

Because this receiver cannot drive the surround back speakers and the ROOM 2 speakers simultaneously, you should assign their power amplifier correctly depending on how to use them. (For details, refer to "CONNECTING ROOM 2 OUTS" on page 11 and "When selecting the AMP ASSIGN" on page 41.)

Front Bi-Amp Connections.

Some speakers are equipped with two sets of input terminals, for bi-amplification.

If no other surround back speakers are used, you can connect the FRONT and the SURROUND BACK/MULTI channels to the bi- amp-capable speakers. (For details, refer to the operating instructions of your bi-amp-capable speakers.)

To drive the bi-amp-capable speakers, you should assign the power amplifier to "BI-AMP".

Note :

Before making bi-amp connections, remove the short-circuiting bars from the terminals of your speakers.

Caution :

Be sure to use the speakers with the impedance of 6 ohms or above.

Do not let the bare speaker wires touch each other or any metal part of this unit. This could damage this unit and/or the speakers.

Never touch the speaker terminals while the AC input cord is connected to the wall AC outlet. Doing so could result in electric shocks.

ENGLISH

9

Image 9
Contents RD-7503 Important Safety Instructions Introduction Read this Before Operating Your Unit120 Contents System Connections Connecting AntennasConnecting Video Components Component video input default settings *2 Connecting Audio ComponentsHdmi High Definition Multimedia Interface connection *1 Copyright protection systemConnecting External INS Connecting Digital INS and OUTDigital input default settings Connecting Speakers Surround back speakersFront Bi-Amp Connections Connecting Subwoofer PRE OUT Speaker placementConnecting DC Trigger OUT Connecting Room 2 OutsConnecting Sirius Connector only for North America Connecting for System ControlAC Input Cord SiriusConnect Home TunerFront Panel Controls Remote SensorFluorescent Display Setup MIC Jack Bluetooth in ConnectorFront AUX in Jack Power on button Universal Remote ControlsUP/DOWN / buttons Numeric 0~9, +10 Input Selector buttons ENTER/SEARCH MODE, Select buttonsFunction Table of the Numbered Buttons Loading Batteries Repeat the above steps 1 to 4 for each of your Components Entering a setup codeUsing a punch-through function Removing a punch-through functionRemoving all punch-through functions Operating a macro function Programming a macro functionTo remove a macro program To change a macro programOperations Listening to a Program SourceBefore operation When CD, F.AUX, Video 1~ 3 is selected as an input source Listening with headphonesMuting the sound Surround modes Hall TheaterStadium RoomDolby Truehd Enjoying Surround SoundEnter the test tone mode Adjusting each channel level with test toneCancel the test tone function To cancel the surround mode for stereo operationAdjust the level of the selected channel as desired Adjusting the current channel levelRepeat the above steps 2 and 3 to adjust each channel level Press the Channel Level buttonRecalling the memorized channel levels Memorizing the adjusted channel levelsManual tuning Auto tuningAuto presetting Listening to Radio BroadcastsTuning to preset stations Manual presettingTuning Press the MEMORY/ENTER buttonTo sign up, access the website at Press the Tuning UP+/DOWN- buttons repeatedly to select SRSirius Satellite Radio only for North America Signing up for Sirius Satellite RadioDirect search Category search→ DIR Srch → CAT Srch → OFF Preset search Presetting channelsWhen tuning in the previously locked channels Parental lockTune in the channel you want to lock or unlock To record audio signals Dubbing the audio and video signals separately onto VideoRecording Dubbing from video components ontoDigital Audio Recording with MD Recorder Adjusting the brightness of the fluorescent display Operating the sleep timerOther Functions Displaying the operation statusSet the selected mode as desired Press the Room 2 button to enter the Room 2 modeRoom 2 Source Playback Start play on the component related to the Room 2 sourceOSD Menu Settings Select the desired menu using the Cursor UP/DOWN buttonsTurn the menu screen on When selecting the SPEAKER/ROOMEQSETUP When selecting the CH Level SetupWhen selecting the items other than OSD Position Adjust Setting the System SetupWhen selecting the AMP Assign Press the Cursor UP/DOWN buttons to select the desired itemWhen selecting the Subwoofer Mode When selecting the Hdmi Audio OUTWhen selecting the Tone Control When selecting the Momentary OSD When selecting the Cinema EQWhen selecting the OSD Position Adjust When selecting the menu of page 2 or Setting the Input SetupWhen selecting the Video Assign When selecting the Hdmi AssignWhen selecting the Audio Assign When selecting the Audio ModeWhen selecting the AV Sync When selecting the Auto SurroundWhen selecting the DC Trigger When selecting the HD AudioWhen selecting the Name Confirm your entryTo resume its factory input source name When selecting the Parental Lock When selecting the Edit Lock Code Setting the Speaker / Room EQ Setup When selecting the Auto SetupPreparations RD-7503A2008.11.4145PM페이지52 When selecting the Speaker Configuration About the speaker distance When selecting the Speaker DistanceWhen selecting the Speaker Crossover When selecting the Room EQ Setup Setting the CH Level Setup Memory modeRepeat the above steps 1 and 2 to adjust each channel level Reference Setting the Sound Parameter When selecting the Night ModeAuto Repeat the above steps 2 and 3 to adjust other parameters When selecting the Dolby Plii MusicWhen selecting the Panorama mode When selecting the Center Width controlWhen selecting the Room Setting the Multi Room SetupWhen selecting the Input When selecting the VolumeProblem Possible Cause Remedy Troubleshooting GuideSpecifications Setup Code Table SSS RCATMK CCEKLH MEISTS NSC ABCHTS SATRD-7503