IntelliFAX
3550-US-5.0 Shipment of the Fax Machine
N T E N T S
N T E N T S
Receiving Faxes and Other Calls
Polling
Specifications
3500-US-5.0
Bad Places
Choosing a Suitable Place for Your Fax Machine
Good Places
Pleasechecktoseethatyouhavethefollowingitems
Usecautionwheninstallingormodifyingtelephonelines
Packing List
Do not remove the startersheet
Setting up Your Fax Machine
Follow these steps to set up your fax machine
Closethetopcover
Untilthelatchclicksintoplace
Insertitintothefaxmachine
Below the mark
Cover
Sheetfeeder
For Your Information
About the Recording Paper…
This fax machine must be grounded using the 3-prong plug
Step F. Connect the telephone line
Converting Telephone Wall Outlets
Roll Over Phone Lines
Two Line Phone System
Connecting Your Machine to a Multi Line System PBXs
Connecting to a Private Branch Exchange
Custom Features on Your Phone Line
Telephone Area One-Touch Area
Number Keys
Hook
Hold
Redial/Pause
Stop
Copy
Shift
Start
Toner Empty
16.Set
Function
Clear
Resolution
Mode
Help
Super Q.Scan
HOW to USE ON-SCREEN Programming OSP and Help KEY
UsingtheFunctionModetoAccessOn-screenProgrammingOSP
User-friendlyProgramming
On-screenProgrammingOSP
Alternating Displays for On-screen Programming OSP
FunctionSelectionTable
Select & SET
Temp
Overseas
Coverpg
TONE/PULSE
TEL
Remote
HelpKey
How to Print a Help List
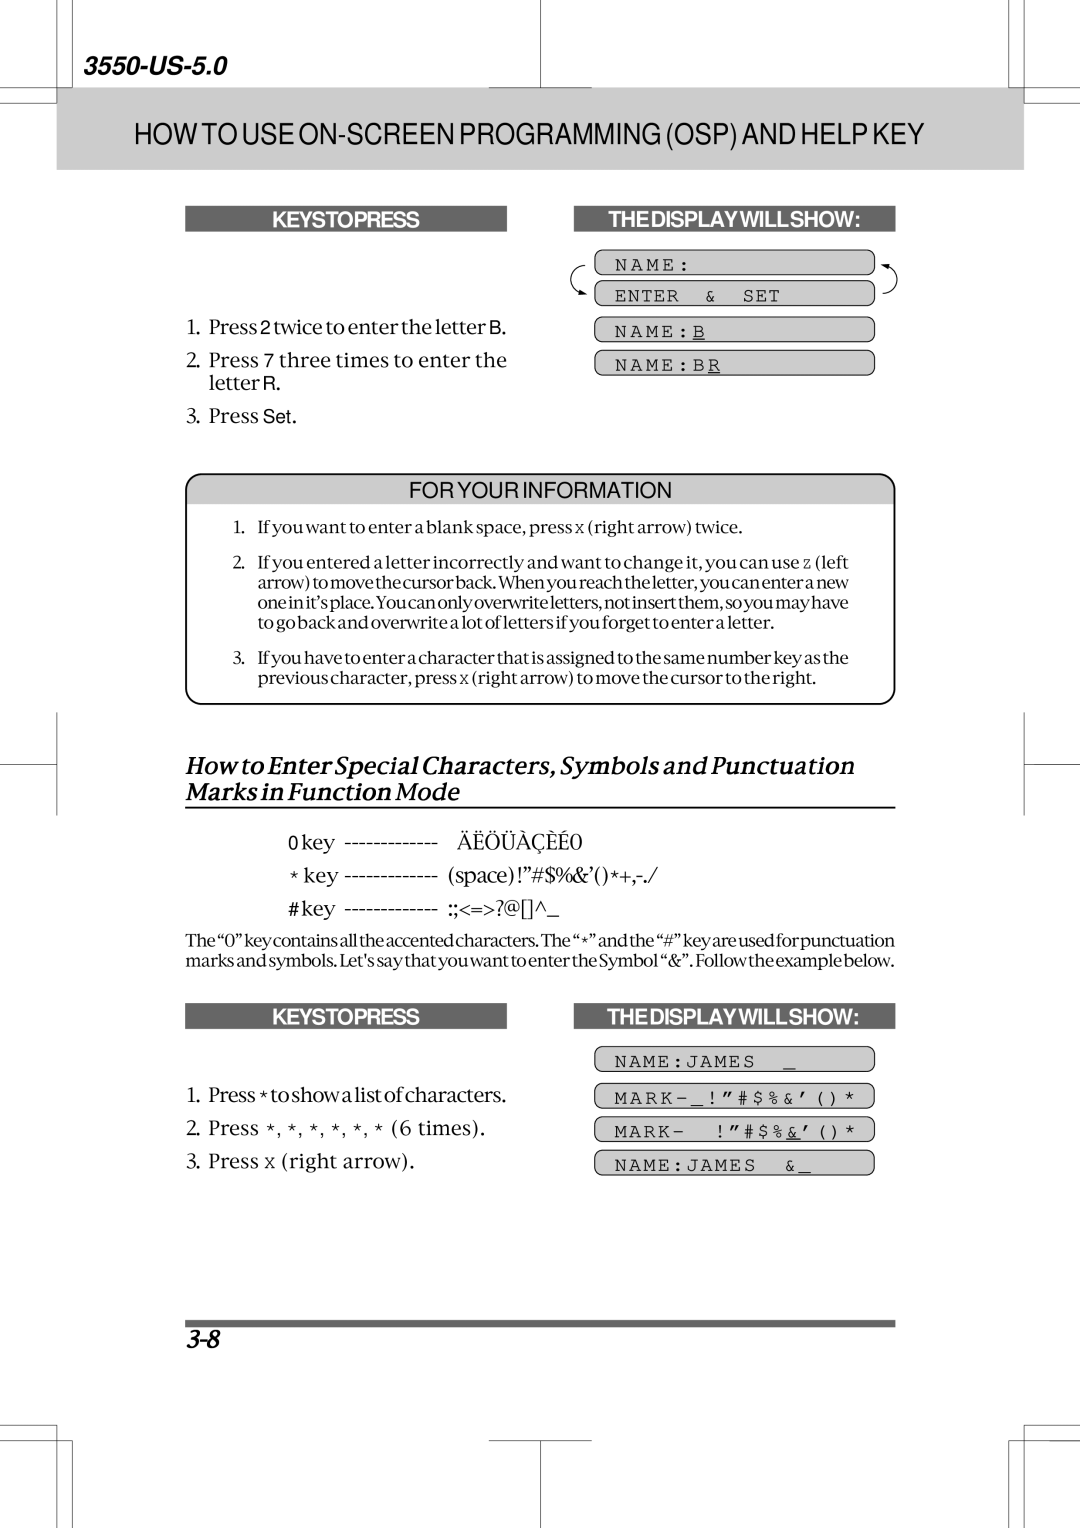
How to Enter Text in Function Mode
Enter & SET
Namejames
How to Set the Sleep Time
Sleep Mode
User Options
Sleep TIME00MIN
Telephonefunctionsettings
Setting the Dialing Mode Tone/Pulse
Setting the Beeper Sound Level
TEL Options
Setting the Date and Time
Press Z left arrow or X right arrowuntilyougetthesettingyou
Example OFF
Example
Setting the Station ID
Station ID F a Enter & SET
You will be prompted to enter your fax number
You will be prompted to enter your telephone number
Storing One-Touch Dial Numbers
Station ID
ONE Touch Dial Select ONE- Touch
T E R
See For Your Information on page 4-6.Example FAX
Namenj
Select ONE- Touch
Storing Speed-Dial Numbers
SET Auto Dial
Types of Numbers
Chain Dialing
Example TEL
SPEED-DIAL? #
Example05
Setting Up Number Groups
Setup Groups Select ONE-TOUCH
05NJ Office Change 2.EXIT
Memory Storage
Setup GROUPG0 Enter & SET
Setup GROUPG01 G 0 Enter & SET
Enter & SET Nameall Brother Setup Groups
Example EntertheOne-TouchorSpeed-Dial numbers in this group
Using Keys with the Telephone
Manual Dialing
One-Touch Dialing
Speed Dialing
Searching the Telephone Index
NJ Office
How to Insert the Document
Size of Your Documents
About the Documents You Send
Tofitthewidthofthedocument
Auto Document Feeder ADF
Getting Ready to Send a Fax
FAX NO. & Start
FAX NO. & Start Copy Press Copy
Example S.LIGHT
Thenstartthefaxsendingoperationseepage6-4orcopyseepage8-1
Talking to the Other Party When Sending a Fax
Sending a Fax Automatically
FAX Start
Copy Press
Sending a Fax Manually
Automatic and Manual Redialing
NJ Office A L I N G Sending P.01
Example One-Touch dialing
Sending a Fax by Using Super Quick-Scan Memory Transmission
Optional Settings When You Send a Fax Manually
Memory 100% Enter FAX no NJ Office
Printing Page Headers
Setting the Daily Timer for Delayed Transmissions
Delayed Transmission
Daily Timer Enter TIME0000 Enter TIME1945
Example 1945 745 P.M
Broadcasting
Memory 100% Enter FAX no
Enter FAX no
Getting Familiar with the Broadcasting Function
Sending by Multiple Transmissions
Memory 100% Enter FAX NO. ALL Brother
Sending
Multi TX 100% Enter FAX no
Interrupting the Timer and Polled Job
Timer Waiting
Remove Document Insert FAX Copy Func To Reset
NJ Office Multi
Canceling a Job
Insert Document FAX or Copy Func 0 to Reset
Cancel JOB
Offic
Setting the Overseas Mode
Press Z left arrow or X right arrow to switch to on
When you finish setting the resolutionforallyourpages,press
Example Fine
Sending a Fax with an Electronic Cover Page Message
Selecting a Comment for the Cover
Setup System SET Coverpage Select TOP Secre T
Customizing Your Cover Page Comment
Printing a Sample Cover
You can customize the comment on your Cover Page as follows
To Always Send a Cover
Coverpg ON/OFF C O V E R P a G E O F F Select & SET
Comment OFF Select & SET 2.PLEASE Call Coverpg ON/OFF
Sending an Automatic Cover
Example 2.PLEASE Call
Sending a Fax When the Cover Page Is on
Sending a Cover Page Temporarily
Using the Call Reservation Function
Waitfortwoseconds .PressStop toexit
Printing the Call Back Message
Call Reserveon Call Backoff Select & SET Call Backon
Error RE-TX Error RE- Txoff Select & SET Error RE-TXON
ECM Error Correction Mode
Error Retransmission
Next-FAX Reservation
Receiving Faxes and Other Calls Basic Setup to Receive Faxes
SelectinganAnswerMode
Setting the Ring Delay
Ring Delay Ring DELAY02 Select & SET Ring DELAY00
ManualReceptionManualMode
AutomaticFaxReceptionFaxMode
TheF/TSwitchFax/TelephoneMode
Start
T Ring Time
Setting the F/T Ring Time
Smoothing
RCD Paper
Setting the Size of the Recording Paper
RCD Paper RCD Paperletter Select & SET RCD PAPERA4
Using Fixed Reduction Ratios
PrintingaReducedCopyoftheIncomingDocument
D U C T I O N a U T O Select & SET Reduction 93%
AutoReduction
Selecting the Ratios of Fixed Reduction
ReceptionintoMemoryOutofPaperReception
Setting the Print Density
TonerSaveFunction
Print Density
Toner Save Toner Saveoff Select & SET Toner Saveon
SpeakerVolume
RingVolume
Speaker Volume S P E a K E R L O W Select & SET
Speaker Volume
UsingRemoteCodes
ConnectinganExternalorExtensionTelephone
Receiving Faxes and Other Calls Remote Activation
WhatisRemoteActivation
Troubleshooting
UsingtheActivationCode
UsingtheDeactivationCode
Remote Activation Receiving Faxes and Other Calls
5REMOTE Code
ChangingandRegisteringRemoteCodes
Remote Code Remote ACT.ON Select & SET Remote ACT.ON
How to Use an External TAD with the Fax
Connecting an External TAD to the Unit
RecordingtheTAD’sOutgoingMessageOGM
Flowchart of External TAD Reception
Hookup
Distinctive Ringing Receiving Faxes and Other Calls
DistinctiveRinging
Flowchart of an Incoming Call
What Must I Do to Set up Distinctive Ringing?
Receiving Faxes and Other Calls Distinctive Ringing
HowDoestheDistinctiveRingingFunctionWork?
Setting the Distinctive Ringing Function
Pick UP to SET Start to SET Stop to Cancel
How to Turn the Distinctive Ringing Function on or OFF
Registered
What is Caller ID?
Caller ID Appears on the Display When Your Telephone Rings
Caller ID Receiving Faxes and Other Calls
Advantages of Caller ID
Receiving Faxes and Other Calls Caller ID
Scanning through the Caller IDs stored in Memory
Caller ID
Caller ID is Stored in Your Machine’s Memory
Printing the Caller ID List
Print Reports Caller ID Press Start KEY I N T I N G
Clearing a Caller IDs Stored in Memory
09/12/1996 1525 1 . T E M P . S E T T I N G S
Turning Receive Password on or OFF
SET Password RX Passwordoff Select & SET RX Passwordon
Making Single and Multiple Copies
Making a Single Copy
Enter & Copy KEY C O P Y I N G Copying
Usethisfunction to makeasingle copy
Making Multiple Copies
Reducing and Enlarging Copies
Enter & Copy KEY no . of Copies 0 Copy Stack
No . of COPIES01 Enter & Copy KEY
For Your Information
No . of Copies 0 Copy Stack
What Is Polling?
When to Use Polling
Polling
How Does It Work?
Setting Up Polled Waiting Being Called
Polling Another Fax Machine Calling
Press Z left arrow or X right arrowtoselectPollingON
ExampleOne-touchdialing
Enter FAX NO. Press Start KEY NJ Office
Delayed Polling
Press Start KEY Polled Waiting
Setting Up Polled Waiting with Super Quick-Scan
Sequential Polling
Setting Up Fax Storage
Remotefaxoptions
10-1
FAX in MEMORY01
Paging/Fax Forwarding
10-2
Setting Up Paging Registering the Paging Number
10-3
10-4
Select & SET FAX Forward
WhatIsRemoteControlAccess?
SettingtheRemoteAccessCode
Remote Access
10-5
HowtoUseRemoteAccessandControlCodes
WhentoPresstheRemoteAccessCode
RemoteRetrieval
10-6
RemoteControlCommands
Printing a Fax Message
10-7
FAX MEMORY03
10-8
Retrieving the Memory Status List and Fax Messages Remotely
Changing the Fax Forwarding Number Remotely
Printingreportsandlists
11-1
How to Print Reports and Lists
Activity Report Interval
11-2
T . R P T . O F F Select & SET Every 12 Hours
Printing the All Dial List
11-3
Transmission Verification Xmit Report
11-4
000045
Memory Status List
11-5
Toner Empty Indicator
Replacingthe Toner Cartridgeand Drum Unit
Replacing the Toner Cartridge
12-1
Powercord
12-2
12-3
12-4
Gentlyrockthetonercartridgefromside tosidefiveorsixtimes
Remove the old drum unit. See
Replacing the Drum Unit
12-5
12-6
Regulations
Gently rock the new drum unit side to sidefiveorsixtimes
Turn on the power switch or plug
12-7
13-1
Regular Maintenance and Troubleshooting
RegularMaintenance
Cleaning the Drum Unit
13-2
Repacking and Shipping the Machine
13-3
13-4
Paper Jams
13-5
Fixing a Document Jam
Fixing a Recording Paper Jam
13-6
Clearing a Paper Jam in the Fuser Unit
13-7
Installing the Optional Memory Board
OptionalMemoryBoard
13-8
ErrorMessages
13-9
Error Codes
13-10
OtherProblems
13-11
13-12
Cover Page Comment Always Prints Please Call
Setting Up the Fax Machine
13-13
Print Quality Problems
13-14
13-15
13-16
Important Information
14-1
14-2
Manufactured
Important Safety Instructions
14-3
International Energy Star Compliance Statement
Do not use this product near water
14-4
15-1
15-2
16-1
15.1 x 17.8 x 9.9 inches/383 x 452 x 251 mm
16-2
Pages at 1 page per job