Quick Reference
Page
Quick Reference
Nagoya 467-8561, Japan
15-1, Naeshiro-cho, Mizuho-ku
EN 55024
EN 61000-3-2
Table of contents
Unpacking
Precautions
Be careful that the CD-ROM is not scratched
Do not put heavy objects on the CD-ROM
Tape Cassettes
When connecting to the serial port
Connecting the interface and power supply cables
Computer using the USB interface cable
When connecting to the USB port
Installing P-touch Editor Version
Installing P-touch Editor
Operating system
Hard disk free space At least 20 MB
Compact Only P-touch Editor Version 3.1 is in- stalled
For a Typical or Compact installation
For a Custom installation
Auto Format
Installing the printer driver
For a serial connection
Dialogue box appears, showing that installation is finished
Using the Change Baud Rate Wizard
Button to start up the Change Baud Rate Wizard
With Windows 2000 and XP
With Windows 98/98SE/Me/2000 Professional
With Windows XP
With the enclosed CD-ROM, the following can be installed
Installing P-touch Editor Version
Remove the CD-ROM from the computer
Available memory free space Minimum 24 MB CD-ROM drive
Installation begins
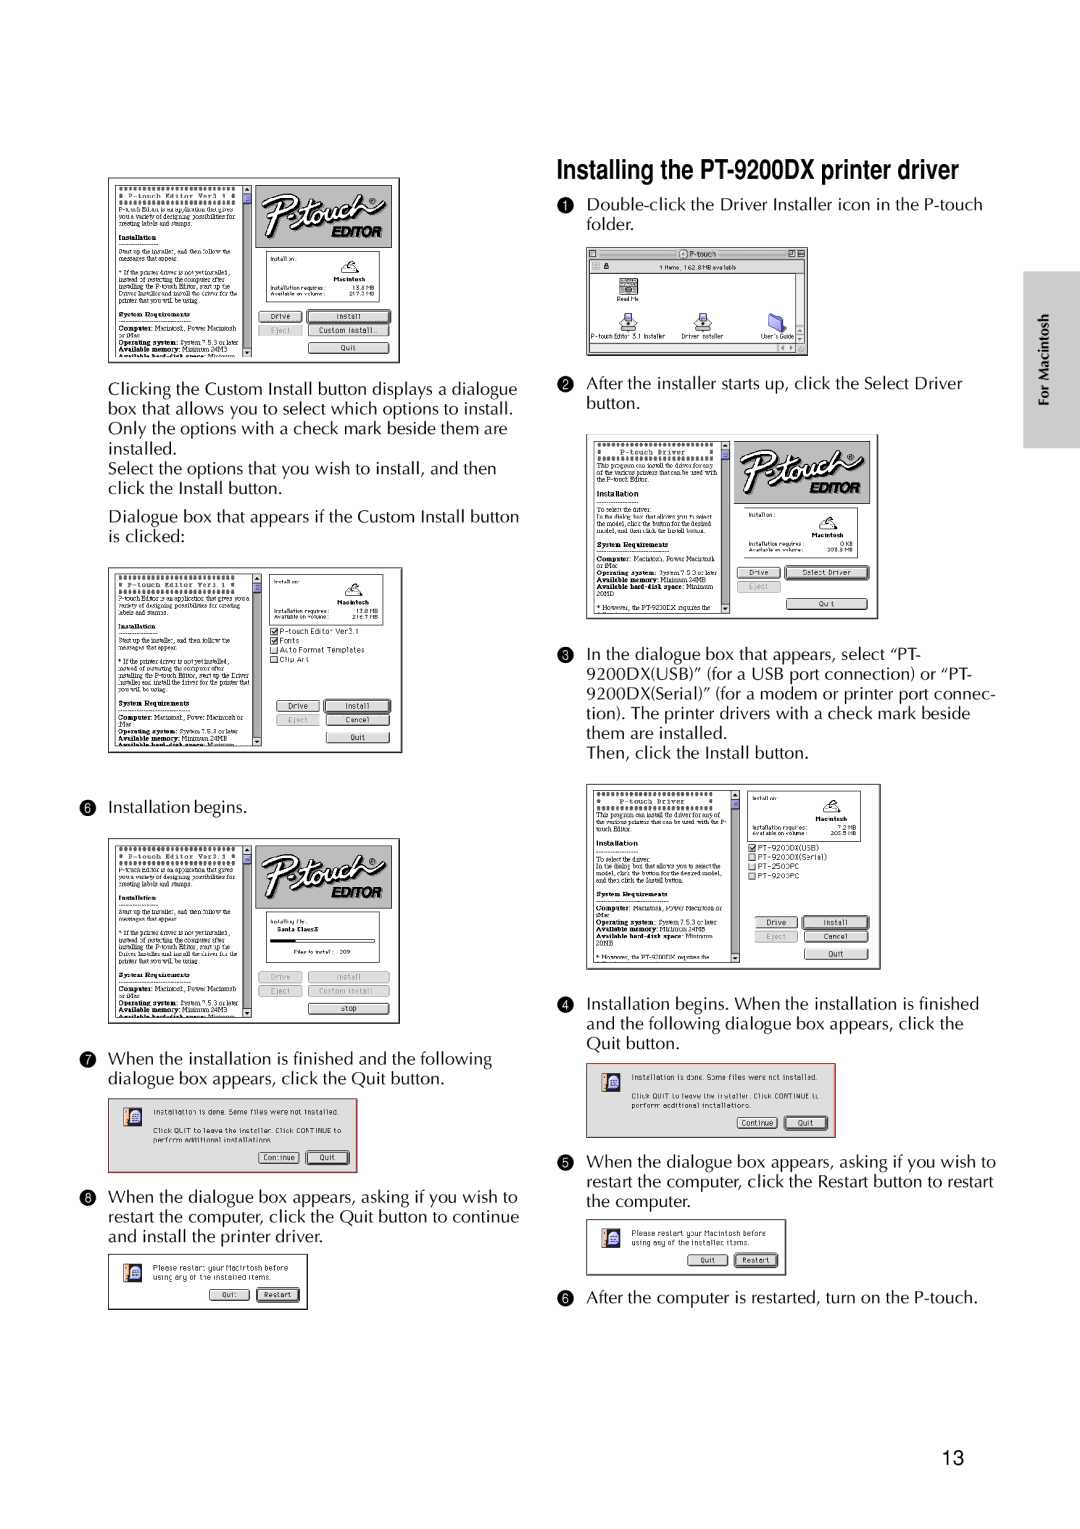
Installing the PT-9200DX printer driver
For a USB port connection or the PT-9200DXSerial
Selecting the printer
List on the left, click the PT-9200DXUSB icon
For a serial connection
For a USB connection Windows 98/Me/2000 Professional/XP only
With Windows XP
With Windows 98/98SE/Me/2000 Professional
If Delete Brother PT-9200DX was selected
Starting up P-touch Editor
Using P-touch Editor
On an IBM PC-compatible computer
On a Macintosh computer
Creating a new layout
Displaying the Properties
Click an icon to display its Properties
For details, refer to Reading the User’s Guide on
Designing a layout from an Auto Format template
Importing a graphics file
When using the P-touch Editor for the PC
Databases
Barcode
Reading the P-touch Editor User’s Guide
Reading the User’s Guide
Installing the tape cassette
Using the PT-9200DX
Turn on the PT-9200DX and start up the computer
Printing a label
Cleaning the Print Head and Roller
Maintenance
PT-9200DX status
Power button light Description/Remedy
Monitoring the P-touch Status
Problem Cause Solution
Troubleshooting
Cleaning the Print Head and Roller on
Windows
Problem Remedy
Changing the P-touch’s Baud Rate
Machine Specification
Stock No Description
Accessories
TZ-132
TZ-131
TZ-133
TZ-135
Special tapes
TZ-PM41
Page
Guide de référence rapide
EN 55022 1998 Class B
Nous 15-1, Naeshiro-cho, Mizuho-ku Nagoya 467-8561, Japan
Sécurité
Table des matières
Lecture du mode d’emploi
Utilisation de la PT-9200DX
Utilisation de P-touch Editor
Précautions
Déballage
Faites attention à ne pas rayer le CD-ROM
Ne pas poser d’objets lourds sur le CD-ROM
Les cassettes d’étiquettes
Pour le raccordement au port série
’alimentation
Pour le raccordement au port USB
Installation de P-touch Editor Version
Installation de P-touch Editor
Système d’exploitation
Espace libre sur le disque dur Au moins 20 Mo
Pour une installation Personnalisée
Pour une installation Typique ou Compacte
Pour une liaison série
Installation du pilote d’imprimante
Avec Windows 2000 et XP
Normalement, 115200 bps est sélectionné
Pour une liaison USB
Cliquez sur le bouton Fin
Avec Windows 98/98SE/Me/2000 Professional
Avec Windows XP
Touch Editor Version Pilote d’imprimante PT-9200DX
Sortez le CD-ROM de l’ordinateur
Mémoire vive disponible Au moins 24 Mo Lecteur de CD-ROM
Installation du pilote d’imprimante PT-9200DX
Refermez la fenêtre Chooser pour valider vos réglages
Sélection de l’imprimante
Si vous avez sélectionné Installez Effectuez les
Page
Avec Windows XP
Si vous avez sélectionné Supprimer une Brother PT-9200DX
Pour Macintosh
Lancement de P-touch Editor
Utilisation de P-touch Editor
Sur un ordinateur compatible IBM PC
Sur un ordinateur Macintosh
Création d’une nouvelle mise en
Affichage des propriétés
Sur un ordinateur compatible IBM PC
Quand vous utilisez P-touch Editor pour PC
Importation d’un fichier graphique
Bases de données
Code barres
Double-cliquez sur Main.htm du dossier Manual Mode d’emploi
Lecture du mode d’emploi
Lecture du mode d’emploi de P-touch Editor
Mise en place de la cassette
Utilisation de la PT-9200DX
Impression d’une étiquette
Nettoyage de la tête d’impression et du cabestan
Entretien
Statut de la PT-9200DX
Couleur de touche on/off Description/Solution
Contrôle du statut de la P-touch
Guide de dépannage
Problème Cause Solution
Problème Solution
Changement de la vitesse de transmission de la P-touch
Alimentation
Spécifications de l’imprimante
Tête d’impression
Coupeuse
No. de stock
Accessoires
Rubans laminés de 12 mm
TZ-N242
TZ-N241
TZ-N243
TZ-N541
Page
Deutsch
Kurzanleitung
Bescheinigung des Herstellers/Importeurs
Allgemeine Hinweise
Online-Benutzerhandbuch
Inhaltsverzeichnis
Verwenden des P-touch Editor
Verwenden des PT-9200DX
Datenkabel Seriell Für IBM-kompatible PCs oder
Packungsinhalt
Vorsichtsmaßnahmen
Bandkassetten
Serieller Anschluss
Daten- und Netzkabel anschließen
USB-Anschluss
Betriebssystem
Touch Editor Version 3.1 installieren
Professional/XP
Freier Festplatten-Speicherplatz mindestens 20 MB
Benutzerdefinierte Installation
Minimal- oder Normalinstallation
Serieller Anschluss
Druckertreiberinstallation
Windows 95, 98, 98SE und Me
Baudraten-Assistenten verwenden
Windows NT
Windows 2000 und XP
Bei Windows 98/98SE/Me/2000 Professional
USB-Anschluss nur Windows 98/Me/2000 Professional/XP
Mit Windows XP
Freier Festplattenplatz mindestens 20 MB
Nehmen Sie die CD-ROM aus dem Computer
Anschluss Seriell oder USB
Arbeitsspeicher Mindestens 24 MB CD-ROM -Laufwerk
Nach dem Neustart des Computers schalten Sie den P-touch ein
PT-9200DX Druckertreiberinstallation
Druckerauswahl
Deinstallation der P-touch Software und Druckertreiber
Klicken Sie auf Weiter
Für einen seriellen Anschluss
FüreinenUSB-AnschlussnurWindows98/Me/2000Professional/XP
Mit Windows XP
Falls Brother PT-9200DX löschen gewählt wurde
Starten des P-touch Editor
Verwenden des P-touch Editor
Mit einem IBM PC-kompatiblen Computer
Mit einem Macintosh-Computer
Einzelheiten siehe Lesen der Bedienungsanleitung auf Seite
Anzeigen der Eigenschaften
Erzeugen eines neuen Layouts
Layout mit einer Autoformat-Vorlage erstellen
Bei Verwendung des P-touch Editor mit einem PC
Bilder importieren
Datenbanken
Touch Editor Online-Benutzerhandbuch lesen
Online-Benutzerhandbuch
Bandkassette einlegen
Verwenden des PT-9200DX
Etikett drucken
Reinigen des Druckkopfes und der Transportrolle
Wartung und Pflege
Ein-/Aus-Taste Bedeutung / Abhilfe
Statusanzeigen des P-touch 9200DX
Was tun bei Störungen?
Problem Ursache Mögliche Abhilfe
Das Band wird nach dem automatischen Abschneiden
Fehler
Ändern der P-touch-Baudrate
Technische Daten
Sonderzubehör
Zubehör
Beschreibung
TZ-164
Schwarze Schrift auf fablosem, mattem Band
Spezialbänder
TZ-N211
Page
Nederlands
Beknopte bedieningsgids
Hartelijk dank voor de aanschaf van de PT-9200DX
Verklaring van Overeenkomst
Onderhoud
Inhoudsopgave
Voorzorgsmaatregelen
Uitpakken
Tapecassettes
Aansluiten op een seriële poort
Aansluiten van de interfacekabel en de netsnoeren
Aansluiten op een USB poort
Installeren van de P-touch Editor Version
Installeren van de P-touch Editor
Besturingssysteem
Vrije ruimte op harde schijf Minimaal 20 MB
Voor een Aangepast installatie
Voor een Normaal of Minimaal installatie
Selecteer Installeer en klik dan op de Volgende knop
Klik op de Volgende knop om te beginnen met de installatie
Bij een seriële verbinding
Sjablonen voor automatische opmaak
Voor Windows 2000 en XP
Voor Windows 95, 98, 98SE en Me
Voor Windows NT
Voor Windows 98/98SE/Me/2000 Professional
Bij een USB verbinding
Voor Windows XP
Touch Editor Version PT-9200DX printerstuurprogramma
Neem de CD-ROM uit de computer
Beschikbaar geheugen Minimaal 24 MB CD-ROM station
De installatie begint
Installeren van het PT-9200DX printerstuurprogramma
Selecteren van de printer
Selecteer de gewenste optie en klik dan op de Volgende knop
Selecteer de gewenste optie en klik dan op de Volgende knop
Alleen voor Windows 98/Me/2000 Professional/XP
Voor Windows XP
Voor Windows 98/98SE/Me/2000 Professional
Als Brother PT-9200DX verwijderen wordt geselecteerd
Starten van de P-touch Editor
Gebruik van de P-touch Editor
Voor een IBM PC-compatibele computer
Voor een Macintosh computer
Een nieuwe lay-out maken
Weergeven van de Eigenschappen
Voor een IBM PC-compatibele computer
Importeren van een grafisch bestand
Barcode
Dubbelklik op Main.htm in de Manual map
Gebruik van de handleiding
Lezen in de handleiding van de P-touch Editor
Plaatsen van de tapecassette
Gebruik van de PT-9200DX
Afdrukken van een etiket
Reinigen van de afdrukkop/rol
Onderhoud
Let op
De onderdelen reinigt
Kleur van lampje van aan/uit toets Beschrijving/Maatregel
Status van de P-touch
Afdrukkop/rol op pagina
Verhelpen van storingen
Storing Oorzaak Oplossing
De tape wordt niet juist naar buiten gevoerd nadat
Storing
Wijzigen van de baudrate van de P-touch
Afdrukkop
Technische gegevens
Tapesnijmes
Poort
Beschrijving
Toebehoren
Materiaal
Witte tekens op zwart tape
Speciale tape
Page
Italiano
Guida di riferimento rapido
Grazie di aver acquistato la PT-9200DX
Dichiarazione di conformità
Utilizzo di P-touch Editor
Indice
Utilizzo della PT-9200DX
Lettura del Manuale dell’utente
Precauzioni
Disimballaggio
Fare attenzione a non Non sottoporre il CD-ROM a
Graffiare il CD-ROM
Cassette a nastro
Quando si esegue il collegamento con la porta seriale
Collegamento dei cavi di interfaccia e di alimentazione
Quando si esegue il collegamento con la porta USB
Installazione di P-touch Editor Version
Installazione di P-touch Editor
Sistema operativo
Spazio libero sul disco fisso Almeno 20 MB
Per Windows
Per collegamento seriale
Installazione del driver di stampa
Guida utilizzatore
Per gli utilizzatori di Windows 95/98/Me Saltare al punto
Per Windows 2000 e XP
Per Windows 95, 98, 98SE e Me
Per Windows NT4.0
Per Windows 98/98SE/Me/2000 Professional
Per collegamento USB
Fare clic sul pulsante Fine
Per Windows XP
Touch Editor Version Driver di stampante PT-9200DX
Memoria libera disponibile Almeno 24 MB Unità CD-ROM
Dopo il riavvio del computer, accendere la stampante P-touch
Installazione del driver della stampante PT-9200DX
Per Windows 95/98/Me/NT 4.0/ 2000 Professional/XP
Selezione della stampante
Per collegamento seriale
Page
Per Windows XP
Page
Avvio di P-touch Editor
Utilizzo di P-touch Editor
Su un computer compatibile PC IBM
Su un computer Macintosh
Creazione di un nuovo layout
Visualizzazione delle proprietà
Creazione di un layout da un modello Autocomposizione
Quando si utilizza P-touch Editor per PC
Importazione di un file grafico
Database
Codice a barre
Lettura del Manuale dell’utente di P-touch Editor
Lettura del Manuale dell’utente
Fare attenzione a non toccare la testina di stampa
Installazione della cassetta a nastro
Utilizzo della PT-9200DX
Accendere la PT-9200DX e avviare il computer
Stampa di un’etichetta
Pulizia della testina e del rullo di stampa
Manutenzione
Descrizione/Rimedio
Stato della PT-9200DX
Causa Soluzione
Guida alla risoluzione dei problemi
Installata una
Problema Rimedio
Page
Dati tecnici della macchina
Stock Descrizione
Accessori
Nastri laminati da 12 mm
Nastri speciali
Page
Norsk
Hurtigreferense
Naeshiro-cho, Mizuho-ku
Konformitetserklæring
Tilbehør
Innholdsfortegnelse
Forholdsregler
Utpakking
Båndkassetter
Ved kopling til serieporten
Tilkopling av grensesnitt- og nettstrømkabler
Ved kopling til USB-porten
Installere P-touch Editor Version
Installere P-touch Editor
Operativsystem
Harddisk-kapasitet Minst 20 MB
For en Skreddersydd installasjon
For en Vanlig eller Minimal installasjon
Minimal Bare P-touch Editor Version 3.1 installeres
For serietilkopling
Installere skriverdiveren
Version 3.1 Clip Art-funksjonen Skrifter De 13 fontene
Maler for
Med Windows 2000 og XP
Med Windows 95, 98, 98SE og Me
Med Windows NT
Med Windows 98/98SE/Me/2000 Professional
Velg ønsket overføringshastighet og klikk på Neste- knappen
Med Windows XP
Følgende kan installeres med den vedlagte CD-ROMen
Installere P-touch Editor Version
Fjern CD-ROMen fra datamaskinen
Minnekapasitet Minst 24 MB CD-ROM stasjon
Installere PT-9200DX skriverdriveren
Professional/XP
Velge skriveren
For serietilkopling
For USB-tilkopling Kun Windows 98/Me/ 2000 Professional/XP
Med Windows XP
Touch Editor Version 3.1 og skriverdriveren er nå slettet
Hvis du valgte Slett Brother PT-9200DX
Åpne Preferenser-mappen i System-mappen
Starte opp P-touch Editor
Bruke P-touch Editor
På en IBM-kompatibel datamaskin
På en Macintosh datamaskin
Klikk på et ikon for å vise dets Egenskaper Side-egenskaper
Vise Egenskapene
Opprette et nytt oppsett
Designe et oppsett fra en autoformateringsmal
Når P-touch Editor for PC brukes
Importere en grafisk fil
Databaser
Strekkode
Lese P-touch Editors Brukerveiledning
Lese Brukerveiledningen
På en IBM PC-kompatibel datamaskin
Dobbelklikk på Main.htm i Manual-mappen
Bruke PT-9200DX
Installere båndkassetten
Slå PT-9200DX på og start datamaskinen
Skrive ut en etikett
Sett inn båndkassetten og lukk båndkammerdekslet
Vedlikehold
Rengjøre skrivehodet og valsene
På/av-knappens lampefarge Beskrivelse/Utbedring
Kontrollere status i P-touch
PT-9200DX
Feilsøking
Problem Årsak Utbedring
Båndet støtes ikke ordentlig ut etter automatisk klip
Problem
Endre overføringshastigheten i P-touch
Maskintekniske data
Artikkelnr Beskrivelse
Tilbehør
Hvite tegn på gray tape
Ekstra tilbehør
Page