MANUTENZIONE | MANTENIMIENTO | MAINTENANCE |
A | 1 |
| Cleaning | |
|
| |||
|
| Removing the Shuttle Hook | ||
| 2 | 1. | Raise the needle to its highest position and remove the power sup- | |
|
| ply plug from the outlet. | ||
|
|
| ||
|
| 2. | Remove the extension table and open the shuttle cover on the front | |
|
|
| of the free arm. | |
|
| 3. | Take out the bobbin case by opening its latch and pulling it out | |
| 3 |
| from the shuttle race. | |
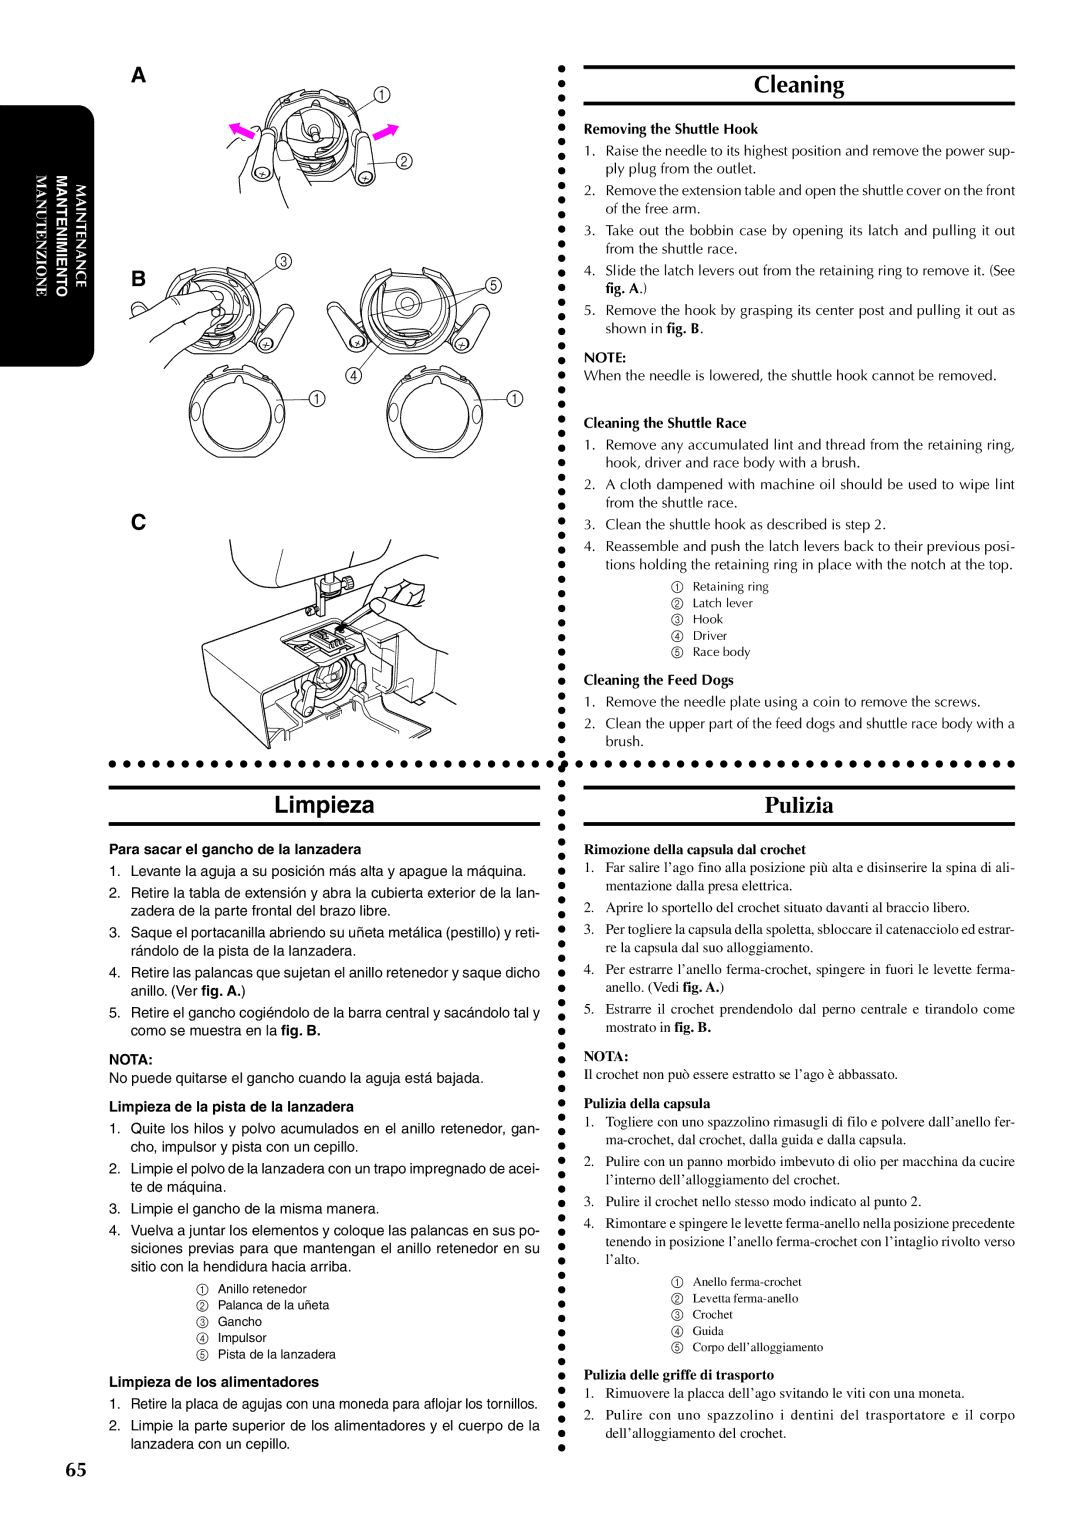
B | 4. | Slide the latch levers out from the retaining ring to remove it. (See | ||
5 | ||||
| fig. A.) | |||
|
| |||
|
| 5. | Remove the hook by grasping its center post and pulling it out as | |
|
|
| shown in fig. B. | |
|
| NOTE: | ||
| 4 | When the needle is lowered, the shuttle hook cannot be removed. | ||
1 1
Cleaning the Shuttle Race
| 1. | Remove any accumulated lint and thread from the retaining ring, | |
|
| hook, driver and race body with a brush. | |
| 2. | A cloth dampened with machine oil should be used to wipe lint | |
C |
| from the shuttle race. | |
3. | Clean the shuttle hook as described is step 2. | ||
| 4. | Reassemble and push the latch levers back to their previous posi- | |
|
| tions holding the retaining ring in place with the notch at the top. | |
|
| 1 | Retaining ring |
|
| 2 | Latch lever |
|
| 3 | Hook |
|
| 4 | Driver |
|
| 5 | Race body |
Cleaning the Feed Dogs
1. Remove the needle plate using a coin to remove the screws.
2. Clean the upper part of the feed dogs and shuttle race body with a brush.
Limpieza |
| Pulizia |
Para sacar el gancho de la lanzadera
1.Levante la aguja a su posición más alta y apague la máquina.
2.Retire la tabla de extensión y abra la cubierta exterior de la lan- zadera de la parte frontal del brazo libre.
3.Saque el portacanilla abriendo su uñeta metálica (pestillo) y reti- rándolo de la pista de la lanzadera.
4.Retire las palancas que sujetan el anillo retenedor y saque dicho anillo. (Ver fig. A.)
5.Retire el gancho cogiéndolo de la barra central y sacándolo tal y como se muestra en la fig. B.
NOTA:
No puede quitarse el gancho cuando la aguja está bajada.
Limpieza de la pista de la lanzadera
1.Quite los hilos y polvo acumulados en el anillo retenedor, gan- cho, impulsor y pista con un cepillo.
2.Limpie el polvo de la lanzadera con un trapo impregnado de acei- te de máquina.
3.Limpie el gancho de la misma manera.
4.Vuelva a juntar los elementos y coloque las palancas en sus po- siciones previas para que mantengan el anillo retenedor en su sitio con la hendidura hacia arriba.
1Anillo retenedor
2 Palanca de la uñeta
3 Gancho
4 Impulsor
5 Pista de la lanzadera
Limpieza de los alimentadores
1.Retire la placa de agujas con una moneda para aflojar los tornillos.
2.Limpie la parte superior de los alimentadores y el cuerpo de la lanzadera con un cepillo.
Rimozione della capsula dal crochet
1.Far salire l’ago fino alla posizione più alta e disinserire la spina di ali- mentazione dalla presa elettrica.
2.Aprire lo sportello del crochet situato davanti al braccio libero.
3.Per togliere la capsula della spoletta, sbloccare il catenacciolo ed estrar- re la capsula dal suo alloggiamento.
4.Per estrarre l’anello
5.Estrarre il crochet prendendolo dal perno centrale e tirandolo come mostrato in fig. B.
NOTA:
Il crochet non può essere estratto se l’ago è abbassato.
Pulizia della capsula
1.Togliere con uno spazzolino rimasugli di filo e polvere dall’anello fer-
2.Pulire con un panno morbido imbevuto di olio per macchina da cucire l’interno dell’alloggiamento del crochet.
3.Pulire il crochet nello stesso modo indicato al punto 2.
4.Rimontare e spingere le levette
1Anello
2 Levetta
3 Crochet
4 Guida
5 Corpo dell’alloggiamento
Pulizia delle griffe di trasporto
1.Rimuovere la placca dell’ago svitando le viti con una moneta.
2.Pulire con uno spazzolino i dentini del trasportatore e il corpo dell’alloggiamento del crochet.
65
