NOTES:

1.Unless otherwise speci®ed, all dimensions are to outside of part.

2.Dimensions are in inches.

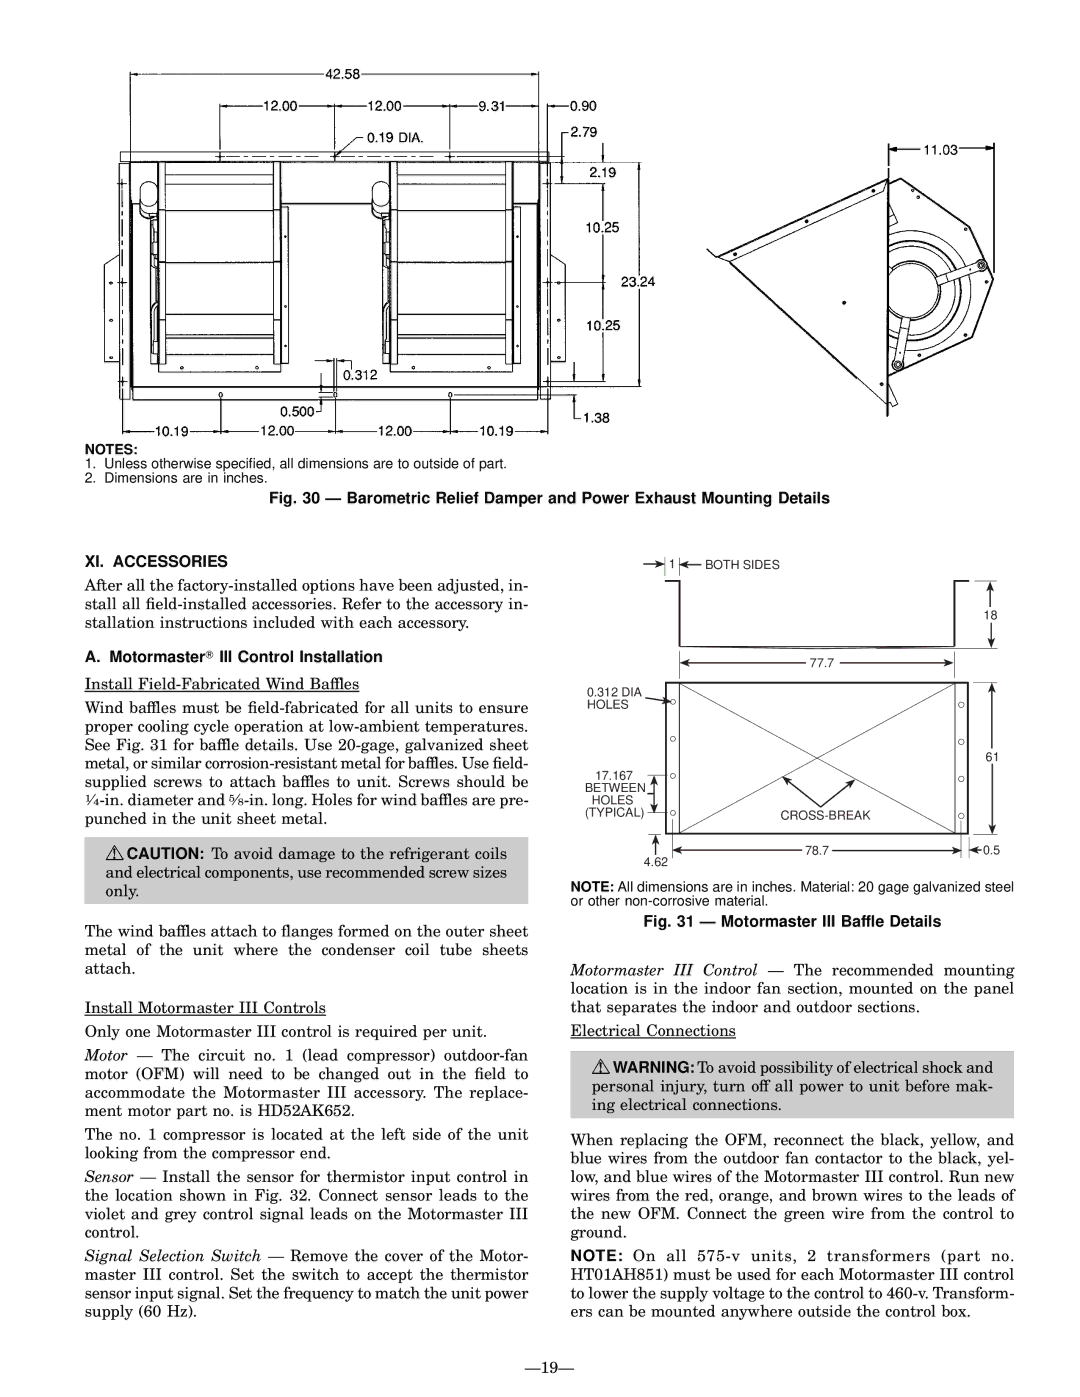
Fig. 30 Ð Barometric Relief Damper and Power Exhaust Mounting Details

XI. ACCESSORIES

After all the factory-installed options have been adjusted, in- stall all ®eld-installed accessories. Refer to the accessory in- stallation instructions included with each accessory.

A. Motormaster III Control Installation

Install Field-Fabricated Wind Baffles

Wind baffles must be ®eld-fabricated for all units to ensure proper cooling cycle operation at low-ambient temperatures. See Fig. 31 for baffle details. Use 20-gage, galvanized sheet metal, or similar corrosion-resistant metal for baffles. Use ®eld- supplied screws to attach baffles to unit. Screws should be 1¤4-in. diameter and 5¤8-in. long. Holes for wind baffles are pre- punched in the unit sheet metal.

CAUTION: To avoid damage to the refrigerant coils and electrical components, use recommended screw sizes only.

1 BOTH SIDES

18

77.7

0.312 DIA HOLES

61

17.167


BETWEEN


HOLES


(TYPICAL)

CROSS-BREAK

78.7

0.5

4.62


NOTE: All dimensions are in inches. Material: 20 gage galvanized steel or other non-corrosive material.

The wind baffles attach to ¯anges formed on the outer sheet metal of the unit where the condenser coil tube sheets attach.

Install Motormaster III Controls

Only one Motormaster III control is required per unit.

Motor Ð The circuit no. 1 (lead compressor) outdoor-fan motor (OFM) will need to be changed out in the ®eld to accommodate the Motormaster III accessory. The replace- ment motor part no. is HD52AK652.

The no. 1 compressor is located at the left side of the unit looking from the compressor end.

Sensor Ð Install the sensor for thermistor input control in the location shown in Fig. 32. Connect sensor leads to the violet and grey control signal leads on the Motormaster III control.

Signal Selection Switch Ð Remove the cover of the Motor- master III control. Set the switch to accept the thermistor sensor input signal. Set the frequency to match the unit power supply (60 Hz).

Fig. 31 Ð Motormaster III Baffle Details

Motormaster III Control Ð The recommended mounting location is in the indoor fan section, mounted on the panel that separates the indoor and outdoor sections.

Electrical Connections

WARNING: To avoid possibility of electrical shock and personal injury, turn off all power to unit before mak- ing electrical connections.

When replacing the OFM, reconnect the black, yellow, and blue wires from the outdoor fan contactor to the black, yel- low, and blue wires of the Motormaster III control. Run new wires from the red, orange, and brown wires to the leads of the new OFM. Connect the green wire from the control to ground.

NOTE: On all 575-v units, 2 transformers (part no. HT01AH851) must be used for each Motormaster III control to lower the supply voltage to the control to 460-v. Transform- ers can be mounted anywhere outside the control box.

Ð19Ð

Page 19
Image 19
Bryant 580G manual XI. Accessories, Motormaster III Control Installation

580G specifications

The Bryant 580G is a high-efficiency gas furnace designed to deliver optimal heating performance while maximizing energy savings. This model stands out in the Bryant product lineup due to its advanced features and robust technology, making it a popular choice for homeowners seeking reliable comfort in colder climates.

One of the key characteristics of the Bryant 580G is its efficiency rating. With an annual fuel utilization efficiency (AFUE) of up to 92.1%, this furnace ensures that a substantial portion of the fuel consumed is converted into heat, minimizing energy waste and reducing utility bills. This high-efficiency performance is particularly beneficial for those looking to lower their environmental footprint and operate a more sustainable home heating system.

The 580G uses a two-stage heating process, which allows it to operate at two levels of output. During mild weather, the furnace can run on a lower setting, providing gentle warmth while conserving energy. When temperatures drop, the system automatically ramps up to a higher output to maintain comfort. This feature not only enhances energy efficiency but also helps to eliminate temperature fluctuations, ensuring consistent warmth throughout the home.

Noise reduction technology is another remarkable aspect of the Bryant 580G. Equipped with a variable speed blower motor, this furnace operates quietly, providing a more peaceful indoor environment. The motor allows for customizable airflow, which further aids in maintaining an even temperature across different rooms and spaces.

The furnace is built with high-quality materials and features a compact design, making it a suitable option for various installation locations. Additionally, it is compatible with Bryant’s EcoNet Smart Home Management System, which enables homeowners to monitor and control their heating system remotely via a smartphone app. This integration enhances convenience and allows for timely adjustments to heating schedules, promoting energy savings.

Safety is a priority with the 580G. It features an integrated safety switch and a reliable flame sensor to ensure safe operation. With its durable construction and thoughtful engineering, the Bryant 580G is designed to withstand the demands of everyday use while providing peace of mind to homeowners.

In summary, the Bryant 580G gas furnace combines high efficiency, advanced technology, and user-friendly features. Its ability to operate quietly, adapt to temperature changes, and integrate with smart home technology makes it a leading choice for efficient home heating solutions. This furnace not only provides comfort but also offers long-term energy savings, making it a smart investment for any household.