Photo Printer Series
Quick Start Guide
Getting Help from Canon
Photo Printer Quick Start Guide
Copyright
Contents
Press the Power button
Turning on the Printer
Basic Printing
Loading Paper
„ Print Media to Avoid
Non-Canon branded paper
„ Using the Sheet Feeder and the Cassette
Sheet Feeder Lamp
„ Loading Plain Paper in the Sheet Feeder
Flatten the four corners of the paper before loading it
Prepare to load paper
Load Limit Mark
Basic Printing Load the paper
You can load up to 20 sheets of 4 x 6-sized paper
„ Loading 4 x 6-Sized Paper in the Sheet Feeder
„ Loading Plain Paper in the Cassette
Do not load beyond this Load Limit Mark
Basic Printing Insert the Cassette into the printer
Cassette Lamp
Basic Printing Prepare the Paper Output Tray
„ Loading 4 x 6-Sized Paper in the Cassette
Using Specialty Media
„ Photo Quality Media
Documents
Sheet Feeder Cassette For Media Type
„ Canon Specialty Media
Ensure that the proper paper source is selected
Printing with Windows
Turn on the printer
Load the paper in the printer
Paper Source
Specify the required settings
Basic Printing Open the printer properties dialog box
Properties
Print the document
See Canceling Printing on
Load the paper on the printer
Printing with Macintosh
Select Paper Size
See Adjusting Print Quality on
Canceling Printing
Press the RESUME/CANCEL button while printing
Basic Printing Print the document
Advanced Printing
Printing Photographs Directly from a Digital Camera
„ Connecting to a Digital Camera
Set up the printer Turn on the printer
Connect the digital camera to the printer
„ Direct Printing from PictBridge-compatible Digital Cameras
Default Camera Settings
Paper size setting
About Paper size and Paper type
Paper loaded in printer
About Date print
About Image optimize
Media Type
Media Types for Digital Camera
Accessing the Printer Driver
Your application, select the command to print a document
Double-click the icon of your printer
Adjusting the Print Quality for Photographs
„ Adjusting Print Quality
„ Improving the Quality of Printed Images
To manually adjust Print Quality settings
Click the Effects tab
To automatically optimize the image
Windows Me or Windows
To use Vivid Photo option
Advanced Printing
Advanced Printing
„ Saving and Recalling Printer Driver Settings
Click OK Click OK on the Profiles tab
Click Add to Profiles
Deleting unwanted profile
Retrieving the registered driver settings
Changing the registered drivers settings
Retrieving profile
„ Easy-WebPrint Windows
Using the Bundled Software
„ Easy-PhotoPrint Windows/Macintosh
„ PhotoRecord Windows
Media Types Suitable for Borderless Printing
Printing Borderless Photographs
Select photographs
Start Easy-PhotoPrint
Click the Paper Selection tab
Select the paper
Select Borderless full
Advanced Printing Select the layout and print the photograph
Replacing an Ink Tank
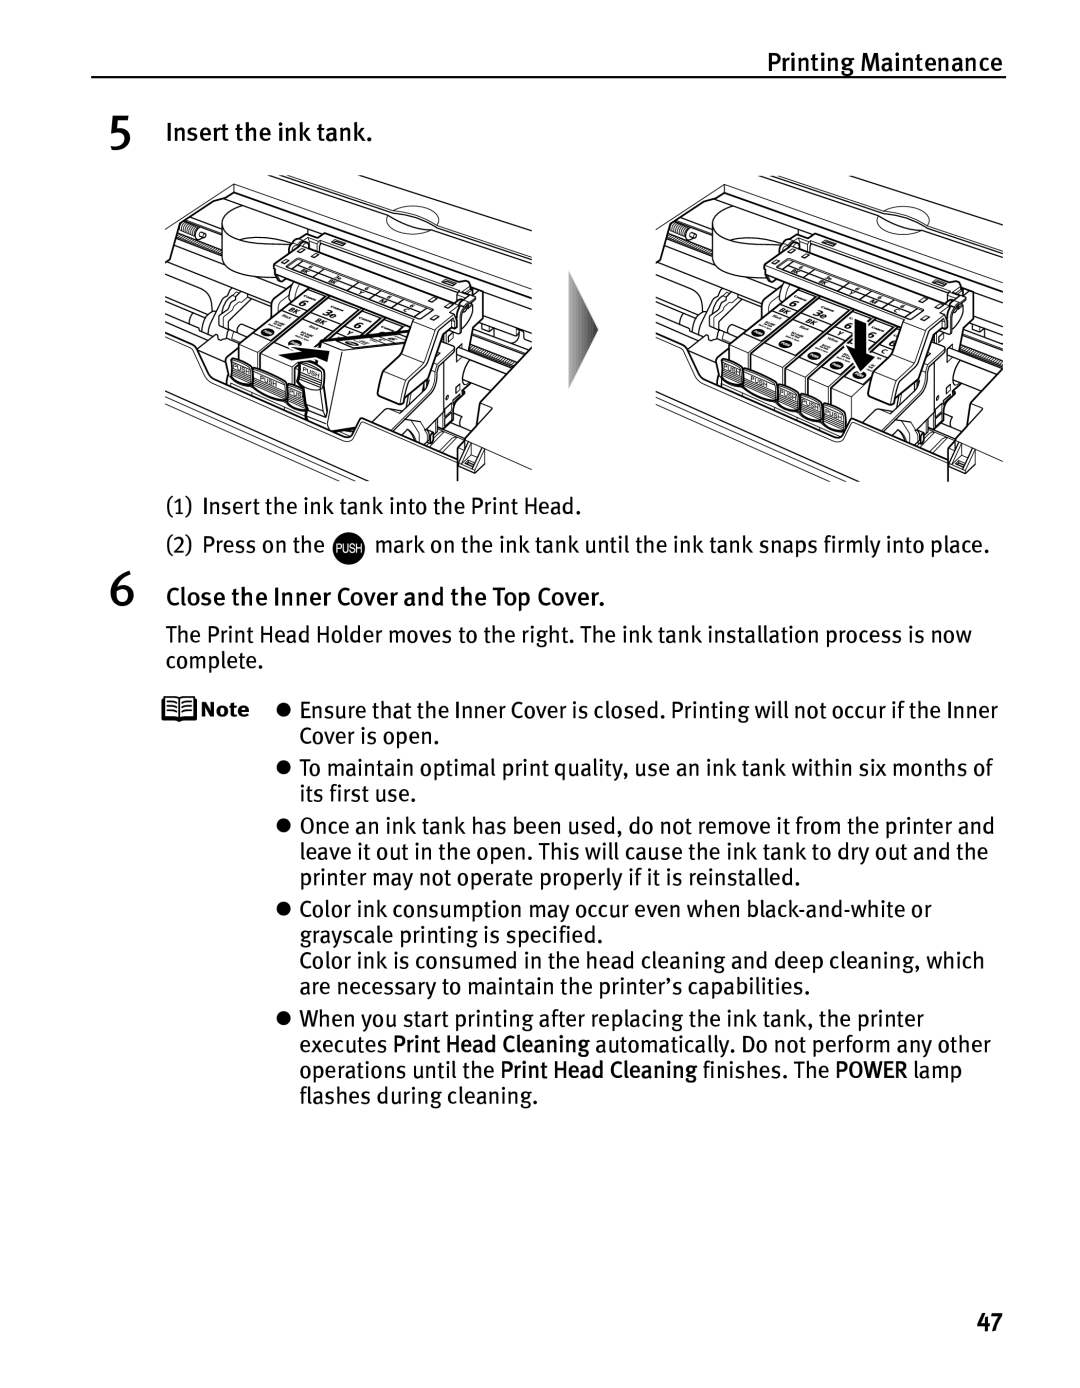
Printing Maintenance
When Low Ink is Detected
„ Knowing When to Replace Ink Tank
Checking the ink level
Remove the empty ink tank
„ Replacing Ink Tanks
Printing Maintenance Prepare a replacement tank
Close the Inner Cover and the Top Cover
Printing Maintenance Insert the ink tank
Step
When Printing Becomes Faint or Colors are Incorrect
Printing the Nozzle Check Pattern
„ Printing the Nozzle Check Pattern
Printing the Nozzle Check Pattern Without a Computer
Click Nozzle Check
Printing Maintenance Print the Nozzle Check Pattern
Printing Maintenance Open the BJ Printer Utility dialog box
See Replacing an Ink Tank on
„ Examining the Nozzle Check Pattern
Print Head Cleaning
Start Print Head Cleaning
Cleaning the Print Head Without a Computer
Ensure that the printer is on
Select the ink group to be cleaned
Click Cleaning Select the ink group to be cleaned
Printing Maintenance
Print Head Deep Cleaning
Start Print Head Deep Cleaning
Click Deep Cleaning
Printing Maintenance
Printing Maintenance Start Print Head Deep Cleaning
See Printing the Nozzle Check Pattern on
Click Print Head Alignment
Aligning the Print Head
Print the pattern
Aligning the Print Head Without a Computer
Read the message and click Print Head Alignment
Read the message and click Print Head Alignment
Printing Maintenance Check the printed pattern
When an Error Occurs
Troubleshooting
CD-ROM icon
Cannot Install the Printer Driver
Reinstall the printer driver
Click Start Over on the Installation
Setting
Print Quality is Poor or Contains Errors
Select Prevent paper abrasion
See Cleaning the Inside of the Printer in the User’s Guide
With Borderless Printing
Windows XP or Windows
Documents in the Printer menu
Troubleshooting Printer Hardware
Use reduced
Printing is not
Area
Paper Does Not Feed Properly
Paper Jams
Paper Jams
Problem Possible Cause
Paper jams inside the Duplex Transport Section
Handling Error Messages
Ten flashes Cannot print on
Press the RESUME/CANCEL button
Power lamp flashes
If the problem remains, contact the Customer Care Center
Uninstall
An Error Message Appears on the Screen
Print Center
Serial Bus controllers, and USB Printing Support
Inner Cover is
Opened while Again Error No Printing Specified period
Cannot Print Properly from the Digital Camera
Troubleshooting
Installing the Printer Driver When Using Mac OS
Appendix
Close the Chooser
Page
User’s Guide Table of Contents
Specifications
Printing resolution Print speed
Printer
Camera Direct Print Canon Bubble Jet Direct
Camera Direct Print PictBridge
BJ Printer Driver Systems Requirements
Additional Systems Requirements for Electronic Manuals
Safety Precautions
Damage the printer
Service
Purchased the printer
Thinners, etc. on top of the printer
Color Printer Model K10244
Regulatory Information
Canon U.S.A., INC. Limited Warranty --- USA Only
Canon is a registered trademark of Canon Inc
Canon U.S.A., Inc One Canon Plaza Lake Success, NY
Nozzle Check Pattern Examining Printing
Index
Index
Media Specialty
Printing Borderless Photographs
17, 29
Ordering Information
Canon Latin America, Inc
Canon U.S.A., Inc
Canon Inc
Canon Canada, Inc