Dell PowerVault 745N NAS Systems Administrators Guide
Software-RAID Recovery and Restoration Procedures
Recovering and Restoring the System
Troubleshooting Software-RAID NAS Systems
Does the power LED show that the NAS system is turned on?
Software-RAID NAS System Hard-Drive Failures
Software-RAID NAS System Hard-Drive Recovery Procedures
Software-RAID NAS System Software Failures
Replacing Software-RAID NAS System Hard Drives
Recovering From a Software-RAID Operating System Failure
Hardware-RAID Recovery and Restoration Procedures
Troubleshooting Hardware-RAID NAS Systems
Hardware-RAID NAS System Hard-Drive Recovery Procedures
Hardware-RAID NAS System Hard-Drive Failures
Replacing Hardware-RAID NAS System Hard Drives
Hardware-RAID NAS System Software Failures
Replacing One Hardware-RAID NAS System Hard Drive
Replacing Two or More Hardware-RAID NAS System Hard Drives
Recreating a Hardware-RAID NAS System Data Volume
Recovering From a Hardware-RAID Operating System Failure
When the Array Properties Menu appears, select RAID
Click Maintenance, and then click Remote Desktop
Troubleshooting External Storage Configuration NAS Systems
Recovering From an Operating System Failure
External Storage NAS System Hard-Drive Recovery Procedures
Are the LEDs for all hard drives in the NAS system lit?
Recreating an External Storage NAS System Data Volume
Reinstalling the Operating System
Replacing External Storage Hard Drives
Requirements
Click Begin Setup
Reinstalling the Operating System on Your NAS System
Click on Dell PowerVault USB Key Preparation Tool
Preparing the USB Key
Select Configure→ Clear Configuration
Click Maintenance
Restoring System-State Data After Reinstallation
Click Import File
Click Advanced
Click Start Restore
Restoring Initial System Setup
Tools and Techniques
Troubleshooting
General Troubleshooting
Troubleshooting
Issue Possible Cause Resolution
Sites Properties window
Viewed in My Network Places
NAS Manager
Macintosh and AppleTalk
Server for NFS
Hardware-RAID NAS System Internal RAID Controller Card
Adapter Binding in Advanced Features
Configuring Your NAS System for the First Time
Initial Configuration
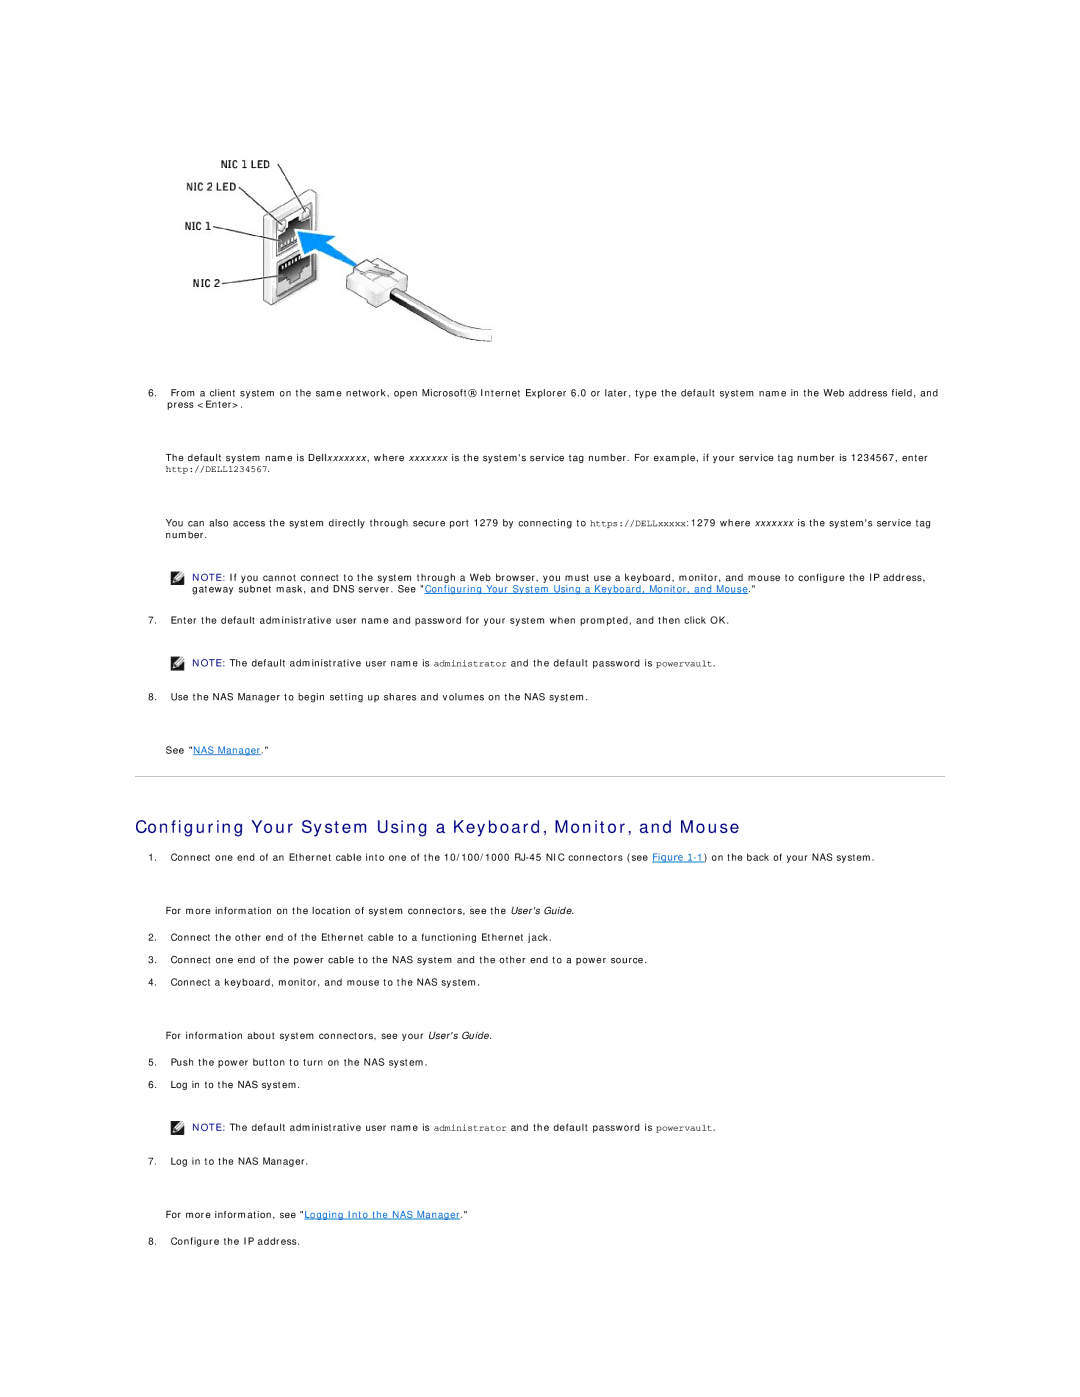
Configuring Your System Using a Keyboard, Monitor, and Mouse
Other Documents
Other Documents You May Need
NAS Manager
Determining a NAS Systems Configuration
Logging Into the NAS Manager
Default Administrator User Name and Password
Basic Navigation
Logging Into the NAS Manager on the Network
Click Maintenance Click Language
How to Find Online Help
Changing the NAS Manager Language
Primary Menu
Default System Name
Configuring Network Properties
Configuring the Network Address for the NAS System
Naming the NAS System
Click IP, and select Use the following IP settings
Changing the Administrator Password
Click Network and click Administrator
Creating Local Users and Groups
Using Shares
Creating a Local Group
Adding a Share
Modifying Share Properties
Removing a Share
Click Properties
Removing a Protocol From the Share
Disk Quotas
Publishing a Share in DFS
Click Publish in DFS
Adding Disk Quota Entries
Enabling, Disabling, or Setting Disk Quotas on a Volume
Modifying Quota Properties
Click Set Quota Entries
Disabling Disk Quotas on a Volume
Using Logs
Removing User Quota Entries
Viewing Log Entry Details
Downloading Log Files
Modifying Log Properties
Viewing Downloaded Log Files
File Download dialog window, select Save this file to disk
Managing Disks and Volumes
Shutting Down the NAS System
Clearing Log Files
Configuring Volume Settings
Shadow Copies
Introduction to Shadow Copies
Scheduling Shadow Copies
Using Shadow Copies
Editing a Shadow Copy Schedule
Accessing Shadow Copies
Defragmenting a Volume Containing Shadow Copies
Drive Configurations
Disk and Volume Management
Managing Your Disks and Volumes
Software-RAID NAS System Drive Configuration
Software RAID Default Hard-Drive Partitions
Hardware-RAID NAS System Drive Configuration
Front-Panel RAID Volume LED Codes
Hardware RAID Default Hard-Drive Partitions
External Storage NAS System Drive Configuration
Hard Drive Condition LED Status Indicator Pattern
Front Panel Hard-Drive LED Codes
Launching Array Manager From the NAS Manager
Using Array Manager to Manage Disk Arrays
Array Manager Console
Managing Disk Arrays
Reconfiguring a Virtual Disk
Reconfiguring and Managing Virtual Disks
Click Reconfigure
Creating Virtual Disks
Using Check Consistency
Using Change Policy
Properties
Click Check Consistency
Disk Commands
Unassign Global Hot Spare
Assign Global Hot Spare
Prepare to Remove
Click Assign Global Hot Spare
General Controller Commands
Enclosure Management
Enclosure Commands
Managing Volumes Using Disk Management
Disk Management
Monitoring Disk Reliability
Initializing a Disk
Accessing the Disk Management Tool
Upgrading a Basic Disk to a Dynamic Disk
Reactivating Dynamic Disks
Checking Partition or Volume Properties
Volume Overview
Formatting a Partition or Volume
Merging Foreign Disks
Working With Dynamic Volumes
Deleting a Partition or Volume
Creating a Dynamic Volume
Extending a Dynamic Simple or Spanned Volume
On Disk Device Properties, click the Policies tab
Dell OpenManage Server Administrator
Integrated Features
Systems Management
Using Remote Access Controllers
Accessing Server Administrator
Additional Information About Server Administrator
Reinstalling the RAC Software
Accessing a RAC From the NAS Manager
Additional Information About RACs
Click Remote Connect
Configuring Snmp Properties
Alert Log Messages From Server Administrator
Configuring Snmp Community Properties
Configuring Snmp Agent Properties
Back to Contents
System-State Backup
Backing Up the System
Backing Up System-State Data
Windows Backup and Restore Tools
Backing Up Data Volumes
Third-Party Backup Software
Using Third-Party Backup Software for Network Backups
Yosemite TapeWare
Veritas Backup Exec
Click Update Driver
Page
Server for Network File System NFS
Configuring Systems in a Heterogeneous Environment
NFS Write Cache
User Name Mapping
Simple Maps
Configuring User and Group Mappings
Click Sharing Protocols
Click User and Group Mappings
Explicit User Maps
Managing NFS Share Access
Click Shares, and click Sharing Protocols
Click Client Groups
Filename Character Translation
Basic Scenarios
Workgroup
Domain
Services for Macintosh
Enabling the AppleTalk Protocol
Disabling the AppleTalk Protocol
Microsoft UAM Volume
Configuring the AppleTalk Protocol
Adapter Bindings
AppleTalk Protocol Adapter Binding
Installing User Authentication
Restarting Workstation Services
Sharing Netware Volumes
Services for the Novell NetWare Operating System
Configuring the NWLink IPX/SPX Compatible Protocol
Viewing Netware System Properties
Microsoft Directory Synchronization Services
Configuring the IPX Protocol
Close the Network and Dial-Up Connections window
Windows Server 2003 Msdss Domain Controller
Outline of the Msdss Deployment Procedure
Small Environment
Click Migration
On the Migrate tab, click Migrate
Medium-Sized or Large Environment
Page
Advanced Features
Using the NAS Utilities
Installing Multilanguage User Interface MUI Support
Network Adapter Teaming
Applying the MUI Language
Control Panel, double-clickRegional and Language Options
Adapter Fault Tolerance
Switch Fault Tolerance
Adaptive Load Balancing
Receive Load Balancing
Removing an Intel PROSet II Adapter From a Network Team
Removing Intel PROSet II Network Teams
Authentication
Changing the Intel PROSet II Network Team Mode
Administration
Telnet Server
Using Secure Sockets Layer
Using Remote Desktop to Enable FTP Write Privileges
Using Remote Desktop to Delete FTP Shares
Using a Custom Certificate
PowerVault 745N Certificate
Introduction to SSL Certificates
Server Certificates
Using DFS
Administration Properties window, click Directory Security
Creating a Standalone DFS Root
Creating Shares in DFS
Creating a Domain-Integrated DFS Root
Back to Contents
Standard Security Recommendations
Security Recommendations
Maximum Security Recommendations
Additional Security Recommendations
On the Shares page, click Sharing Protocols
Click Security Click Disable Web Sharing