Manuals
/
Dukane
/
Computer Equipment
/
Projector
Dukane
8943, 8918
user manual
Specifications
Models:
8918
8943
1
70
137
137
Download
137 pages
15.34 Kb
67
68
69
70
71
72
73
74
Troubleshooting
Specs
Error codes
Selecting an input signal
Password
Lamp Error
Typical Symbols
Regarding the indicator lamps
Connecting your devices
Maintenance
Page 70
Image 70
Specifications
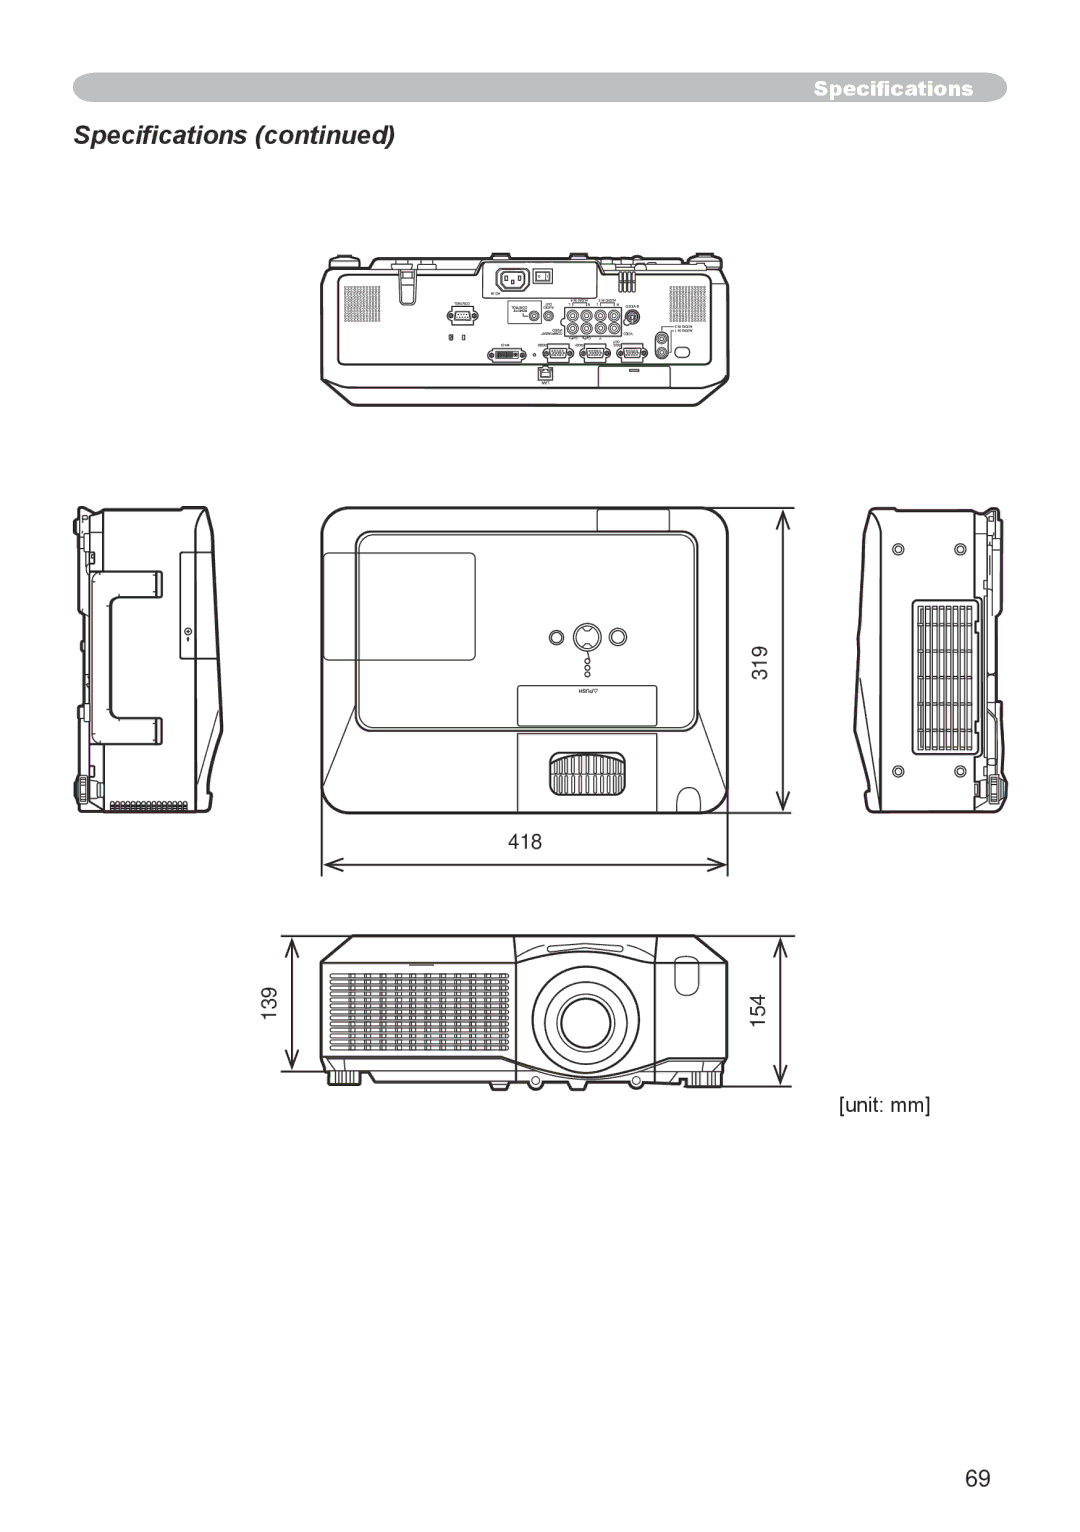
Specifications (continued)
319
418
139
154
[unit: mm]
69
Page 69
Page 71
Page 70
Image 70
Page 69
Page 71
Contents
USER’S Manual
Thank you for purchasing this projector
About this manual
Trademark acknowledgment
Content
Contents of package
Fastening the lens cover
HOT!4
Part names
Projector
HOT
M1-D port 10
Control panel
Rear panel
Video port 10
Laser pointer 13 It is a beam outlet
Remote control
Back Remote control
Enter button to push down the center point
Setting up
Suspended from the ceiling
Arrangement
On a horizontal surface
Down
Security bar Anti-theft chain or wire Security slot
Adjusting the projectors elevator
Using the security bar and slot
Foot
Signal source Remote control Speakers
Connecting your devices
VCR/DVD player
Connecting your devices
About Plug-and-Play capability
Connecting power supply
AC inlet Connector of the power cord to the outlet
Putting batteries
Remote control
Laser pointer
Laser button
About the remote control signal
Changing the frequency of remote control signal
Using as a wired remote control
Using as a simple PC mouse & keyboard
Turning off the power
Power on/off
Turning on the power
Power switch is turned on after the power was turned off by
Operating
Adjusting the volume
Selecting an input signal
Temporarily muting the sound
Selecting an input signal
Searching an input signal
Selecting an aspect ratio
Using the automatic adjustment feature
Adjusting the zoom and focus
Adjusting the lens shift
For a video signal or s-video signal
Correcting the keystone distortions
Adjusting the position
Remote control. a dialog will appear on
Press the Keystone button on
Freezing the screen
Using the magnify feature
Press the on button of Magnify on the remote control
Magnify indication will appear on the screen
Temporarily blanking the screen
Advanced Menu
Using the menu function
Enter button
Easy Menu
Easy Menu
Picture Menu
Gamma
Custom and then pressing the button or
Using the / buttons switches the color temperature mode
Picture Menu
Color Temp
MY Memory
Active Iris
LOAD1, LOAD2, LOAD3, LOAD4
SAVE1, SAVE2, SAVE3, SAVE4
Over Scan
Image Menu
Position
Image Menu
Phase
Auto Adjust
Size
3D-YCS
Input Menu
Progressive
Color Space
Video Format
Input Menu
Component
M1-D
Frame Lock
RGB
Resolution
Custom Resolution BOX
Function may not work correctly
Setup Menu
Some input, this function may not work well
Function may not work well
Brightness are reduced
Setup Menu
Normal ó Whisper
Normal ó Hinvert ó Vinvert ó H&VINVERT
Audio Menu
Screen Menu
Using the /// buttons adjusts the menu position
Using the / buttons switches the mode for the blank screen
Or keep no operation for about 10 seconds
Screen Menu
Start UP
Capturing error has occurred. Please try again
MyScreen registration is finished
Message
Source Name
Auto Search
Option Menu
Auto on
Auto OFF
Option Menu
Lamp Time
Performs automatic keystone distortion correction 35
Service
Using the / buttons switches the rotation speed
FAN Speed
Filter Message
Ghost
Lens Type
Remote Receiv
Factory Reset
KEY Lock
Remote Freq
Changing the Password
Using Security Features
Inputting the Password
Security
Turning on the MyScreen Password
Using the MyScreen Password Function
Description If you have forgotten your Password
Setting the Password
Turning the Password off
Using the PIN Lock Function
Registering the PIN Code
Turning Off the PIN Lock Function
If you have forgotten your PIN Code
Setting the Transition Detector Password
Using the Transition Detector Function
Turning On the Transition Detector Function
Setting the Transition Detector off
BOX
Network Menu
Difference
Network Menu
Time
Date and Time
Refer to the separate volume on Network Functions
Network functions
Lamp
Maintenance
Case of replacement by yourself
Type number = Replacing the lamp
Lamp
Lamp
Type number = MU03642 Cleaning the air filter
Air filter
Air filter
Take the old battery out
Internal clock battery
Will come up. Remove the battery Put a new battery
Maintenance
Internal temperature is rising
Troubleshooting
There is no input signal
Related messages
Regarding the indicator lamps
Regarding the indicator lamps
Signal cables are not correctly connected
Electrical power cord is not plugged
Power switch is not set to the on position
Signal source does not correctly work
Color settings are not correctly adjusted
Volume is adjusted to an extremely low level
Audio setting is not correct
Color Space setting is not suitable
Whisper function is working
Not properly adjusted
Either the focus and/or horizontal phase settings are
Lamp is approaching the end of its product Lifetime
Warranty and after-service
Specification
Specifications
Example of computer signal
Initial set signals
Connection to the ports
At RGB signal
M1-D
Mini DIN 4pin jack Pin
Connection to the ports
RCA jack MVrms 47kΩ terminator
Ø3.5 stereo mini jack MVrms 47kΩ terminator
Ø3.5 stereo mini jack MVrms 1kΩ output impedance
RJ-45 jack Pin Signal
Communications setting
Connecting the cable
RS-232C Communication
Using the projector default settings Reset Command
Requesting projector status Get command
Changing the projector settings Set command
Increasing the projector setting value Increment command
Be EF
CRC
Be EF EA F5
Be EF CE D6
Normal Be EF
Be EF B6 CD
Be EF CE FE
High Be EF
English Be EF
C2 FF
Freeze
User’s Manual Network Functions
Controlling the Projector via Scheduling
Failure & Warning Alerts via E-mail
Projector Management via Snmp
Still Image Transfer
Before using the network functions…
If using a network with Dhcp enabled
Configuring and controlling the projector via a web browser
Configuring and controlling the projector via a web browser
Settings
Https//192.168.1.10 into
Displays the Dhcp configuration settings
Network Information
Dhcp on
Network Settings
Displays and configures network settings
Dhcp OFF
Displays and configures communication port settings
Port Settings
Click the Apply button to save the settings
Mail Settings
Displays and configures e-mail addressing settings
Alert Settings
Displays and configures failure & warning alerts
Temp Error
Alert Settings
Lamp Error
Air Flow Error
Cool Error
Lamp Time Error
Filter Error
Lamp Time Alarm
Other Error
Schedule Execution Error
Alarm Time
Authentication Failure
Filter Time Alarm
Transition Detector Alarm
Change the Lamp is
Schedule Settings
Displays and configures schedule settings
Schedule Setting
Displays and configures the date and time settings
Date/Time Settings
Parameter
Date/Time Settings
Sntp
Security Settings
Snmp
Security Settings
Network Control
Community Name
Projector Control
Projector Control
Projector Control
Selects the 3D-YCS setting
Performs the Automatic keystone distortion correction
Screen
Description Audio
Option
Network Restart
Displays and configures the current projector status
Projector Status
Logoff
10
Failure & Warning Alerts via E -mail
Example If the IP address of the projector is set to
Mail Settings
Configure the following items via a web browser to use Snmp
Snmp settings
Projector management via Snmp
Controlling the Projector via Scheduling
Date/Time Settings 18
Date/Time setting can be adjusted via a web browser
Schedule Settings 16
Schedule settings can be configured from a web browser
Communication Port
Shot Still Image Transfer Settings
Shot Still Image Transfer Display
Following port is used for e-SHOT TCP #9716
Shot Still Image Transfer Settings
Shot Still Image Transfer Transmission
Command Control via the Network
Command Control Settings 9
Command Control Settings
20
Header Data RS-232Ccommand
Command format
Reply Error code
Send Data format
Reply Data format
Authentication
Automatic Connection Break
Read this Safety Guide first
Typical Symbols
Do not insert liquids or foreign object
Never use the projector if a problem should occur
Use special caution for children and pets
Never disassemble and modify
Be cautious of the power cord connection
Be cautious of High temperatures of the projector
Never look through the lens or openings when the lamp is on
Be sure to connect with ground wire
Be careful in handling the battery of the remote control
Be careful in handling the light source lamp
Do not put anything on top of the projector
Avoid a high temperature environment
Be careful in moving the projector
Avoid a smoky, humid or dusty place
Take care of the cabinet and the remote control
Remove the power cord for complete separation
Do not give the remote control any physical impact
Take care of the lens
Connecting with notebook computer
About displaying characteristic
Turn the power on/off in right order
About consumables
Damaging the lamp
Clean the projector or replace the lamp yourself
Projector vents, or get it in your eyes or mouth
Bulb is not broken
FCC Statement Warning
For the Customers in Canada
Audio Visual Products
Top
Page
Image
Contents