XP-620 Users Guide
Page
Contents
Placing Originals on the Product
Loading Paper
Copying
Printing from a Computer
Multi-Page Printing Options Windows
Scanning 108
187
Using Memory Cards With Your Product 173
Printing Personalized Projects 197
Printing on CDs/DVDs 203
Replacing Ink Cartridges 217
Adjusting Print Quality 231
Solving Problems 247
244
Page
Technical Specifications 288
298
XP-620 Users Guide
Using the Control Panel
Control Panel Buttons and Lights
Parent topic Product Basics
Using the LCD Screen
Adjusting Control Panel Position
Changing LCD Screen Language
Turning Off Control Panel Sounds
Product Parts Locations
Turning On Quiet Mode
Product Parts Front
Product Parts Top
Parent topic Product Parts Locations
Product Parts Inside
USB port
Product Parts Back
Changing the Power Off Timer Setting from the Control Panel
Power Off and Sleep Timers
Changing the Sleep Timer Setting from the Control Panel
Parent topic The Power Off and Sleep Timers
Select Printer Settings
Changing the Power and Sleep Timer Settings Windows
Changing the Power and Sleep Timer Settings OS
Using Epson Email Print
Epson Connect Solutions for Smartphones, Tablets, and More
Using the Epson iPrint Mobile App
Related topics
Using Epson Scan to Cloud
Using Epson Remote Print
Using AirPrint
Related tasks
Parent topic Product Basics Related tasks
Select the Google Cloud Print Services option Click Register
Using Google Cloud Print
Click Add Device
Setting Up Google Cloud Print on a Chromebook
Wi-Fi Infrastructure Mode Setup
Wi-Fi Networking
Selecting Wireless Network Settings from the Control Panel
Page
Access point mode
Wi-Fi Direct Mode Setup
Peer-to-peer mode
Enabling Wi-Fi Direct Mode
Page
Wi-Fi Protected Setup WPS
Printing a Network Status Sheet
Using WPS to Connect to a Network
Page
Accessing the Web Config Utility
Changing a USB Connection to a Wi-Fi Connection
Changing or Updating Network Connections
Connecting to a New Wi-Fi Router
Disabling Wi-Fi Features
Related concepts
Parent topic Changing or Updating Network Connections
Loading Paper in Cassette 1 Upper Cassette
Loading Paper
Page
Page
Page
Parent topic Loading Paper Related references
Loading Paper in Cassette 2 Lower Cassette
Page
Page
Page
Page
Selecting the Paper Settings for Each Source Control Panel
Select Paper Size
Turning Off the Paper Setting Alert
Select Paper Type
Parent topic Loading Paper
Paper Loading Capacity
Available Epson Papers
Paper Type Size Part number Sheet count
Borderless Paper Type Compatibility
Borderless Paper Types
Borderless Paper Sizes
For this paper Select this paper Type or Media Type setting
Paper or Media Type Settings
Parent topic Loading Paper
Placing Originals on the Scanner Glass
Placing Originals on the Product
Parent topic Placing Originals on the Product
Copying Documents or Photos
Copying
Paper Type Settings Copying
Paper type loaded Paper Type setting
Parent topic Copying Related references
Copying Options
Paper Size Settings Copying
Page
Copying and Restoring Photos
Page
Parent topic Copying Related references
Printing with Windows
Selecting Basic Print Settings Windows
Page
Related references
Paper Source Options Windows
More Settings
Auto Cassette Selection
Cassette 1 Cassette
Multi-Page Printing Options Windows
Selecting Double-sided Printing Settings Windows
Up and 4-Up
×1 Poster, 2×2 Poster, 3×3 Poster, 4×4 Poster
Page
Double-sided Printing Options Windows
Binding Edge Options
Print Density Adjustments Windows
Binding Margin Options
Start
Selecting Additional Layout and Print Options Windows
Page
Custom Color Correction Options Windows
Color Controls
Fix Photo
Image Options and Additional Settings Windows
No Color Adjustment
Additional Settings Options Rotate 180º
Header/Footer Settings Windows
Click the Main or More Options tab
Selecting a Printing Preset Windows
Parent topic Printing with Windows
Click the Extended Settings button
Selecting Extended Settings Windows
Enable Epson Status Monitor
Extended Settings Windows
Show Progress Meter
Check Paper Width Before Printing
Printing Your Document or Photo Windows
Related tasks
Checking Print Status Windows
Selecting Default Print Settings Windows
Changing the Language of the Printer Software Screens
Select Software Update Settings
Changing Automatic Update Options
Printing with OS
Selecting Basic Print Settings OS
Page
Page
Related references
Paper Source Options Mac OS
Print Quality Settings OS
Fast Economy
Economy
Grayscale
Selecting Page Setup Settings OS
Selecting Print Layout Options OS
Selecting Double-sided Printing Settings OS
Double-sided Printing Options and Adjustments Mac OS
Managing Color OS
Adjustments Print Density
Two-sided Printing Options Long-Edge binding
Short-Edge binding
Color Matching Settings Epson Color Controls
Color Matching and Color Options OS
ColorSync
Off No Color Adjustment
Color Options Settings Manual Settings
Selecting Printing Preferences OS
Select Driver or Options
Quiet Mode
Printing Preferences OS
Permit temporary black printing
Printing Your Document or Photo OS
Automatic Cassette Switching
High Speed Printing
Establish bidirectional communication
Checking Print Status OS
OS X 10.6/10.7
OS X 10.8/10.9
Cancelling Printing Using a Product Button
Starting a Scan Using the Product Control Panel
Starting a Scan
Parent topic Scanning Related tasks
109
Scan to Memory Card Available options Description Setting
Scan to Memory Card Options
JPG for photos
Starting a Scan Using the Epson Scan Icon
Changing Default Scan Button Settings
Click Make Job Settings
112
You see an Epson Scan window like this
Starting a Scan from a Scanning Program
Select your product You see an Epson Scan window like this
Scan Modes
Selecting Epson Scan Settings
Scanning in Full Auto Mode
Selecting the Scan Mode
You see this window
119
Available Image Adjustments Full Auto Mode
Scanning in Home Mode
Dust Removal
Color Restoration
121
Image Preview Guidelines Scan Resolution Guidelines
Selecting a Scan Area Home Mode
124
125
Descreening
Available Image Adjustments Home Mode
Backlight Correction
Selecting a Scan Size Home Mode
Text Enhancement
Auto Area Segmentation
128
129
Scanning in Office Mode
Selecting a Scan Area Office Mode
132
Unsharp Mask
Available Image Adjustments Office Mode
Color Enhance
Scanning in Professional Mode
135
136
Selecting a Scan Area Professional Mode
Available Image Types Professional Mode
Bit Color
Color Smoothing
138
139
Available Image Adjustments Professional Mode
Auto Exposure
Histogram Adjustment
Tone Correction
Saturation
Selecting a Scan Size Professional Mode
143
144
Image Preview Guidelines
Scan Resolution Guidelines
Thumbnail preview
Normal preview
146
Selecting Scan File Settings
File Formats Bitmap *.bmp
Available Scanned File Types and Optional Settings
Jpeg *.jpg
Multi-TIFF *.tif
Scanning with OS X Using Image Capture
150
Available Scan Settings OS X Image Capture
Scanning Special Projects
Image Correction
Scanning Using Easy Photo Scan
Scanning to Online Destinations Using Easy Photo Scan
153
Uploading Scanned Images to Facebook
155
Uploading Scanned Images to Picasa
157
Uploading Scanned Images to Evernote
159
Uploading Scanned Images to SugarSync
161
Uploading Scanned Images to a Web Folder
163
Uploading Scanned Images to Email
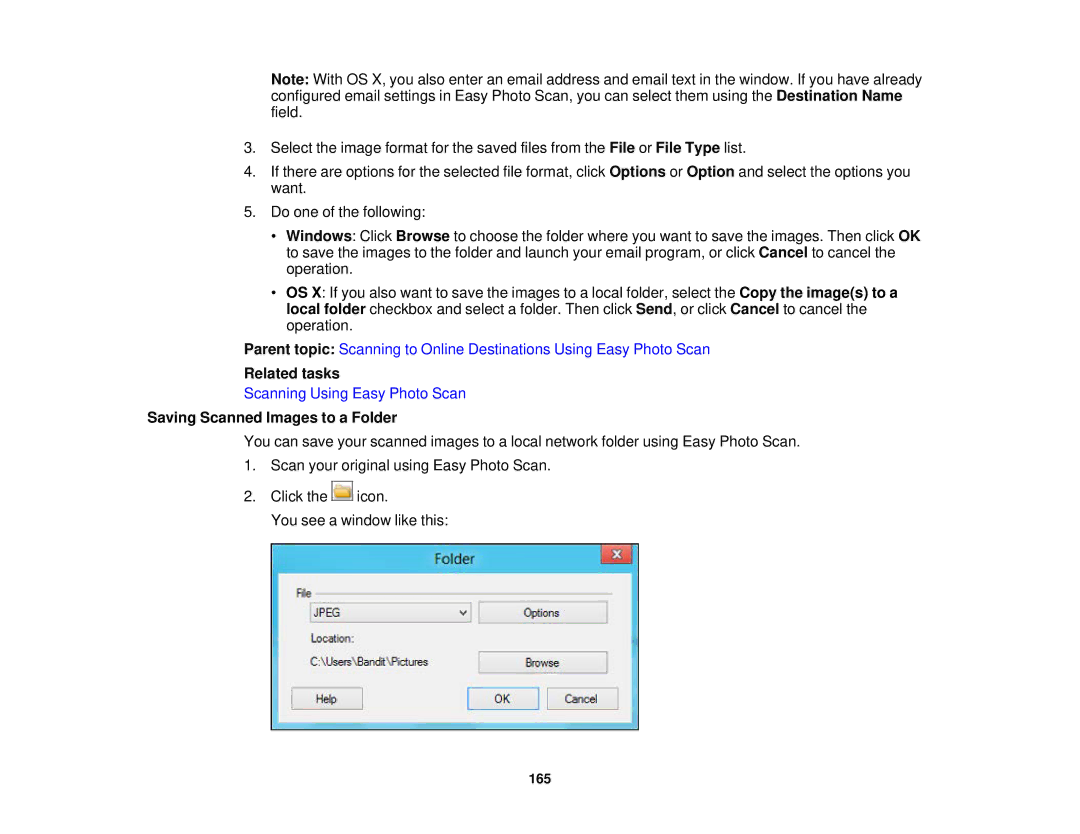
Saving Scanned Images to a Folder
Setting Description Image Quality Options
Epson Jpeg File Settings
Setting Description Encoding
Epson Tiff and Multi-TIFF File Settings
Embed ICC Profile
Compression
Setting Description Byte Order
169
170
Restoring Photo Colors as You Scan
172
Inserting a Memory Card
Using Memory Cards With Your Product
Memory Card File Specifications
Memory Card Types
File format
Removing a Memory Card
Printing from a Memory Card
Viewing and Printing Photos
Viewing and Printing Photos
177
Print Setting Options Memory Card
Photo Adjustment Options Memory Card
Paper Source Cassette
Print settings Available Description Options Paper Size
1Cassette
Quality Draft
Printing Photo Layouts From a Memory Card
181
Picture Package
Photo Layout Options
Up, 4-up, 8-up, or 20-up
Upper ½ or Lower ½
Jewel Index
Printing Photo Greeting Cards
Creating and Printing a Greeting Card Template
Printing a Greeting Card from a Template
Print Photo Greeting Card Print Greeting Cards
Transferring Photos from a Memory Card to Your Computer
Transferring Photos on a Memory Card
Inserting a Memory Card Removing a Memory Card
Printing from a Camera
Selecting Print and Photo Adjustment Settings
188
189
Print settings Available options Description Paper Size
Print Settings Camera
191
Photo Adjustments Camera
Connecting and Printing from a Camera
Printing from a Camera Wirelessly
Connecting and Using a USB Flash Drive or External Device
USB Device File Specifications
Loading Paper Viewing and Printing Photos
Printing Coloring Book Pages
Printing Personalized Projects
Printing Personalized Note Paper
199
Printing Lined Paper, Graph Paper, and Music Sheets
Printing Calendar Pages
202
Loading a CD/DVD
CD/DVD Printing Features
204
205
Removing a Printed CD/DVD
Placing a CD/DVD on the Scanner Glass
Copying onto a CD/DVD
Printing Photos from a Memory Card Onto a CD/DVD
Printing a Jewel Case Insert from a Memory Card
211
Starting Epson Print CD Windows
Printing on CDs/DVDs from a Computer
Starting Epson Print CD OS
Printing Your CD/DVD Design Windows
Printing Your CD/DVD Design OS
216
Checking Cartridge Status on the LCD Screen
Check Cartridge Status
Checking Cartridge Status with Windows
219
220
Checking Cartridge Status with OS
Ink Cartridge Part Numbers
Purchase Epson Ink Cartridges
Ink color Part number Standard-capacity High-capacity
Removing and Installing Ink Cartridges
224
225
226
Printing with Black Ink and Expended Color Cartridges
Printing with Expended Color Cartridges OS
Printing with Expended Color Cartridges Windows
Select On as the Permit temporary black printing setting
Conserving Low Black Ink with Windows
Print Head Maintenance
Checking the Nozzles Using the Product Control Panel
Print Head Nozzle Check
232
Checking the Nozzles Using a Computer Utility
Print head is clean Print head needs cleaning
234
Print Head Cleaning
Cleaning the Print Head Using the Product Control Panel
Cleaning the Print Head Using a Computer Utility
238
Print Head Alignment
Aligning the Print Head Using the Product Control Panel
Aligning the Print Head Using a Computer Utility
Select Print Head Alignment
Cleaning the Paper Path
Transporting Your Product
Cleaning Your Product
245
Print Head Cleaning Print Head Alignment
Checking for Software Updates
Solving Problems
Product Status Messages
LCD screen message Condition/solution
Running a Product Check
250
Resetting Control Panel Defaults
Solving Setup Problems
Noise After Ink Installation
Software Installation Problems
Solving Network Problems
Control Panel Setup Problems
Product Cannot Connect to a Wireless Router or Access Point
Parent topic Solving Network Problems
Product Does Not Appear in OS X Printer Window
Network Software Cannot Find Product on a Network
Cannot Print Over a Network
Cannot Scan Over a Network
Solving Copying Problems
Product Makes Noise When It Sits for a While
Product Makes Noise, But Nothing Copies
Paper Feeding Problems
Solving Paper Problems
Paper Jam Problems Inside the Product
Paper Jam Problems in the Paper Cassette
Paper Jam Problems in the Auto Duplexer
263
Paper Ejection Problems
Nothing Prints
Solving Problems Printing from a Computer
Product Icon Does Not Appear in Windows Taskbar
Printing is Slow
Error After Cartridge Replacement
Always Spool RAW Datatype Rendering Mode Print as Bitmap
Solving Page Layout and Content Problems
Inverted Image
Too Many Copies Print
Blank Pages Print
Border Appears on Borderless Prints
Incorrect Margins on Printout
Incorrect Image Size or Position
Incorrect Characters Print
Slanted Printout
Solving Print Quality Problems
Blurry or Smeared Printout
White or Dark Lines in Printout
274
Grainy Printout
Faint Printout or Printout Has Gaps
Incorrect Colors
Scanning Software Does Not Operate Correctly
Solving Scanning Problems
Cannot Start Epson Scan
Image Consists of a Few Dots Only
Solving Scanned Image Quality Problems
Line of Dots Appears in All Scanned Images
Straight Lines in an Image Appear Crooked
Image is Distorted or Blurry
Image Colors are Patchy at the Edges
Auto Exposure Brightness Histogram Adjustment
Image is Too Dark
Back of Original Image Appears in Scanned Image
Scanned Image Colors Do Not Match Original Colors
Scan Area is Not Adjustable in Thumbnail Preview
Scanned Image Edges are Cropped
Solving Memory Card Problems
Memory Card Does Not Fit Into a Slot
Cannot View or Print Photos from a Memory Card or Device
When to Uninstall Your Product Software
Uninstalling Product Software Windows
Cannot Transfer Photos To or From a Memory Card or Device
Disconnect any interface cables Do one of the following
Windows 8.x Select Epson Event Manager and click Uninstall
Uninstalling Product Software OS
Where to Get Help
Click Uninstall
Internet Support Speak to a Support Representative
Purchase Supplies and Accessories
Windows System Requirements
Technical Specifications
OS X System Requirements
Scanning Specifications
Printable Area Specifications
Paper Specifications
Weight
Color depth
Single sheets borderless printing
Single sheets normal printing
Envelopes
Ink Cartridge Specifications
Color
Cartridge life
Memory Card Specifications
Temperature
Compatible types/Maximum capacities Voltage requirements
Dimension Specifications
External USB Device Specifications
Height
Width
Electrical Specifications
Environmental Specifications
Interface Specifications
Safety and Approvals Specifications
Network Interface Specifications
297
General Product Safety Instructions
299
Parent topic Notices
Ink Cartridge Safety Instructions
Wireless Connection Safety Instructions
LCD Screen Safety Instructions
FCC Compliance Statement
For United States Users
Software Notice
Trademarks
For Canadian Users
LibTIFF Software Acknowledgment
Copyright Notice
Copyright Attribution
Default Delay Times for Power Management for Epson Products