|
| Getting Started | 1 | |
|
| Operating the Controls | ||
|
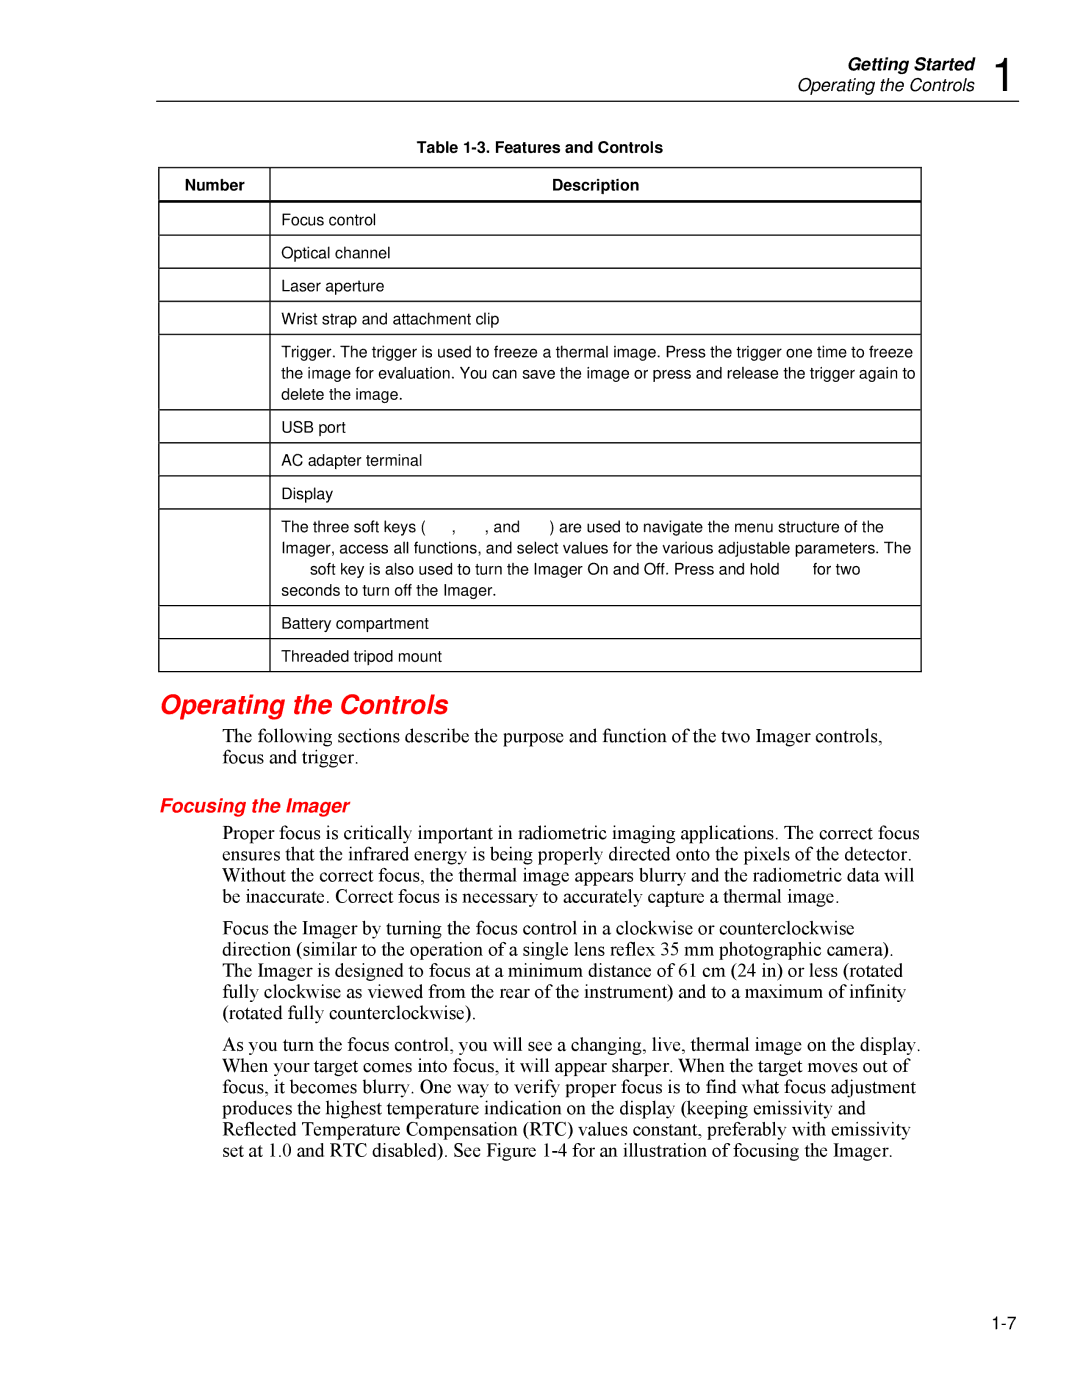
| Table |
| |
|
|
|
|
|
| Number | Description |
|
|
|
|
|
|
|
| A | Focus control |
|
|
|
|
|
|
|
| B | Optical channel |
|
|
|
|
|
|
|
| C | Laser aperture |
|
|
|
|
|
|
|
| D | Wrist strap and attachment clip |
|
|
|
|
|
|
|
| E | Trigger. The trigger is used to freeze a thermal image. Press the trigger one time to freeze |
|
|
|
| the image for evaluation. You can save the image or press and release the trigger again to |
|
|
|
| delete the image. |
|
|
|
|
|
|
|
| F | USB port |
|
|
|
|
|
|
|
| G | AC adapter terminal |
|
|
|
|
|
|
|
| H | Display |
|
|
|
|
|
|
|
| I | The three soft keys (F, G, and H) are used to navigate the menu structure of the |
|
|
|
| Imager, access all functions, and select values for the various adjustable parameters. The |
|
|
|
| Gsoft key is also used to turn the Imager On and Off. Press and hold Gfor two |
|
|
|
| seconds to turn off the Imager. |
|
|
|
|
|
|
|
| J | Battery compartment |
|
|
|
|
|
|
|
| K | Threaded tripod mount |
|
|
|
|
|
|
|
Operating the Controls
The following sections describe the purpose and function of the two Imager controls, focus and trigger.
Focusing the Imager
Proper focus is critically important in radiometric imaging applications. The correct focus ensures that the infrared energy is being properly directed onto the pixels of the detector. Without the correct focus, the thermal image appears blurry and the radiometric data will be inaccurate. Correct focus is necessary to accurately capture a thermal image.
Focus the Imager by turning the focus control in a clockwise or counterclockwise direction (similar to the operation of a single lens reflex 35 mm photographic camera). The Imager is designed to focus at a minimum distance of 61 cm (24 in) or less (rotated fully clockwise as viewed from the rear of the instrument) and to a maximum of infinity (rotated fully counterclockwise).
As you turn the focus control, you will see a changing, live, thermal image on the display. When your target comes into focus, it will appear sharper. When the target moves out of focus, it becomes blurry. One way to verify proper focus is to find what focus adjustment produces the highest temperature indication on the display (keeping emissivity and Reflected Temperature Compensation (RTC) values constant, preferably with emissivity set at 1.0 and RTC disabled). See Figure
