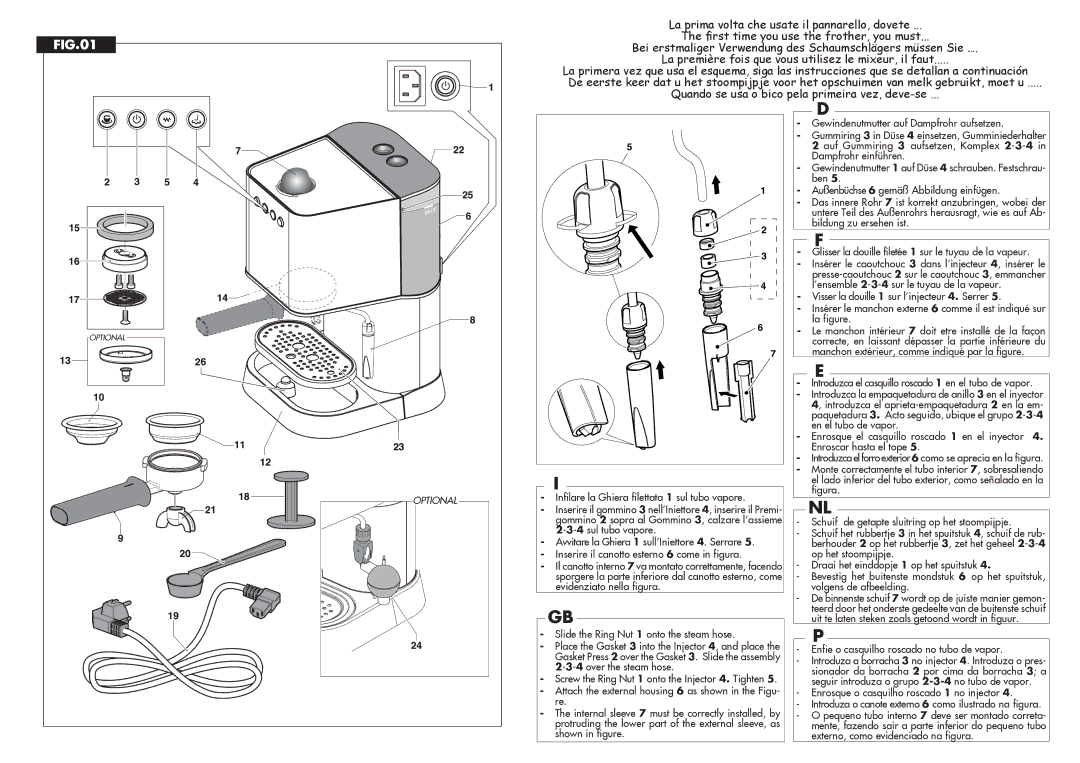
La prima volta che usate il pannarello, dovete ...

The first time you use the frother, you must...

Bei erstmaliger Verwendung des Schaumschlägers müssen Sie ….

La première fois que vous utilisez le mixeur, il faut.....

La primera vez que usa el esquema, siga las instrucciones que se detallan a continuación

De eerste keer dat u het stoompijpje voor het opschuimen van melk gebruikt, moet u .....

Quando se usa o bico pela primeira vez, deve-se ...

5

1

2

3

4

6

7

I

-Infilare la Ghiera filettata 1 sul tubo vapore.

-Inserire il gommino 3 nell’Iniettore 4, inserire il Premi- gommino 2 sopra al Gommino 3, calzare l’assieme 2-3-4sul tubo vapore.

-Avvitare la Ghiera 1 sull’Iniettore 4. Serrare 5.

-Inserire il canotto esterno 6 come in figura.

-Il canotto interno 7 va montato correttamente, facendo sporgere la parte inferiore dal canotto esterno, come evidenziato nella figura.

GB

-Slide the Ring Nut 1 onto the steam hose.

-Place the Gasket 3 into the Injector 4, and place the Gasket Press 2 over the Gasket 3. Slide the assembly 2-3-4over the steam hose.

-Screw the Ring Nut 1 onto the Injector 4. Tighten 5.

-Attach the external housing 6 as shown in the Figu- re.

-The internal sleeve 7 must be correctly installed, by protruding the lower part of the external sleeve, as shown in figure.

D

-Gewindenutmutter auf Dampfrohr aufsetzen.

-Gummiring 3 in Düse 4 einsetzen, Gumminiederhalter 2 auf Gummiring 3 aufsetzen, Komplex 2-3-4in Dampfrohr einführen.

-Gewindenutmutter 1 auf Düse 4 schrauben. Festschrau- ben 5.

-Außenbüchse 6 gemäß Abbildung einfügen.

-Das innere Rohr 7 ist korrekt anzubringen, wobei der untere Teil des Außenrohrs herausragt, wie es auf Ab- bildung zu ersehen ist.

F

-Glisser la douille filetée 1 sur le tuyau de la vapeur.

-Insérer le caoutchouc 3 dans l’injecteur 4, insérer le presse-caoutchouc 2 sur le caoutchouc 3, emmancher l’ensemble 2-3-4sur le tuyau de la vapeur.

-Visser la douille 1 sur l’injecteur 4. Serrer 5.

-Insérer le manchon externe 6 comme il est indiqué sur la figure.

-Le manchon intérieur 7 doit etre installé de la façon correcte, en laissant dépasser la partie inférieure du manchon extérieur, comme indiqué par la figure.

E

-Introduzca el casquillo roscado 1 en el tubo de vapor.

-Introduzca la empaquetadura de anillo 3 en el inyector 4, introduzca el aprieta-empaquetadura 2 en la em- paquetadura 3. Acto seguido, ubique el grupo 2-3-4en el tubo de vapor.

-Enrosque el casquillo roscado 1 en el inyector 4. Enroscar hasta el tope 5.

-Introduzca el forro exterior 6 como se aprecia en la figura.

-Monte correctamente el tubo interior 7, sobresaliendo el lado inferior del tubo exterior, como señalado en la figura.

NL

-Schuif de getapte sluitring op het stoompijpje.

-Schuif het rubbertje 3 in het spuitstuk 4, schuif de rub- berhouder 2 op het rubbertje 3, zet het geheel 2-3-4op het stoompijpje.

-Draai het einddopje 1 op het spuitstuk 4.

-Bevestig het buitenste mondstuk 6 op het spuitstuk, volgens de afbeelding.

-De binnenste schuif 7 wordt op de juiste manier gemon- teerd door het onderste gedeelte van de buitenste schuif uit te laten steken zoals getoond wordt in figuur.

P

-Enfie o casquilho roscado no tubo de vapor.

-Introduza a borracha 3 no injector 4. Introduza o pres- sionador da borracha 2 por cima da borracha 3; a seguir introduza o grupo 2-3-4no tubo de vapor.

-Enrosque o casquilho roscado 1 no injector 4.

-Introduza o canote externo 6 como ilustrado na figura.

-O pequeno tubo interno 7 deve ser montado correta- mente, fazendo sair a parte inferior do pequeno tubo externo, como evidenciado na figura.

Page 2
Image 2
Gaggia Baby manual Enfie o casquilho roscado no tubo de vapor

Baby specifications

The Gaggia Baby is a stylish and compact espresso machine that appeals to both coffee aficionados and casual drinkers alike. Known for its reliability and performance, it has gained a dedicated following among home baristas who seek a café-quality espresso experience in the comfort of their kitchens.

One of the standout features of the Gaggia Baby is its high-pressure pump, which delivers up to 15 bars of pressure. This is crucial for extracting rich flavors from coffee beans, resulting in a full-bodied espresso with a thick crema on top. The machine is designed to work well with both ground coffee and ESE pods, providing versatility for users depending on their preference.

Another notable characteristic of the Gaggia Baby is its powerful stainless steel boiler. The boiler heats up quickly, allowing users to brew their espresso relatively quickly. For those who enjoy milk-based beverages, the machine is equipped with a steam wand that provides ample power for frothing milk, enabling the creation of delicious cappuccinos and lattes with ease. The wand is articulated, offering flexibility in angles that help create the perfect microfoam.

In terms of build quality, the Gaggia Baby stands out with its durable and compact design. The machine is made from robust materials, ensuring it can withstand regular use while maintaining its aesthetic appeal. Its elegant lines and polished finish make it an attractive addition to any kitchen counter.

The user-friendly interface features a simple control panel, which allows users to easily operate the machine. The Gaggia Baby includes a removable water reservoir, making refilling convenient. Additionally, the drip tray is adjustable and removable, which allows for easy cleaning and maintenance.

Technology-wise, the Gaggia Baby integrates user-friendly functionalities such as a temperature control system that ensures the brew temperature is optimal for various coffee types, enhancing flavor extraction. This attention to detail caters to both novices and experienced coffee makers who desire consistency with each cup.

In conclusion, the Gaggia Baby is a reliable and well-engineered espresso machine that delivers professional-level coffee right at home. With its impressive features, versatile capabilities, and stylish design, it is an excellent choice for anyone looking to elevate their coffee experience.