M375 M475
Page
Page
Trademark Credits
Copyright and License
Conventions used in this guide
Conventions used in this guide
Table of contents
Enww
Solve problems 111
135
Load Tray 1 Type SIZE, Press OK to use available media
Enww
Enww
218
Parts and diagrams 245
291
279
289
Enww
Index 313
List of tables
Xviii
List of figures
35 Remove the rear door simplex product 1
74 Reinstall the left cover 1
137 Remove the fuser 1 101
Rollers 124
Xxiv
Removal and replacement
Introduction
Removal and replacement strategy
Removal and replacement strategy
Required tools
Electrostatic discharge
Description Size Part Number
Types of screws
Common fasteners
After performing service
Service approach
Before performing service
Test 1 print-quality test
Post-service tests
Test 2 copy-quality test
Test 3 fax-quality test fax models only
2Parts removal order 1
Parts removal order
3Parts removal order 2 Removal and replacement
Transfer roller
Removal and replacement procedures
Rollers and pads
Pickup roller Tray 2 and Tray
4Remove the pickup roller 1
5Remove the pickup roller 2 Removal and replacement
6Remove the pickup roller 1
Separation roller Trays 2 or
Enww
9Reinstall the separation roller
Reinstall the separation roller
Document feeder pickup roller assembly
Pickup roller and separation pad Tray
13Remove the Tray 1 pickup roller 2 Removal and replacement
15Remove the Tray 1 separation pad
Print-cartridge drawer
Main assemblies
Enww
Dimm cover
Right cover
22Remove the right cover 3 Removal and replacement
24Remove the document feeder input tray 2
Document feeder input tray
25Remove the scanner assembly 1 Remove four screws callout
Scanner assembly
Enww
Right-front cover and power button
Enww
Rear-upper cover duplex product
30Remove the rear-upper cover 2 Removal and replacement
32Remove the feed assembly 2
Paper-feed guide assembly
Rear-door stopper and link caps simplex product
36Remove the rear door simplex product 2
Rear door simplex product
Enww
40Remove the rear door duplex product 2
Rear door duplex product
Enww
Remove the rear cover and feed guide simplex product
Rear cover and feed guide simplex product
Before proceeding, remove the following components
Remove three screws callout
Enww
Enww
Rear-lower cover and rear-door links duplex product
Enww
Enww
Enww
Remove the rear-door rib assembly duplex product
Rear-door rib assembly duplex product
Enww
58Replace the link guide simplex products
Link guide
Control panel and right-arm mount
63Reinstall the control panel and right-arm mount 1
Reinstall the control panel and right-arm mount
Enww
Remove the upper-cover assembly
Upper-cover assembly
Enww
69Reinstall the upper-cover assembly 2
Reinstall the upper-cover assembly
Enww
Remove the left cover
Left cover
73Remove the left cover 3 Removal and replacement
75Reinstall the left cover 2
Reinstall the left cover
Remove the front-door assembly
Front-door assembly
78Remove the front-door assembly 3
Enww
Enww
Push the black-plastic arm into the product
Reinstall the front-door assembly
85Remove the front-door assembly 10
Enww
89Remove the ITB 2
Intermediate transfer belt ITB
91Remove the ITB 4 Removal and replacement
93Remove the ITB 6
Reinstall the ITB
Diagnostics
95Remove motor M1 and motor M2 1
Drum motor M1 and developer motor M2
96Remove motor M1 and motor M2 2 Removal and replacement
97Remove motor M1 and motor M2 3
Release one tab callout
100Remove motor M1 and motor M2 6
Reinstall the drum motor M1 and developer motor M2
Intermediate PCA
Remove the formatter PCA and fax PCA
Formatter PCA and fax PCA
Replacing the formatter PCA before the DC controller PCA
104Remove the formatter 1 of 4 base model
106Remove the formatter 3 of 4 base model
108Remove the wirelss PCA 1 Remove the wireless PCA callout
Wireless PCA
Before you proceed, remove the following components
DC controller PCA
Replacing the DC controller PCA before the formatter PCA
110Remove the DC controller PCA 1
Remove the DC controller PCA
Enww
Remove the fuser-motor assembly
Fuser-motor assembly
Enww
Enww
Reinstall the fuser-motor assembly
117Remove the fuser-motor assembly 6
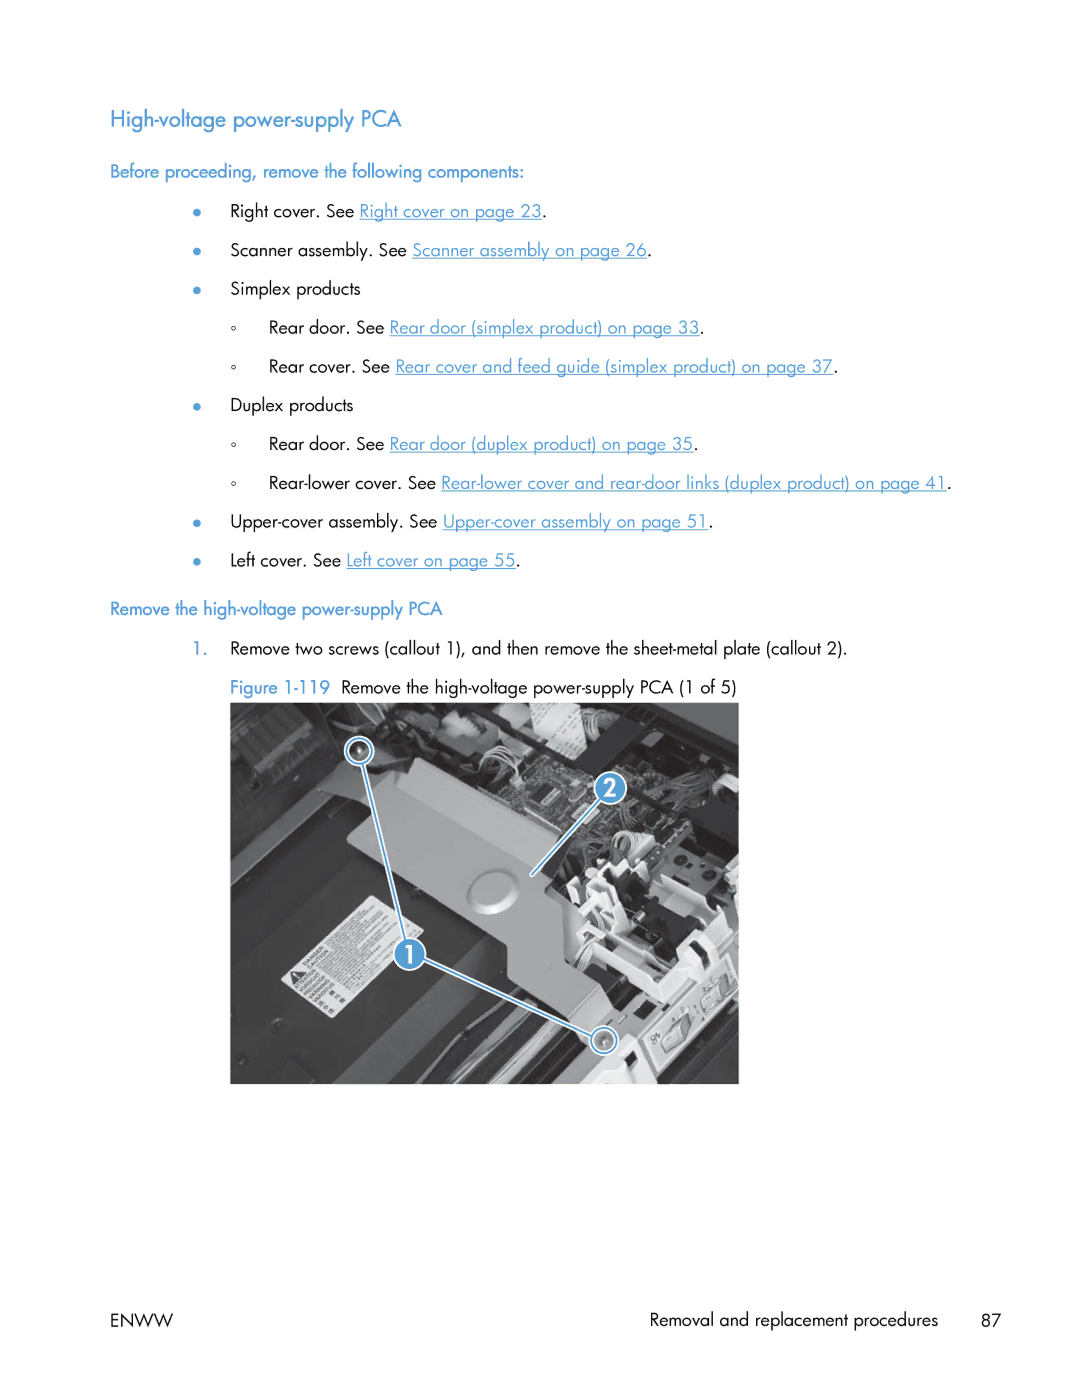
Remove the high-voltage power-supply PCA
High-voltage power-supply PCA
Enww
Enww
Remove the color-misregistration sensor assembly
Color-misregistration sensor assembly
126Remove the color-misregistration sensor assembly PCA 3
Reinstall the color-misregistration sensor assembly
127Remove the color-misregistration sensor assembly PCA 4
Enww
Fan FM1
131Remove the fan FM1 2
Remove the USB PCA
USB PCA fax/memory-card models
Remove the duplex-reverse drive assembly
Duplex-reverse drive assembly
Release the wire harnesses from the retainer callout
136Remove the duplex-reverse drive assembly 4
Fuser
137Remove the fuser 1
Remove the fuser
Enww
141Remove the fuser 5
142Remove the fuser 6
144Remove the fuser 8
145Reinstall the fuser Removal and replacement
Reinstall the fuser
Remove the paper-delivery assembly
Paper-delivery assembly
Enww
149Remove the paper-delivery assembly 4
Tray cassettes and optional Tray 3 assembly
Solve problems
Solve problems checklist
Print a menu map
Menu map
General topic Questions
Troubleshooting process
Pretroubleshooting checklist
Power-on checks
LED diagnostics
Troubleshooting tools
Component diagnostics
Control-panel tests
Component tests
Test the control-panel display
Test the control-panel buttons
Plug/jack locations
Diagrams
DC controller PCA
Location of connectors
Connector Board
Enww
1Major components
Location of major components
Major components
Enww
2Solenoid, sensors, and motors
Motors and fans
Item Description
Rollers
PCAs
PCAs
5Optional 250-sheet cassette
Optional 250-sheet cassette
General timing diagram
General circuit diagram
129
Asic diagram
HVT / Toneremp
Driver PCA1-1
Environment Sensor
FSR diagram
Diagram
Print the Configuration
Print quality troubleshooting
Service
Internal print quality test pages
Clean the paper path
Print-quality troubleshooting tools
Print the Service
Print the cleaning
Control panel menus
Setup Menu
Calibrate the product
Calibrate the product from the control panel
Menu item Description
HP Web Services menu
Reports menu
Menu item Sub-menu item Description
Quick Forms menu
Menu item Sub-menu item Description
Fax Setup menu
Menu item Sub-menu item
Private Receive Off
System Setup menu
Use the Y Shift setting to center the image from top to
Adjust Tray X1 Shift
Side on the first side of a two-sided
Bottom on
Off Supply Settings Black Cartridge Very Low Setting Prompt
Disable Fax
Product Security
USB Flash Drive
Print Black
Color Cartridges Very Low Setting Stop
Low Threshold Cyan Enter percentage Magenta
Yellow
Not on Supply
Store Usage Data On Supply
Courier Font Regular
Dark Color Copy
Service menu
Install Off
Restore
Defaults HP Smart
Network Setup menu
Copy menu
Function specific menus
Sets the product so that it communicates only with Web
ID Copy
Specifies the paper size and type
Fax menu
Jobs
Displays pending fax jobs,
Scan menu
Opens the Fax Setup menu
Interpret control panel messages
10.100X Supply Memory Error
Control panel message types
Control panel messages
Scanner Error
Error, Turn off then on
Fuser Error
Black Cartridge Low
Fan Error, Turn off then on
Error Turn off then on
Canceled send. Clear document
Canceled scan. Clear document
Black in wrong position
Black Very Low
Cyan Cartridge Low
Communication error
Cyan in wrong position
Cyan Very Low
Device is busy. Try again later
Device error, press OK
Document feeder door is open
Document feeder jam. Clear and reload
Engine error. Press OK to continue
Engine Communication Error
Document feeder mispick. Reload
Door open
Fax is busy. Redial pending
Fax is busy. Canceled send
Fax receive error
Fax storage is full. Canceling the fax receive
Fax Send error
Genuine HP supply installed
Fax storage is full. Canceling the fax send
Install color cartridge
Fit to Page on flatbed only
Invalid entry
Invalid driver Press OK
Jam in area, Open door and clear jam
Jam in Tray 1, Clear jam and then press OK
Load tray X Press OK for available media
Load Tray 1, Plain Size / Cleaning mode, OK to start
Magenta Cartridge Low
Magenta in wrong position
Manual feed Size TYPE, Press OK to use available media
Manual Duplex Load Tray 1, Press OK
Memory is low. Press OK
Memory is low. Try again later
Memory low Only 1 copy made. Press OK to continue
No fax answer. Canceled send
Misprint, Press OK
No dial tone
No fax detected
No fax answer. Redial pending
Scanner error #, Turn off then on
Print failure, press OK. If error repeats, turn off then on
Remove shipping lock from color cartridge
Remove shipping locks from cartridges
Settings cleared
Scanning error Cannot connect
Scanner reserved for PC scan
Unexpected size in tray # Load size Press OK
Unsupported color Press OK to continue
Used color installed, to accept press OK
Used color in use
Used supplies in use
Yellow Very Low
Event-log messages
Yellow in wrong position
Event log messages
Print the event log
7Event-log messages
Event code Description
Troubleshooting tools 177
Event-log-only messages
Description Solution
Event-log messages
8Event-log-only messages
Event code Description Solution
Jam locations
Clear jams
Common causes of jams
Clear jams from the document feeder
Enww
Clear jams in Tray
Enww
Enww
Clear jams in Tray
Clear jams in the fuser area
Clear jams in the output bin
Clear jams in the duplexer duplexing models only
Enww
Product does not pick up paper
Solve paper-handling problems
Product picks up multiple sheets of paper
Print quality examples
Solve image-quality problems
Problem Cause
AaBbCc
Problem Cause Solution
Severity of the defect
Continue Black
Color image defects
AaBbCc
Clean the pickup and separation rollers
Clean the product
Clean the paper path
Clean the paper path from the product control panel
Clean the scanner glass strip and platen
Clean the document feeder pickup rollers and separation pad
Clean the touch screen
Factors affecting print performance
Solve performance problems
Print speeds
Product does not print
Product does not print or it prints slowly
Product prints slowly
Solve direct-connect problems
Solve product connectivity problems
Solve network problems
Computer is using the incorrect IP address for the product
Computer is unable to communicate with the product
Solve wireless network problems
Computer or workstation might be set up incorrectly
Wireless connectivity checklist
Cannot connect more computers to the wireless product
Wireless network is not functioning
Network does not appear in the wireless networks list
Service menu
Service mode functions
Secondary service menu
Service menu settings
Secondary service menu structure
Open the secondary service menu
9Secondary service menu
Scan Calibration Calibrate
Nvram initialization
Product resets
Restore the factory-set defaults
Enww
Fax troubleshooting checklist
Solve fax problems
Enww
Communication error
Fax error messages
Document feeder door is open. Canceled fax
Fax is busy. Canceled send
Fax is busy. Redial pending
Fax receive error
Fax storage is full. Canceling the fax receive
Fax Send error
No dial tone
Fax storage is full. Canceling the fax send
No fax answer. Canceled send
No fax detected
No fax answer. Redial pending
Enww
Code number
View and interpret fax error codes
Troubleshoot fax codes and trace reports
Fax trace report
Fax logs and reports
Print individual fax reports
Print all fax reports
Set the fax-error-correction mode
Change error correction and fax speed
Set the fax error report
An error message displays on the control panel
Solve problems sending faxes
Communication error. message displays
Change the fax speed
Open the Error Correction menu
No fax answer. message displays
Fax is busy. message displays
Fax storage is full. message displays
Document feeder paper jam
Unable to use fax functions from the control panel
Faxes can be received, but not sent
Unable to use group dials
Unable to use speed dials
Enww
Fax does not respond
Solve problems receiving faxes
Fax has a dedicated phone line
An answering machine is connected to the product
Voice mail is available on the fax line
Answer Mode setting is set to the Manual setting
Telephone handset is connected to the product
Product uses a fax over IP or VoIP phone service
Product is connected to a DSL phone service
No fax detected. message displays
Open the Advanced Setup menu Open the Fax Resolution menu
Cannot send or receive a fax on a PBX line
Sender receives a busy signal
Fax is received but does not print
Faxes are sending slowly
Solve general fax problems
Fax cuts off or prints on two pages
Fax quality is poor
Enww
Product updates
Enww
Parts and diagrams
Orderable parts
Order parts by authorized service providers
Whole unit replacement
5Related documentation and software
Related documentation and software
Part number Cartridge number Description
Supplies and accessories
Service parts
How to use the parts lists and diagrams
Scanner and document feeder main assemblies
Description Part number Qty
Scanner and document feeder main assemblies
Covers
2External panels and covers Parts and diagrams
Covers 1,2
Internal assemblies 1
Internal assemblies
8Internal assemblies 1
4Internal assemblies 2
Internal assemblies 2
9Internal assemblies 2
5Internal assemblies 3
Internal components 3
10Internal assemblies 3
A03
Internal assemblies 4
11Internal assemblies 4
7Internal assemblies 5
Internal assemblies 5
12Internal assemblies 5
8Internal assemblies simplex models
Internal assemblies simplex models
13Internal assemblies simplex models
9Internal assemblies duplex models
Internal assemblies duplex models
Description Part number
14Internal assemblies duplex models
10 PCAs
PCAs
PCAs
Sheet paper feeder optional Tray
Input devices
16250-sheet paper feeder optional Tray
17Alphabetical parts list
Alphabetical parts list
Internal assemblies 5
Internal assemblies 4
Paper pickup assembly RM1-8045-000
18Numerical parts list
Numerical parts list
RL1-3053-000 Motor, developer DC M1
RM1-8051-000 Paper-pickup guide assembly duplex
Enww
Service and support
HP Product Duration of Limited Warranty
Hewlett-Packard limited warranty statement
Hewlett-Packard limited warranty statement
Enww
Data stored on the print cartridge
End User License Agreement
Transfer
Enww
OpenSSL
LJColorMFPM475
Customer support
Product specifications
Table B-1Physical specifications
Physical specifications
Table B-2Environmental specifications1
Product Height Depth Width Weight
Regulatory information
FCC regulations
Power consumption
Environmental product stewardship program
Protecting the environment
Paper use
Toner consumption
Plastics
HP LaserJet print supplies
Multiple returns more than one cartridge
Non-U.S. returns
Single returns
Shipping Residents of Alaska and Hawaii
Material restrictions
Paper
Chemical substances Material Safety Data Sheet Msds
For more information
Supplementary Information
Declaration of conformity
Manufacturers Name Manufacturers Address
For regulatory topics only
Boise, Idaho USA
October
Enww
Declaration of conformity wireless models
Types of memory
Certificate of volatility
Volatile memory
Non-volatile memory
Laser safety
Safety statements
Vcci statement Japan Power cord instructions
Power cord statement Japan
Luokan 1 laserlaite
EMC statement Korea Laser statement for Finland
Restriction on Hazardous Substances statement Ukraine
GS statement Germany
EU Statement for Telecom Operation
Additional statements for telecom fax products
New Zealand Telecom Statements
Additional FCC statement for telecom products US
Industry Canada CS-03 requirements
Telephone Consumer Protection Act US
Enww
Additional statements for wireless products
Korean statement
Enww
Enww
Index
Symbols/Numerics 2ndary service menu
Msds
Jams
USB
Control-panel tests 117 Curled media Demo 116 Diagrams 121
288 Macintosh customer support Material Safety Data Sheet
Enww
Page
CE863-90966* *CE863-90966