4500, 4500 N, 4500 DN Printer
Page
User Guide
Warranty
Contents
Common Printing Tasks
Using Color
Consumables and Cleaning
Appendix a Dimm Installation
Index
HP JetDirect Print Server Software Installation Guide
Where to Look for More Information
Setting Up the Printer
Getting Started Guide
Quick Reference Guide
Using the Printer
Online User Guide
Online Help
How to Use This Online User Guide
Magnifying the Page View
Paging Through a Document
Finding Words
Browsing with Thumbnails
HP Color LaserJet 4500 Printer
Using Your Printer
Overview
Printer Features
Performance
Environmental
Factors Affecting Printer Performance
Effects of Printer Features
Managing Memory
Locating Printer Components
Page
Enter printer commands directly into files
Select printer settings using the printer control panel
Controlling Print Jobs
Printer Supplies and Accessories
Accessory Product Description Additional Information Number
HP JetSend Communications
Using the Printer Control Panel
When to Use the Printer Control Panel
Locating Printer Control Panel Features
1Printer Control Panel
Using Printer Control Panel Keys
Using the Printer Online Help System
Interpreting Control Panel Indicator Lights
Indicator Off Flashing
Menu Locking
Using Printer Control Panel Menus
Information Menu
Interpreting the Menu Map
Printing a Menu Map
To print a menu map
Interpreting the Printer Configuration
Printing a Printer Configuration
To print a printer configuration
Page
Paper Handling Menu
Menu Item Values
Configuration Menu
Menu Item Values Description
Printing Menu
Menu
EIO Menu
Calibration Menu
Resets Menu
Using the Printer Control Panel Shared Environments
Changing PowerSave Settings
Changing Printer Control Panel Configuration Settings
To change printer control panel configuration settings
To change PowerSave setting
Switching Printer Personalities
To switch printer personality
Setting the I/O Timeout
To set the I/O Timeout
To disable the high speed parallel interface
Disabling the High-Speed Parallel Interface
To enable bidirectional parallel communication
Setting Advanced Functions
Resetting Printer Memory
To reset printer memory
Resetting the Printer to Factory Default Settings
To reset the printer to factory default settings
Common Printing Tasks
Selecting Print Media
Supported Media Weights and Sizes
JIS B5
Duplex
Media to Avoid
Printing on Glossy Paper
Printing on Special Media
Printing on Transparencies
Printing on Colored Paper
Printing Envelopes
Printing on Labels
Preprinted Forms and Letterhead
Heavy Paper
Recycled Paper
Selecting Output Bins
Selecting Media by Type
Configuring Tray 1 as a Cassette
Configuring Input Trays
To configure Tray 1 as a cassette
To configure Trays 2 or
Configuring Trays 2 and 3 by Media Type
Tray Priority
Printing from Tray 1 Multipurpose Tray
Loading Media into Tray
To load media into Tray
Loading Envelopes into Tray
To load envelopes into Tray
Printing envelopes when Tray 1 MODE=CASSETTE
Printing envelopes when Tray 1 MODE=FIRST
Printing from Tray
Loading Media into Tray
Page
Printing from Tray 3 500-Sheet Paper Feeder
2Tray 3 optional 500-Sheet Paper Feeder
Loading Media into Tray
Page
Page
Using the Duplex Printing Accessory for Two-Sided Printing
3Duplex Printing Accessory
To use the duplex printing accessory successfully
Control Panel Settings for Duplex Printing
To set duplex printing from the printer control panel
Options for Binding Duplex Printing Jobs
4Binding Options
Printing a Different First
Special Printing Situations
Printing on Custom-Size Media
Panel
Stopping a Print Request
To stop the current print job from the printer control
To stop the current print job from your software
Using Color
Customizing Color Output Through Printer Drivers
Halftone Options
Vivid Color
HP ColorSmart
Print in Grayscale
Screen Match
Color-Matching Factors
Matching Colors
Matching Pantone * Colors
To adjust color balance
Adjusting Color Balance
Print a color balance calibration
1Color Balance Calibration Adjust the cyan C density setting
Adjust the magenta M density setting
Adjust the yellow Y density setting
Adjust Gray Balance
Adjust the black K density setting
Reprint the color balance calibration page. See step
Using Fonts
Accessing HP FontSmart from Windows 3.1 and Windows NT
Using HP FontSmart
Accessing HP FontSmart from Windows 95 and Windows NT
Click HP LaserJet
Using Internal TrueType Fonts
Selecting a Font Other than the Default
Understanding Printer Default Fonts
Changing the Default Font
Font Selection Priority
Entering Symbols into Text
Selecting Symbol Sets
Symbol Set Availability
Selecting Fonts
Selecting PCL Fonts Through Printer Control Panel
Internal Soft
Printing a List of Available Printer Fonts
To print a list of available fonts
Interpreting the Font Lists
Using Typefaces for PostScript Emulation in the Printer
Using Fonts on a Network
Guidelines for printing with different fonts
Verifying Software Application Support for
Adding Support for Accessory Fonts to a Printer Driver
Fonts
Using Special Type Effects
Hewlett-Packard Custom Font Services
Printer Interfaces
Parallel Configuration
Parallel Cable with a C Connector
Busy Call PE Select
Parallel Cable Pin Configuration
Data
VDC GND
Enhanced I/O EIO Configuration
HP JetDirect Print Servers
NetWare 3.x- and 4.x-Based Products
Available Enhanced I/O Interfaces
Windows and Windows NT Networks
IBM OS/2 LAN Server and Warp Server Networks
LocalTalk Configuration
LocalTalk Network Configuration
Macintosh DIN-8 Cable
Setting Network Security on the Printer
Unix Networks
Configuring Novell NetWare Frame Type Parameters
Enii
Ensnap
Configuring TCP/IP Parameters
Page
Disabling Network Protocols Optional
To reach network protocols
To disable DLC/LLC
To disable IPX/SPX
To disable TCP/IP
To disable Apple EtherTalk
Consumables and Cleaning
1Consumable Replacement Clearance Diagram
Making Room for Replacing Consumables
Consumable Replacement Guidelines
Approximate Replacement Intervals for Consumable Items
Consumable Printer Message Count Approximate Time Period2
Locating Consumables
2Consumable Item Locations
Environmental Collection Program
Cleaning the Toner Density Sensor
To clean the toner density sensor
Page
Printer Control Panel Messages
Message Types
Critical Error Messages
Status Messages
Printer Control Panel Messages
Printer
Press Cancel JOB
Checking
Clearing Paper
Duplex Error
Clean Density
Sensor Drum Error
Power OFF EIO
Memory Settings
Install
Install Tray
No JOB to Cancel
Please Wait
Powersave on
Configuration
Press GO to
Resetting Values
Reinstall
Resetting
Factory Settings Restore Factory Settings
Transfer KIT LOW
Toner Position
Color = State
Transfer KIT OUT
Rear Doors
XX Paper JAM
Check ALL
Check Middle
Continue
Data Error
Insufficient
Buffer Overflow
Fuser Error
Error
Cycle Power
Laser Error
RAM
Printer Error
ROM
DC Controller
Check Settings
FAN Error
Nvram Error
Service
Solving Problems with the Printer
Basic Troubleshooting Checklist
Paper Jam Locations
Paper Jam Recovery
To enable Paper Jam Recovery
Cause Solution
Common Causes of Paper Jams
Paper Jam Messages
Front Drawer XX Paper JAM
Clearing Paper Jams
Tips for Avoiding Paper Jams
Clearing Jams in the Middle Front Drawer Area
Clearing Jams in the Tray 2 Area
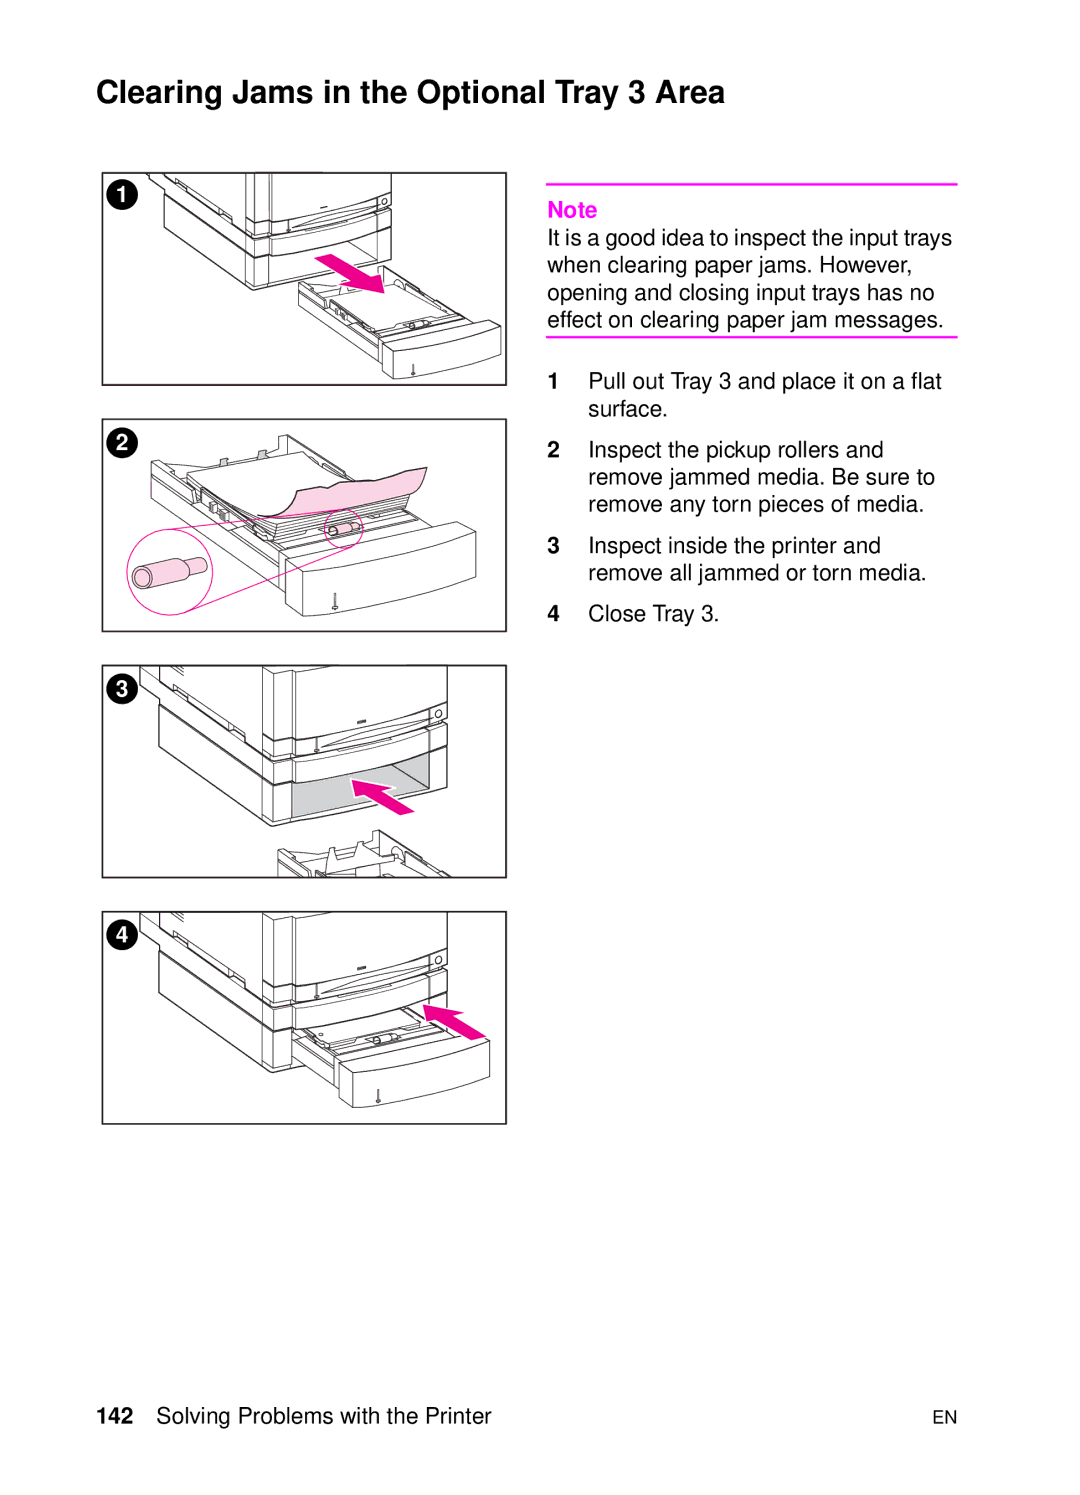
Clearing Jams in the Optional Tray 3 Area
Clearing Jams in the Rear Door Areas
Page
Clearing Jams in the Front Duplex Drawer Area
Printer feeds multiple sheets
Media-Handling Problems
Printer feeds incorrect page size
Media does not feed automatically
Media does not feed from Input Trays 2 or
Transparencies or glossy paper will not feed
Envelopes jam or will not feed in the printer
Output is curled or wrinkled
No display message
Printer Response Problems
Printer is on, but nothing prints
Printer is on, but is not receiving data
Printer will not duplex
Tray 3 is incorrectly installed
Printer is on, but will not print a PostScript file
Unable to select the printer from the computer
Control panel settings work incorrectly
Printer Control Panel Problems
Unable to select Tray 3 optional 500-sheet paper feeder
Toner smear
Solving Print Quality Problems
Transfer KIT LOW Replace
Vertical lines or streaks
Vertical bands or very dark backgrounds
Faded print, random faded areas, or speckles
Irregular, raised spots or stray toner
Banding
Wavy characters
Dull or dark colors on transparencies
Rippled or wavy transparencies
Horizontal streaks on transparencies
Smudges
Repetitive defects
Fuser Life OUT Replace KIT
Printing black instead of color
Color Printing Problems
Missing color or incorrect shade
Inconsistent colors after loading toner
Printed colors do not match screen colors
Incorrect fonts are printed
Unable to print all characters in a symbol set
Incorrect Printer Output
Drifting text between printouts
Erratic, missing characters or interrupted printout
Partial printout
Unable to select a font from the software
Software Application Problems
Unable to change system selections through software
Unable to select colors from the software
Solving Problems with the Printer
Dimm Installation
Dimm Configuration
Do not remove the Dimm in slot #4
Installing DIMMs
To install a Dimm
Page
Page
Verifying Dimm Installation
PCL Commands
PCL Commands
PJL Commands
Interpreting PCL Printer Command Syntax
Figure B-1Printer Command Elements
Combining Escape Sequences in PCL Printer Command Syntax
Entering Escape Characters
Application Escape Character Entry What Appears
Font List
Selecting PCL Fonts
Point Size
Common PCL Commands
PCL Commands
Control Commands
Cursor Positioning
Programming Hints
PCL Commands
PCL Commands
Electrical Specifications
Specifications
Operating Environment Specifications
Acoustic Emissions
Protecting the Environment
Environmental Product Stewardship Program
This HP LaserJet printer design eliminates
This HP LaserJet printer design reduces
Design of this HP LaserJet printer facilitates the recycling
HP Cartridge Recycling Program Information
Specifications
Regulatory Statements
FCC Regulations
Canadian DOC Regulations
Vcci Statement Japan Korean EMI Statement
ALL
Declaration of Conformity
EMC
For Compliance Information ONLY, contact
Laser Safety
Safety Information
Material Safety Data Sheet Msds
Luokan 1 laserlaite
Laser Statement for Finland
Klass 1 Laser Apparat
Varo
Specifications
Hewlett-Packard Warranty Statement
Warranty
Support Information
Warranty and Support Information
HP Maintenance Agreements
On-Site Service Agreements
Support Information
HP Service Agreements
Accessories or supplies HP Support Assistant
HP Service Information
HP support HP direct ordering for
Customer Support Options Worldwide
Customer Support Worldwide
Worldwide Sales and Service Offices
Denmark
ColombiaGermany
Czech Republic
Far East Region
Latin American Headquarters
Japan
Korea
México
Sweden
Singapore
Spain
Switzerland
Warranty and Support Information
Index
Numerics
Changing 41 resetting 46 density sensor
Index
Index
Index
See also fonts
Page
C4084-90937