User’s guide
USA
Table of contents
Using the internet
Troubleshooting
Using application recovery and system recovery
Index 145
Viii user’s guide
Finding answers to commonly asked questions
Safety information
Putting your pc together
Setting up your pc
Safety and comfort
Pc back
Computer safety warning
Serial
Connector Symbol Description
Pc front
Other ways to connect
Connecting the modem
Upgrading your 56k modem
Setting up the ethernet connection
Turning on your pc for the first time
Turning off the pc
Registering your pc
Hibernation mode
Standby mode
Click Turn Off Computer
Automatic standby or hibernation
Hp products work better together
Making recovery cds/dvds
Installing software and hardware devices
Beginning to use your software
Learning the basics
Icon Opens Use it to
Using the desktop
Using the start menu
Learning to use your pc
Using hp organize software
Organizing your all programs list
Using the all programs menu
Using pc help & tools
Using the mouse
Panning
Scrolling
Autoscrolling
About your keyboard
Using the keyboard
Switching mouse button functions
Changing mouse pointer speed
Internet keyboard
Standard keyboard
Alphanumeric keys
Wireless keyboard set
Standard keyboard features
Arrow keys
Function keys
Edit keys
Icon Name Description
Keyboard indicators
Numeric keys
Special keyboard buttons
Music
Key Icon Feature Description
User
Photo
CD/DVD/MP3
Media control keys
Customizing the buttons
Adjusting the monitor
Using a printer
About the internet
Using the internet
Setting up your internet account
Using a browser
Searching the internet
Restricting internet content
Sending and receiving e-mail
If using outlook express
Receiving e-mail messages with outlook express
If your isp provides the e-mail program
Sending e-mail messages with outlook express
Instant support
Getting help
Help and support center
Turning off messages
Using updates from hp
Getting messages
Upgrading and servicing the pc
Resolving problems
Warranty & support guide
Re-enabling messages
Microsoft windows xp operating system
Online guides
Web sites about your pc
Working with sound, pictures, and video
Using speakers
Connecting a multi-channel speaker system to your pc
Adjusting speaker volume
Connect speaker plugs for To PC Connector Icon Speaker Mode
Configuring the multi-channel sound manager
Configuring multi-channel audio output for the dvd player
Using a microphone
Using the microphone with multi-channel audio
Adjusting microphone volume
Working with digital images
Using hp image zone
Projects in Help
Tab or button Description
Card Slot Reader
Using the 7-in-1 memory card reader
About the 7-in-1 memory card reader
Special note about the safely remove hardware utility
Card Insert Into 4-slot reader
Slot memory card reader
Drive What it does
Using your cd, dvd, and diskette drives
Your drive options
Card Insert Into 2-slot reader
Inserting and removing cds and dvds
Handling cds/dvds
Using the combo drive
Playing music cds with musicmatch jukebox
Using the diskette floppy drive
Playing cds and dvds
Playing cds and dvds with windows media player
Dvd terms
Playing dvd movies with the intervideo windvd player
Click InterVideo WinDVD Player
Using country/region codes
Getting started with recordnow
Creating burning cds with recordnow
Creating a data cd
Creating a music cd
Creating burning music cds with windows media player
Creating burning data cds using windows xp program
Cables you may need
Creating burning dvds using the dvd writer drive
Using a tv as a monitor
Connecting to a tv set
Viewing the pc image on your tv screen
Disabling the tv option
Using your multi-storage bay
Disconnecting the tv
Docking a peripheral device
Storing cds, dvds, or memory
Placing a peripheral device on the multi-storage bay top
Using the optional camera station pc top
Writer Hp dvd Bay expansion
User’s guide
Taking care of your pc
Protecting your pc from power surges
Using virus protection programs
Unavailable hard disk drive space
Increasing available hard disk drive space
Viewing the amount of used and free disk space
Uninstalling programs
Emptying the recycle bin
Removing desktop icons
Cleaning up your hard disk drive
Troubleshooting
Devices
Symptom Problem Solution
Audio
Click Sounds, Speech, and Audio Devices, if it is
Manager button
Click Performance and Maintenance, if it is
Cd-rom, cd-rw, dvd-rom, or dvd writer drive
Diskette floppy drive select models only
Display monitor
End Task
Hardware installation
Hard disk drive
Hardware tab
Click Start and choose Control Panel
Internet access
Keyboard and mouse
Click Turn Off Computer
Memory
Multi-storage bay
Power
Miscellaneous
Using application recovery and system recovery
Using application recovery and system recovery
User’s guide
Using application recovery and system recovery
Creating recovery cds/dvds
To run the recovery cd-dvd creator program
Using recovery cd-dvd creator
Recovery program
Using the recovery tools cd
System restore
To start system restore
Application recovery
Starting system recovery if the pc is responding
System recovery
Starting system recovery using recovery discs
Starting system recovery if the pc is not responding
System recovery using recovery discs
To run system recovery program using recovery discs
Upgrading and servicing the pc
User’s guide
Upgrading and servicing the pc 1
After closing the pc
Opening and closing the pc
Preparing the pc
Before opening the pc
Replacing the side panel
Removing the side panel
Locating components inside the pc Removing the front panel
Replacing the front panel
Removing and replacing drives
Removing an optical drive
Installing an optical drive
CS SL MA
Upgrading and servicing the pc 1
User’s guide
Removing the preinstalled hard drive
Slave
Replacing the preinstalled hard drive
Installing a second hard drive
Slave
User’s guide
Removing a second hard drive
Adding memory
About installing ddr dimms
Removing a memory module
Add-in cards
Installing a memory module
Removing an add-in card
Installing an add-in card
Replacing the battery
BB B Chassis
Chassis features of the pc
Always replace the cover before turning on the system
Opening the computer
Before you begin
Removing the side panel
Removing the fan duct
Removing the drive cage
User’s guide
Dimms
Dimm
Ddr dimms
Dimm DDR Dimm
Installing add-in cards
Upgrading and servicing the pc 2
If the new card or device isn’t working
What is plug and play?
Adding and removing drives
Replacing the diskette drive
Upgrading and servicing the pc 2
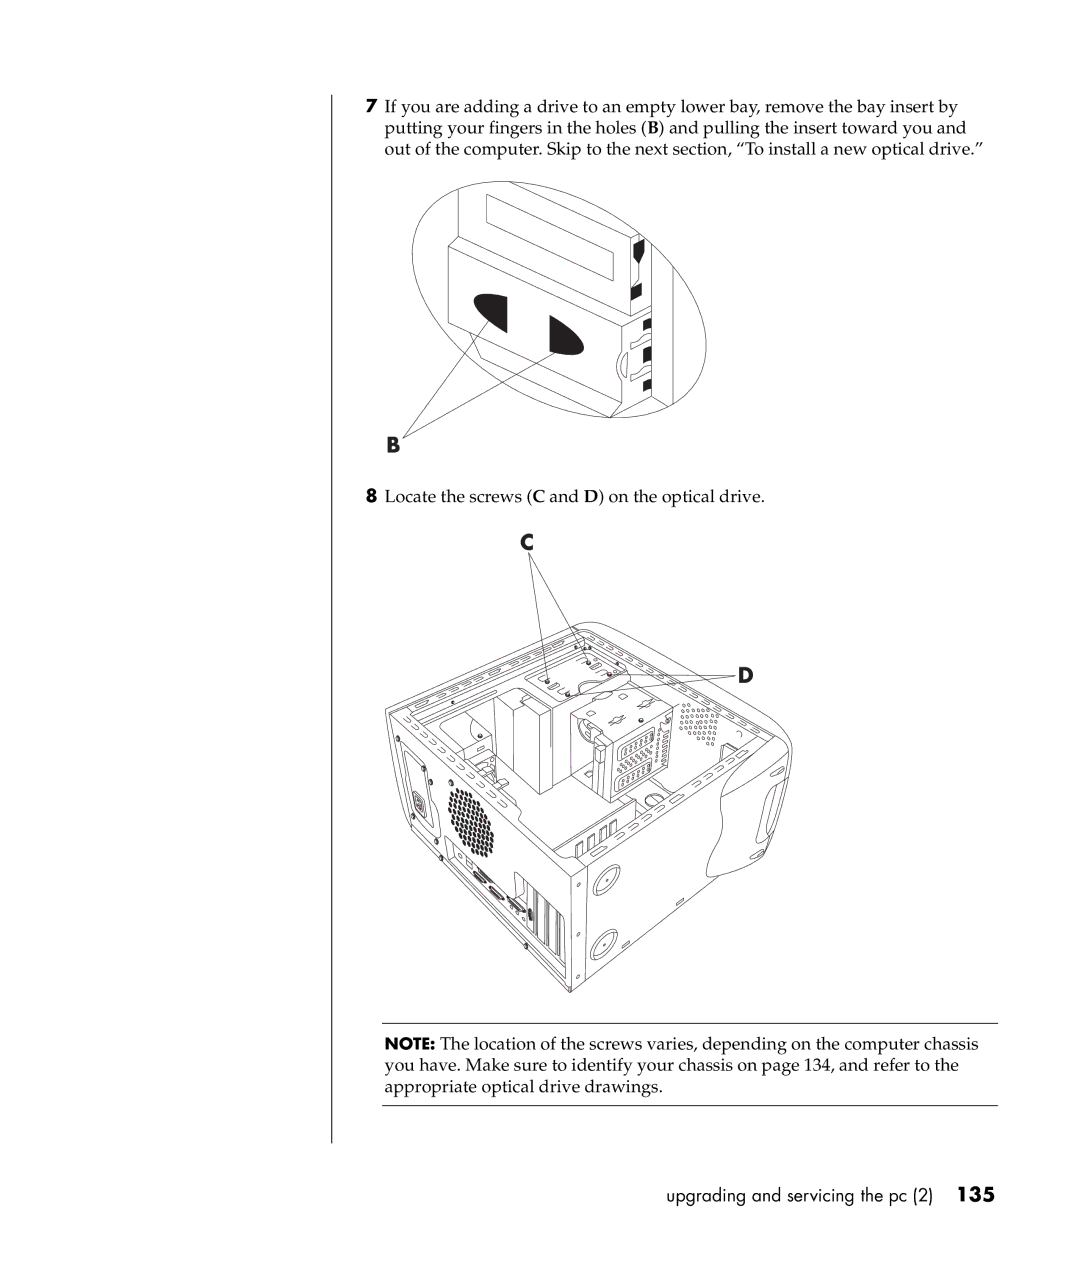
Replacing the optical drive
Upgrading and servicing the pc 2
Chassis I and Chassis
Chassis I and Chassis II only
User’s guide
Replacing the battery
Closing the computer
Replacing the drive cage
User’s guide
Replacing the fan duct
Replacing the side panel
CD/DVD
Index
DVD
Reinstalling, 93 operating system help
Pointer speed, adjusting, 21 power management settings
Speakers, 41 multi-channel
User’s guide