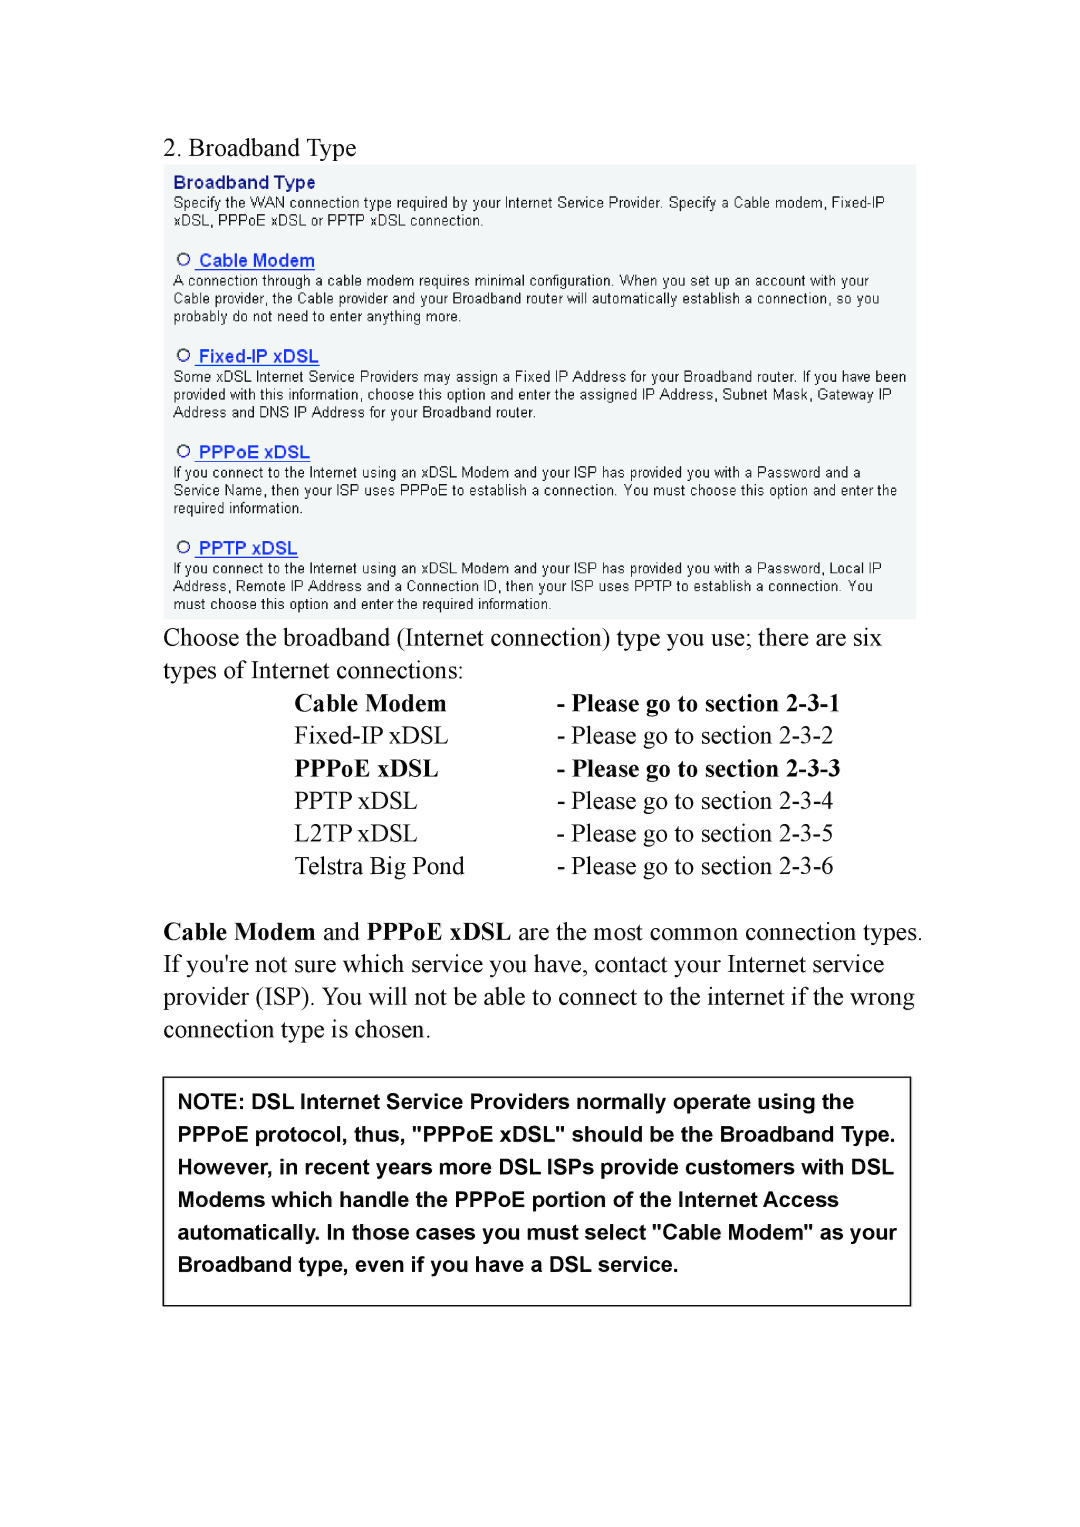
User Manual
Wireless 802.11n Gigabit Router
INT-524315-UM-0808-1
FCC Part
Federal Communication Commission Interference Statement
Federal Communication Commission FCC Radiation Exposure Statement
EU Countries Not intended for use
R&TTE Compliance Statement
Safety
EU Countries Intended for Use
CHAPTER I PRODUCT INFORMATION
CHAPTER II SYSTEM AND NETWORK SETUP
Table of Contents
CHAPTER III ADVANCED FUNCTIONS
CHAPTER IV APPENDIX
Chapter I Product Information
Integrated 10/100 Mbps LAN switch with Auto MDI/MDI-X support
QoS Quality of Service bandwidth management VPN Pass Through PPTP
Supports Wi-Fi Protected Setup WPS
QoS Quality of Service bandwidth management
2. DO NOT put this router at or near hot or humid places
1-2 Safety Information
KEEP THIS ROUTER OUT THE REACH OF CHILDREN
1-3 System Requirements
Gigabit router main body, 1 pcs…………………………
1-4 Package Contents
Quick installation guide 1 pcs …………………………………
A/C power adapter 1 pcs ……………………………………
Front Panel
Back Panel
2-1 Connecting the Wireless Gigabit Router
Chapter II System and Network Setup
4. Check all LEDs on the front panel
Windows
2-2 Connecting to the Wireless Gigabit Router
If the operating system of your computer is…
Windows 95/98/Me
2-2-1 Windows 95/98/Me IP address setup
2. Select Obtain an IP address from a DHCP server and then click OK
2-2-2Windows 2000 IP address setup
Page
2-2-3Windows XP IP address setup
Page
2-2-4Windows Vista IP address setup
Page
Input cmd, then click OK
2-2-5 Router IP address lookup
3. Connect the routers management interface by the Web browser
Page
HERE
2-3 Using Quick Setup
Please go to the QuickSetup menu by clicking QuickSetup button
Items and meanings
The following message will be displayed 1. Set Time Zone
Click Apply
PPPoE xDSL
Cable Modem
2-3-1 Setup procedure for Cable Mode
2-3-2 Setup procedure for Fixed-IP xDSL
2-3-3 Setup procedure for PPPoE xDSL
2-3-4 Setup procedure for PPTP xDSL
Enter the user ID user name assigned by your ISP
here. Use the default value unless your ISP specifies
2-3-5 Setup procedure for L2TP xDSL
Items and meanings
2-3-4 Setup procedure for L2TP
2-3-6 Setup procedure for Telstra Big Pond
Attention DSL Users
Wait for about 30 seconds, then click OK
2-4-1 Time zone and time auto-synchronization
2-4 Basic Setup
2-4-2 Change management password
Items and meanings
2-4-3 Remote Management
Host Address 1 Input the IP address of the remote host you wish to
http//1.2.3.48888
Refer to chapter 2-5-8 ‘DDNS client’ for details
2-5 Setup Internet Connection WAN Setup
2-5-1 Setup procedure for Dynamic IP
2-5-2 Setup procedure for Static IP
2-5-3 Setup procedure for PPPoE
Continuous - The connection will always be kept on. If the connection is interrupted, the router will re-connect automatically
2-5-4 Setup procedure for PPTP
wish to use. Refer to section 2-5-3 for detailed
Items and meanings
Specify the MTU value of your network connection here
2-5-5 Setup procedure for L2TP
you wish to use, and refer to section 2-5-3 for detailed
2-5-6 Setup procedure for Telstra Big Pond
dns.serviceprovider.com…………………………………………... Incorrect
2-5-7 Setup procedure for DNS
2-5-8 Setup procedure for DDNS
Domain Name 3 Input the domain name youve obtained from DDNS
2-6 LAN Configuration
Recommended values if you don’t know what to enter
2-6-1 LAN IP section
2-6-2 DHCP Server
2-6-3 Static DHCP Leases Table
Click Apply to save the settings
2-7 Wireless LAN Configuration
Band
2-7-1 Basic Wireless Settings
ESSID
what it should be, default value is
2-7-2 Advanced Wireless Settings
should be, default value is
automatically, its not necessary to change this
modify the default value if you dont know what it
modify default the value if you dont know what it
should be, default setting is Auto 20/40 MHz
WMM 12 Short for Wi-Fi MultiMedia, it will enhance the data transfer performance of multimedia contents when its being transferred over wireless network. If you dont know what it is or not sure if you need it, its safe to set this option to Enable. The default setting is Disable
2-7-3-1 Disable wireless security
2-7-3 Wireless Security
2-7-3-2 WEP - Wired Equivalent Privacy
If you dont know which one you should use, select
Some examples of WEP key Don’t use these examples use your own
Its not recommended to use a word that can be
2-7-3-3 Wi-Fi Protected Access WPA
found in a dictionary for security reasons
1812
2-7-3-4 WPA RADIUS
2-7-4 Wireless Access Control
to delete, then click the Delete Selected button
so you can identify the MAC addresses later
2-7-5 Wi-Fi Protected Setup WPS
Enable WPS
settings for a WPS connection. When Enrolle mode
authentication mode of this wireless router is shown
when this wireless router is waiting for an incoming
2-7-6 Security Tips for Wireless Networks
3-1-1 Basic QoS Settings
3-1 Quality of Service QoS
Chapter III Advanced Functions
then click the Edit button. Only one rule should be
inaccessible
delete. If the QoS table is empty, this button is
bandwidth in kbits. To disable the upload bandwidth
a b c d e f g h i
3-1-2 Add a new QoS rule
Items and meanings
If you want to erase all values you just entered, click Reset
3-2 Network Address Translation NAT
3-2-1 Basic NAT Settings Enable or disable NAT function
3-2-2 Port Forwarding
Items and meanings
application or service. If youre not sure what to use
3-2-3 Virtual Server
redirected to the port number of the local IP address
Click Apply 13 to save the settings
Items and meanings
Select the type of connection, TCP or UDP. If youre
3-2-4 Port Mapping for Special Applications
Add to save the setting to the Current Trigger-Port
3-2-5 UPnP Setting
3-2-6 ALG Settings
3-3 Firewall
3-3-1 Access Control
Click the Add button to add the MAC address and
You can input any text here as the comment for this
characters here. This is optional and you can leave
it blank, however, its recommended to use this field
filtering table. Up to 20 IP addresses can be added
a b c d e f
3-3-1-1 Add PC
Items and meanings
If you want to remove all settings in this page, click Reset button
address in the left field to define a single IP address
Check this box to enforce URL Blocking
3-3-2 URL Blocking
Enable URL
uncheck it to disable URL Blocking
If you want to delete a specific URL/Keyword entry
Removes the value you input in URL/Keyword field
3-3-3 DoS Attack Prevention
data packets, to make your Internet connection
a b c d e
3-3-3-1 DoS - Advanced Settings
activated
3-3-4 Demilitarized Zone DMZ
the select box of the DMZ entry you want to delete
Items and meanings
address will be mapped to. That is the computer you
and associated private IP address to the DMZ table
Delete All 8 Deletes all DMZ entries
3-4 System Status
3-4-1 System information and firmware version
Reset 9 Reset the input form values
3-4-3 Device Status
3-4-2 Internet Connection Status
The information shown may vary from the output on your screen
3-4-4 System Log
Save 1 Saves current event log to a text file
Clear 2 Deletes all event log messages displayed
Clear 2 Deletes all system log messages displayed
3-4-5 Security Log
3-4-5 Active DHCP client list
Save 1 Saves the current system log to a text file
3-4-6 Statistics
3-5 Configuration Backup and Restore
BackupPress the Save... button, and youll be prompted to
Click Next, and the following message will be displayed
3-6 Firmware Upgrade
Click Browse and locate the firmware file you have downloaded from the Web site. If the firmware file is in ZIP compressed archive format, you have to uncompress it prior to the firmware upgrade
3-7 System Reset
Chapter IV Appendix
4-1 Hardware Specifications
Output power OFDM 15 dBm +/- 1 dBm 300 Mbps, 50 mW max
Access control based on MAC address URL filter DMZ demilitarized zone
Certifications FCC Class B, CE Mark, RoHS Wireless
Chipset Ralink RT2880 Wireless frequency range 2.412 - 2.472 GHz
Dimensions 195 W x 127 L x 35 H mm 7.6 x 5.0 x 1.4 in
Wireless security WEP encryption 64/128 bit WPA TKIP WPA2 AES
Client access control through media access control MAC filter
2T3R MIMO mode 2 transmitter, 3 receiver LEDs Power WLAN Link/Act
4-2 Troubleshooting
e. Call your Internet service provider and
WAN connection settings of the router to
make sure they are set up correctly
and password again
make sure its safe before youre doing
power adapter, disconnect the router and
A/C power adapter from the utility power
a. Adjust the internal clock of the router
4-3 Glossary
Page
Telnet
Application
Protocol
Port Number
Web-based management Graphical User Interface GUI Many devices support a graphical user interface that is based on the Web browser. This means the user can use the familiar Netscape or Microsoft Internet Explorer to Control/configure or monitor the device being managed
owners
Copyright INTELLINET NETWORK SOLUTIONS