INT-PSNC-UM-1106-06
PRO Series
Table of Contents
Electromagnetic Compatibility EMC
Safety
Radio Transmission Regulatory Information
Video Standard and Product Classification
Important Notices
Product Overview
Main Features and Benefits
About the Pro Series Network Cameras and Video Servers
Physical Description
Package Contents
MPEG4 CCD and Cmos Camera Front View
Operating Status LED Power LED
Rear View
MPEG4 CCD IR Camera
Reset Speaker Out
Power Connector Ethernet
Network Video Server
Video Input Video Output On Air Network LED
Dome Glass
Vandal Proof Dome Camera Front View
Tamper-proof screws
Vari-focal lens 4-9 mm
Image Capture LED
Jpeg Cmos Camera 550710 Front/Top View
Network Activity LED
Network Connector
Installation Summary and Examples
RS232 Connector
Power Connector
Page
Connecting the Camera to a PC
Assigning an IP Address and Accessing the Camera’s Homepage
Setting up the IP Address Using IP Installer
Starting the Web Browser
Accessing the Camera’s Homepage
MS Internet Explorer MPEG4 Stream Mode
Behind a Firewall
Username and Password
ActiveX Installation for MS Explorer Users automatic
Page
Homepage Options MPEG4 Cameras
Audio
Video Size
Save Snapshot
Install XviD
Administrator Menu
Record Video
Logout
Expansion
Homepage Options Jpeg Cmos Camera
Frame rate
Show Only Image
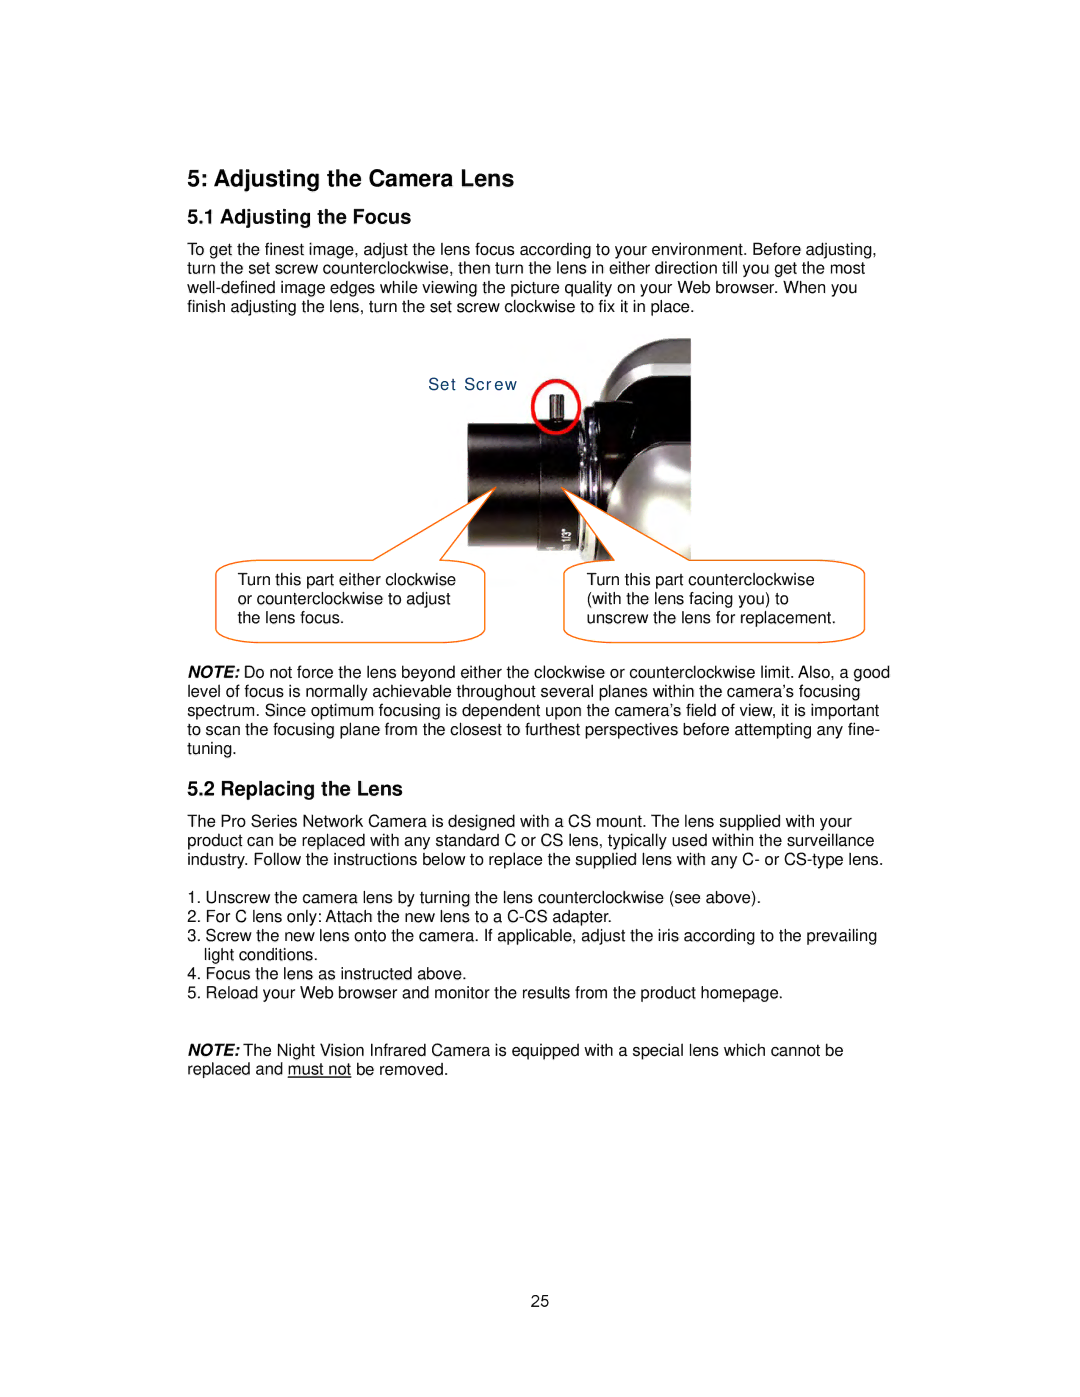
Adjusting the Focus
Adjusting the Camera Lens
Replacing the Lens
Overview of the Administration Menu
Administrator Menu
Quality
Rate Control
Bit Rate
Page
Display Name/Location Stamp
Resolution
Display Time/Date Stamp
Vertical Flip and Horizontal Flip
Brightness
De-Interlace
Contrast
Hue
Load Default Values
Saturation
Color Killer
Auto Exposure
MPEG4 Cmos Cameras
Minimum Image Sensor Rate
Auto White Balance
Jpeg Cmos Camera
Brightness Mode
Compression Rate
Image Size
Back Light
Exposure Mode
Further Reduce Exposure Time
Indoor / Outdoor
Page
Set IP address, Subnet Mask, Gateway Address
Upgrade Port Number
Set Dhcp
Send an IP address to Email
ID, Password
Use Smtp Authentication
Ddns Manual Update
Rtsp Port Number
Jpeg Cmos Camera
Maximum Frame Rate
Password
Authority
PTZ Only Digital PTZ Camera models
Jpeg Cmos Camera
Trigger Condition
Event Trigger Configuration
Top Middle Bottom Left Right MiddleMiddle
Before event
Image Capture Option
Image Capture option limitation
Jpeg Cmos Camera
Operation Mode and Output Stream Type
System Configuration
Direct Public Access to Image via Http
Camera Name
Audio On/Off
Image File Name
Video On/Off
LED On/Off
Page
Wireless Setup
Wireless Configuration for wireless cameras only
Wireless Security Settings
Page
WPA & WPA2 personal
Ad hoc Mode
Infrastructure Mode
Power over Ethernet PoE Injector
PoE Power over Ethernet Support
PoE Midspan
PoE Web-Smart Switch
PoE Office Switch
Power over Ethernet Injector
Multi-Viewer Application for Windows
Installation
Configuration
Adding a camera
Camera Information
Page
Etsp Client
Setting up the camera in Etsp Client
Getting Started
Click Add Define the location where Video should be saved
Page
Page
Rtsp Playback in MPlayer for Windows
Rtsp Video Playback
Page
Access to the camera via Https
SSL Encryption / Access via Https
Page
MPEG4 Network Camera default values
Remote Access to a Camera & Router Setup
Click on NAT Virtual Server. Check x Enable Virtual Server
Page
Page
Software Development Kit SDK
Developer Information
Web Integration
MS Visual Studio C++, Visual Basic
Direct public access to image via Http
Direct Access to internal Jpeg
Motion-JPEG Access
IP Installer does not find the camera. Why?
Appendix a Frequently Asked Questions FAQ
Sender e-mail address max characters Use Smtp Authentication
How do I activate the FTP upload function?
Camera does not send any e-mails. Why?
Short
Why won’t the ActiveX control automatically download?
Page
Appendix B Accessing the camera via HyperTerminal
Configure the parameters as shown below All MPEG4 models
Symptoms Possible causes Remedial actions
Appendix C Troubleshooting
PINGing Your IP address
Ping reply Interpretation and recommendation
Hub-to-hub cable
Appendix D Utilizing IP Addresses on a Local Network
Page
Appendix E Updating Firmware
Download New Firmware Install New Firmware
Identify the Version of Firmware
Function Description
Appendix F The I/O Connector MPEG4 Cameras
PIN
Appendix G Dynamic Domain Name System Ddns
How to Use the DynDNS Ddns Server
Page
Page
Page
Ddns Registration for the Pro Series Network Camera
Pressing the Reset Button
Appendix H Reinstating the Factory Default Settings
Using HyperTerminal
Factory default settings
Appendix I Glossary of Terms
Page
Pro Series Network Camera
Appendix J Product Specifications
MPEG4, CCD, Day/Night, Ntsc
Pro Series Wireless Network Camera
Pro Series Wireless Network Camera
MPEG4, CCD, Day/Night, IR Lens, PAL
Pro Series Night Vision Network Camera
100
Pro Series Wireless Night Vision Network Camera
102
MPEG4 + M-JPEG Dual Mode, 2.0 Megapixel CMOS, PAL/NTSC
Pro Series Digital PTZ Network Camera
Pro Series Digital PTZ Wireless Network Camera
MPEG4 + M-JPEG Dual Mode, Two-way Audio, PAL/NTSC
Pro Series Network Video Server
JPEG, CMOS, PAL/NTSC
107
108