RX-D701S / RX-D702B
European Union
Information for Users on Disposal of Old Equipment
Important for the U.K
If in Doubt Consult a Competent Electrician
Regulatory information
Above ALL
Precautions
Features
Table of Contents
TV, VCR, DVR/DVD, FM/AM, USB, AUX, Video
Remote control
When operating a DVD player, set the mode selector o to DVD
Parts identification
See pages in parentheses for details
How to open the front door
Front panel
Inside the front door Press down on PUSH-OPEN
Rear panel
Display window
Getting started
Before Installation
Putting batteries in the remote control
Checking the supplied accessories
Antenna
Connecting the FM and AM MW antennas
FM antenna connection
FM antenna supplied
Connecting the powered subwoofer
Connecting the speakers
Speaker Layout Diagram
Connecting the speakers
Hdmi
Connecting video components
Before connecting video components
Video conversion function
Connections
Connecting a TV
Green Component video cable not supplied Blue Red
Turn off all components before making
Red
Connecting a DVD recorder or DVD player
Stereo audio cable
Monaural audio cable not supplied Signal current
When you enjoy sound recorded in DVD-Audio
White
Green
Connecting a VCR
Scart cable not supplied Signal current
Component video cable not supplied Hdmi cable not supplied
Connecting another video component to the Video in jacks
Component video cable not supplied
Hdmi cable not supplied
Connecting a video component to the AUX input jacks
How to open the front door
Video camera, etc
Digital input terminals
Connecting the power cord
Digital audio connection
Turn off all components before making connections
For USB Terminal
USB connection
USB Terminal
How to install the USB drivers
USB drivers are installed automatically
Check if the drivers are correctly installed
Basic operations
Turn on the power
To turn off the power into standby
Press STANDBY/ON or Audio on the remote control
Hdmi Digital Analog
Adjust the volume
Selecting the video input setting
Selecting the audio input setting
Turning off the sounds temporarily
Selecting the digital decode mode
Listening with headphones
From the remote control only Press Dimmer repeatedly
Making sounds natural
Turning off the power with the Sleep Timer
Basic adjustment of auto memory
Signal and speaker indicators on the display
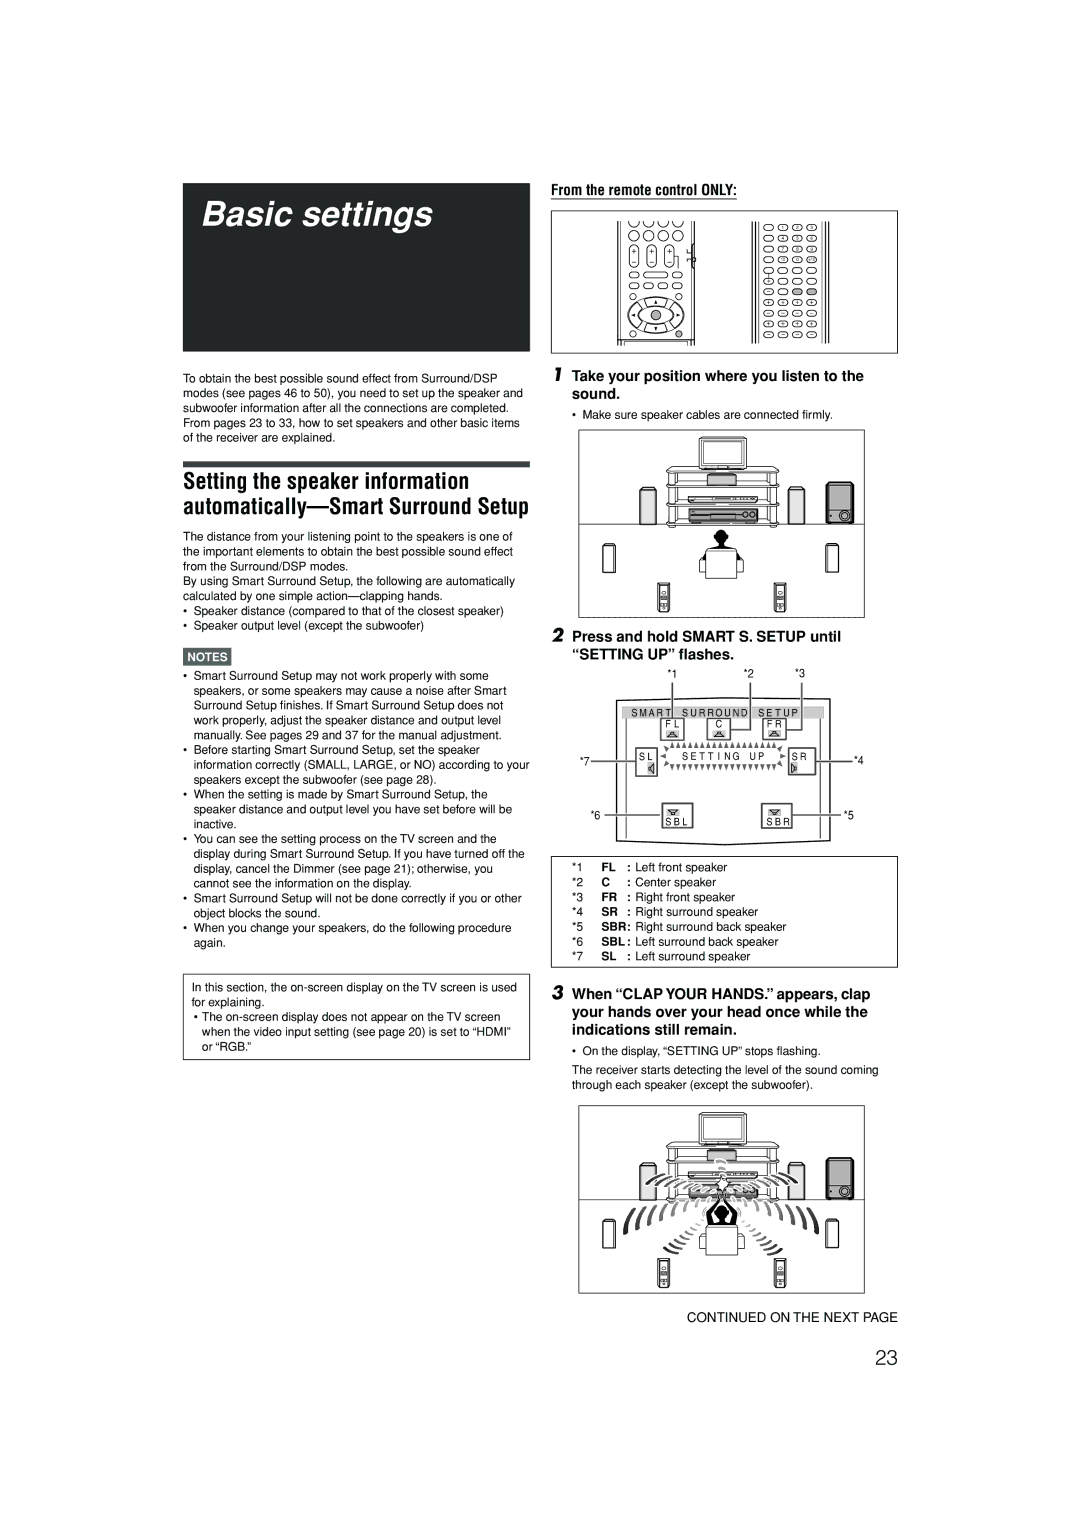
Press and hold Smart S. Setup until Setting UP flashes
Basic settings
SBR SBL SL
Menu operation buttons
Basic setting items
From the remote control
Operation through on-screen display menus
See
Setup menu configuration
Usable buttons and their functions
Menu operating procedure
Button indications on the screen
To select the desired submenu, press 5 or ∞ repeatedly
Press SET
Setting the items
Setting the speakers
Setting subwoofer information-SUBWOOFER
Speaker distance
Setting the surround back speakers
Setting the speaker distance
Initial setting S Back OUT 2SPK
Selecting the main or sub channel
Activating the EX/ES/PLIIx setting-EX/ES/ PLIIx
Setting bass sound
Setting subwoofer output-SUBWFR OUT
Midnight OFF
Using the Midnight mode-MIDNIGHT
Setting the low frequency effect attenuator
Setting the crossover frequency-CROSSOVER
Memorizing the volume level for each source-ONE Touch OP
Setting the Audio delay level
Selecting the output video signals
Setting the Auto Function mode
Superimposing the menus
Basic adjustment items
Sound adjustments
Adjust Menu
To select the desired submenu, press Or ∞ repeatedly
To start the adjustment, press
Adjusting the items
Adjusting the speaker output levels
Press Test to check the speakers’ output balance
Adjusting the virtual room size for DSP modes
Adjusting the sound parameters for the Surround/DSP modes
Adjusting the bass sounds
Attenuating the input signal-INPUT ATT
Adjusting the center tone-CENTER Tone
Adjusting the liveness effect for DSP modes
Tuner operations
Tuning in to stations manually
Using preset tuning
To store the preset stations
To tune in a preset station
Selecting the FM reception mode
Press Display while listening to an FM station
Using the Radio Data System RDS to receive FM stations
What information can RDS signals provide?
RDS indicator
Press PTY Search while listening to an FM station
To search for a program using the PTY codes
Searching for a program by PTY codes
PTY codes
Description of the PTY codes
TA News Info TA/NEWS TA/INFO
TA Traffic Announcement in your area
Display
Dolby Digital
Creating realistic sound fields
Reproducing theatre ambience
Introducing the Surround modes
DTS
About other digital signals
Digital Acoustic Processor DAP modes
All Channel Stereo mode ALL CH Stereo
3D Headphone mode
Introducing the DSP modes
Auto
Using the Surround/DSP modes
About the DSP modes
Virtual Surround Back
Selecting the Surround/DSP modes
When you select Auto Surround
From the remote control Select and play any source
Turn Multi JOG to select the Surround/DSP mode you want
REW
Operating other JVC products
VCR
Channel +
DVD Menu
Changing the remote control code for DVD recorder
DVD recorder or DVD player
Release DVR/DVD
Release TV
Changing the transmittable signals for operating a TV
Operating other manufacturers’ products
Manufacturers’ codes for TV
Manufacturers’ codes for VCR
Changing the transmittable signals for operating a VCR
Release VCR
Try to operate your VCR by pressing VCR
Changing the transmittable signals for operating a STB
Sound and picture
Troubleshooting
Power
Problem Possible Cause Solution
Correct antenna
Remote control Tuner
AM MW tuner
Specifications
Amplifier
FM tuner IHF
1105RYMMDWJEIN
Victor Company of Japan, Limited

