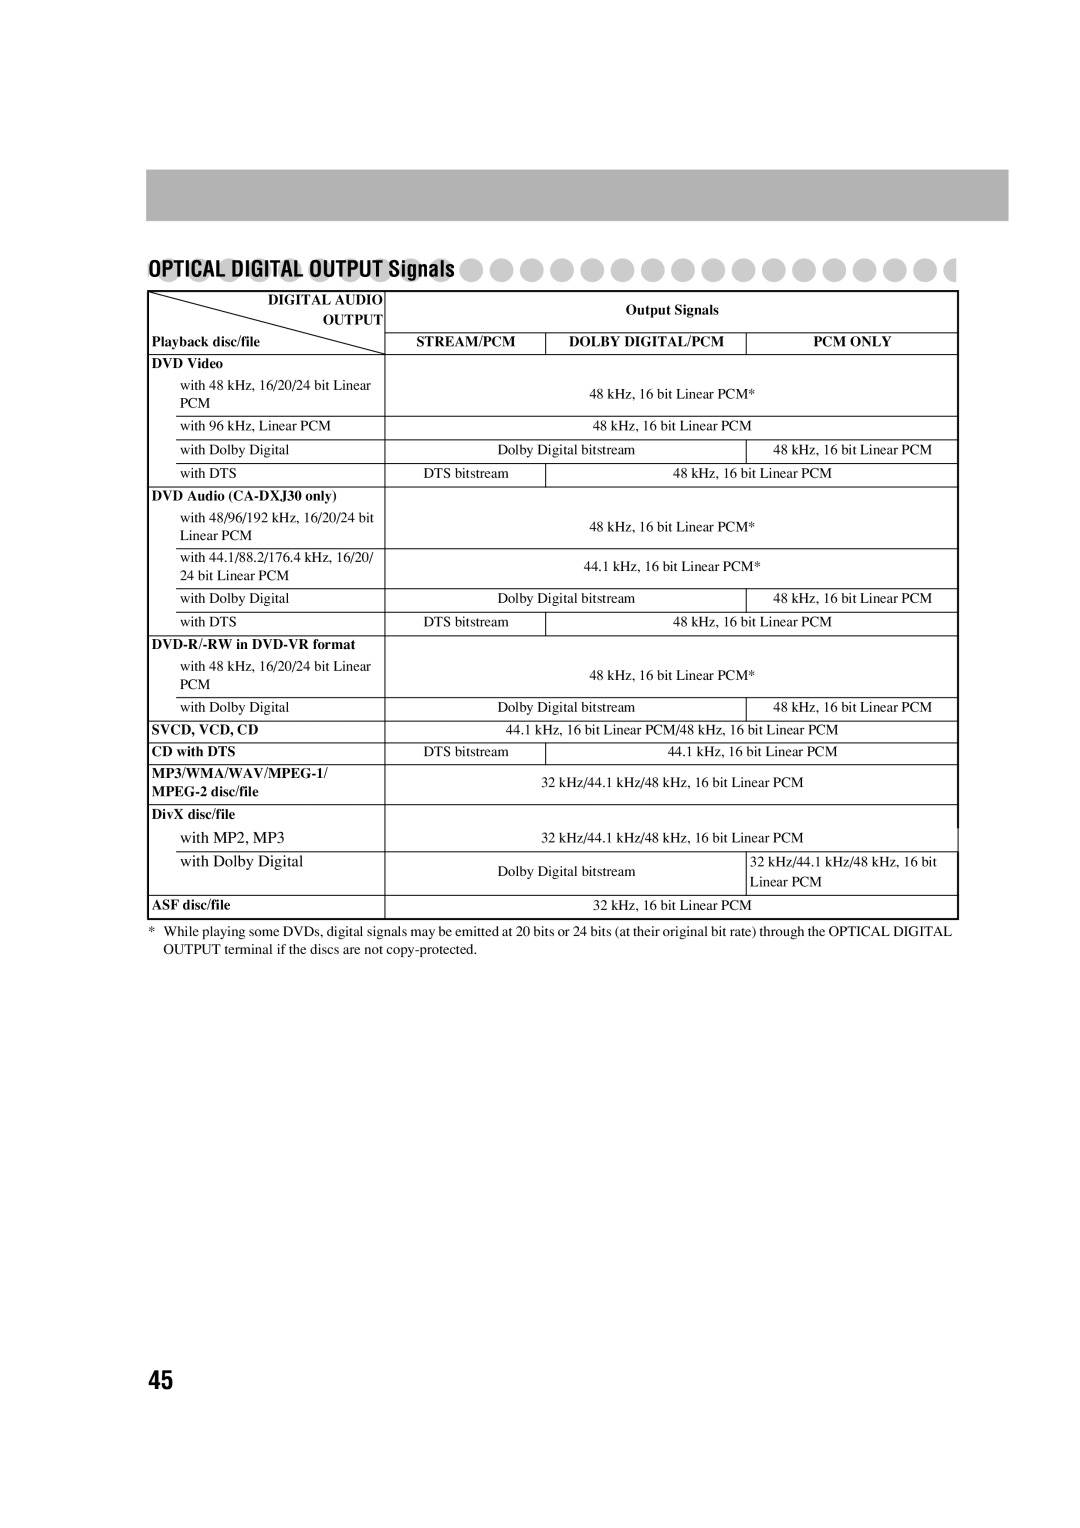
CA-DXJ35
COMPACT COMPONENT SYSTEM
INSTRUCTIONS
GVT0208-001AUS, UN, A, UG, UX
IMPORTANT FOR LASER PRODUCTS
Warnings, Cautions and Others
European Union only
CA-DXJ35
Caution: Proper Ventilation
Front view
Side view
How to Read This Manual
Introduction
Audio formats
Note on Region Code
Precautions
Contents
Installation
Power sources
Supplied accessories
From the powered subwoofer See page
Connections
~From the video input of TV/monitor See page
Powered subwoofer
~TV/monitor
ŸAM/FM antenna
To assemble the AM loop antenna
⁄Speakers
@Auxiliary equipment
¤Voltage selector
Not applicable for Australian model
#Power cord
Connecting a USB Mass Storage Class Device
Preparing the Remote Control
Cancelling the Demonstration
Display Indication
¥Turn on the power
πAdjust the volume
How to select a number
connecting or putting on the headphones
Adjusting the Volume
To preset stations
Remote control
To drop the volume in a moment
To tune in to a preset station
If “” appears on the TV screen when you press a
Playing Back a Disc/USB Mass Storage
Class Device
To play back by using the disc menu
To select a disc
To select a chapter/track
To locate a particular portion
Playing Back a Tape
To change the tape running direction deck B only
To reverse the tape automatically deck B only
To insert a tape
Daily Operations—Sound& Other Adjustments
Adjusting the Speaker Output Level
1Select the speaker you want to adjust
3Repeat steps 1 and 2 to adjust other speakers
2Select the SEA parameter you want to adjust
3Adjust the parameter
To cancel the Sound Mode, select “FLAT.”
5Store the setting
Presetting Automatic DVD Video
To select a preset picture tone
1While playing, display VFP setting screen
2Select a preset picture tone
Setting the Clock
To adjust the picture tone
2Select a parameter you want to adjust
1Activate clock setting mode
Unique Video Disc/File Operations
Selecting the Audio Track
While playing DVD Video
While playing a DVD Audio/DivX
Selecting the View Angle
Selecting Browsable Still PicturesRemote
Selecting the Subtitle Language
Reviewing the Playback Quickly
To cancel the key number entry, press
Special Picture Playback
Playing Back Bonus Group
Still picture playback
Canceled
Advanced Playback Operations
Programming the Playing Order
ProgramPlay
To check the programmed contents
Canceled
PROGRAM RANDOM Canceled
To modify the program
Repeat Play
A-BRepeat
Playing Repeatedly—RepeatPlay
Prohibiting Disc Ejection—ChildLock
On-screenBar Information
On-ScreenOperations
On-screenbars
Operations Using the
5Finish the setting
On-screenBar
1Disc type/source type 2Playback information
5 Finish the setting
To change the time information
1 Display the on-screenbar with the pull-downmenu
Make sure
Time Search
Chapter/Track Search
6 Select the end point B
4Enter the time
Operations Using the Control
Screen
Control screen for DVD-VR
Control screen for AV files/JPEG files
To start playback
For JPEG file
For the other files
To stop playback
Recording Operations
Recording onto a Tape Main Unit
1Insert a recordable cassette into deck B
To change the direction
To cancel while recording
Dubbing Tapes
Synchronized Recording Main Unit
4Start recording To stop recording
5Adjust the MIC LEVEL and VOLUME
To cancel the Mic Mixing
Enjoying Karaoke
Singing Along Karaoke
Adjusting the Sound Track for Karaoke
Scoring Your Karaoke Skill
To return to normal playback temporarily
OFF R CHANNEL
Changing the Karaoke Setting
To adjust the key
2Adjust the echo level
4Adjust the key
To change the mic volume
2Select the volume level
To erase the entire program, repeat the procedure
Reserving Karaoke Songs
Timer Operations
Setting the TimerRemote INFO
Canceled
2Make the timer setting as you want
Turning Off the Power AutomaticallyRemote
Timer Priority
How Recording Timer works
How Daily Timer works
Setup Menu Operations
Basic Procedure
1Press SET UP while playback is stopped
To erase a preference display, press SET UP
SPK. SETTING menu
AUDIO menu
OTHERS menu
Contents
To adjust TV volume
Operating the TV
To turn on or
To select the input mode either TV or
Additional Information
Learning More about This System
Daily Operations—Playback see pages 8 to
Changing the Color System and Scanning Mode
Daily Operations—Sound& Other Adjustments
Adjusting the Speaker Output Level
Setting the Clock
Unique Video Disc/File Operations see pages
Operations Using the On-screenBar
Adjusting the Sound Track for Karaoke
Advanced Playback Operations see pages
On-ScreenOperations see pages 23 to
Setup Menu Operations see pages 37 to
Setting the Timer
SPK. SETTING menu—DELAY
Reserving Karaoke Songs—KaraokeProgram Play
Maintenance
Troubleshooting
Cleaning the System
To clean the disc
Timer Operations
Daily Timer or Recording Timer does not work
Disc/file Operations
Tape Operations
Language Code List
Afar
Persian
Cambodian
Specifications
Supplied Accessories
Amplifier section
Cassette deck section
Remote control
Parts Index
Main unit
Remote control
Exclude Australian Model
CA-DXJ35COMPACT COMPONENT SYSTEM
CA-DXJ30 CA-DXJ20 CA-DXJ10
US, UN, UG, UX, A, UW
CA-DXJ10
CA-DXJ20
IMPORTANT FOR LASER PRODUCTS
Warnings, Cautions and Others
European Union only
Caution: Proper Ventilation
Front view
Side view
CA-DXJ30
Playable Disc/File Types
How to Read This Manual
Introduction
Audio formats
Precautions
Contents
Installation
Power sources
From AM/FM antenna See page
⁄From the subwoofers CA-DXJ30only See page
From the speakers See page
The illustration above is CA-DXJ30
ŸDigital audio component
AM/FM antenna
~TV/monitor
To assemble the AM loop antenna
not applicable for Australian models
For CA-DXJ30
For CA-DXJ20
For CA-DXJ10
Connecting a USB Mass storage class device
NTSC PROGNTSC
For CA-DXJ10/J20
For CA-DXJ30
1Source signal indicators
Display Indication
¥Turn on the power
πAdjust the volume
How to select a number
connecting or putting on the headphones
Listening to the Radio
Adjusting the Volume
To preset stations
Remote control
To connect a USB mass storage class device
4Store the station
To tune in to a preset station
If “” appears on the TV screen when you press a
To select a title/group
To play back by using the disc menu
To select a disc
To select a chapter/track
Playing Back a Tape
To change the tape running direction deck B only
To reverse the tape automatically deck B only
To insert a tape
Adjusting the Speaker Output Balance Remote
Reinforcing the Bass Sound
Applying an Optimal Bass Sound Effect –VARIOBASS
TECHNO
SEA Sound Effect Amplifier Modes
Surround Modes
User Modes
4Select one of the User Modes
Creating 3-DimensionalSound
1 While playing, display VFP setting screen
Select a preset picture tone
Select a parameter you want to adjust
Changing the display information
Setting the Clock
3Adjust the parameter
1Activate clock setting mode
Unique Video Disc/File Operations
Selecting the Audio Track
While playing DVD Video
While playing a DVD Audio/DivX
CA-DXJ30only
Selecting the View Angle
Selecting Browsable Still PicturesRemote
Selecting the Subtitle Language
Playing Back Bonus Group Remote
Pause playback
To cancel the key number entry, press
Special Picture Playback
—ProgramPlay
PROGRAM RANDOM
1Before starting playback, activate Program Play
4Start playback
To check the programmed contents
Canceled
PROGRAM RANDOM Canceled
Canceled
Prohibiting Disc Ejection
Repeat Play
A-BRepeat
Playing Repeatedly—RepeatPlay
On-ScreenOperations
On-screenBar Information
On-screenbars
DVD Audio CA-DXJ30only
Operations Using the
5Finish the setting
On-screenBar
1Disc type/source type 2Playback information
5 Finish the setting
To change the time information
Repeat Play
A-BRepeat
5 Finish the setting
Time Search
Chapter/Track Search
Control screen for AV files/JPEG file
Operations Using the Control
Screen
Control screen for DVD-VR
DISC
To start playback
For JPEG file
For the other files
Recording Operations
Recording onto a Tape Main Unit
1Insert a recordable cassette into deck B
To change the direction
To stop dubbing
To cancel while recording
Dubbing Tapes
Synchronized Recording Main Unit
5Adjust the MIC LEVEL and VOLUME
To cancel the Mic Mixing
Enjoying Karaoke
Singing Along Karaoke
Adjusting the Sound Track for Karaoke
Scoring Your Karaoke Skill
To return to normal playback temporarily
OFF R CHANNEL
2Select the fanfare setting
ECHO OFFECHO 6 ECHO
To change the calculation level
Calculation level is strict
To change the mic volume
8Adjust the MIC LEVEL and VOLUME
To check the programmed contents
2Select the volume level
Timer Operations
Setting the TimerRemote INFO
Canceled
2Make the timer setting as you want
Turning Off the Power AutomaticallyRemote
Timer Priority
How Recording Timer works
How Daily Timer works
Basic Procedure
Setup Menu Operations
1Press SET UP while playback is stopped
To erase a preference display, press SET UP
Contents
Contents
AUDIO menu
OTHERS menu
To adjust TV volume
Remote control
Operating the TV
To turn on or
Daily Operations—Playback see pages 8 to
Additional Information
Learning More about This System
Changing the Color System and Scanning Mode
Creating 3-dimensionalSound Field—3DPhonic
Applying an Optimal Bass Sound Effect–VARIOBASS
Daily Operations—Sound& Other Adjustments
Setting the Clock
Operations Using the On-screenBar
Adjusting the Sound Track for Karaoke
On-ScreenOperations see pages 23 to
Recording Operations see pages 29 to
Maintenance
Setup Menu Operations see pages 37 to
Cleaning the System
Setting the Timer
Troubleshooting
Timer Operations
Operations are disabled
Daily Timer or Recording Timer does not work
OPTICALDIGITAL OUTPUT Signals
with MP2, MP3
with Dolby Digital
Output Signals
LanguageCode List
Afar
Persian
Cambodian
Specifications
Supplied Accessories
Amplifier section
Cassette deck section
Remote control
Remote control
Parts Index
Main unit
Excluding Australian model