2. CONTROLS, INDICATORS AND CONNECTORS
2-1 Front Section (Cont’d)
• | The depth of field can be reduced and the lens focusing | |
| can be adjusted more accurately. | |
|
| CAUTION: |
| • | As the automatic shutter is activated here, flicker may |
|
| appear on the screen depending on the lighting |
|
| conditions (such as a fluorescent lamp, etc.) |
|
| Colors may appear for white subjects. |
| • | This operation is not possible in the LOLUX mode. |
2. CONTROLS, INDICATORS AND CONNECTORS
|
|
|
|
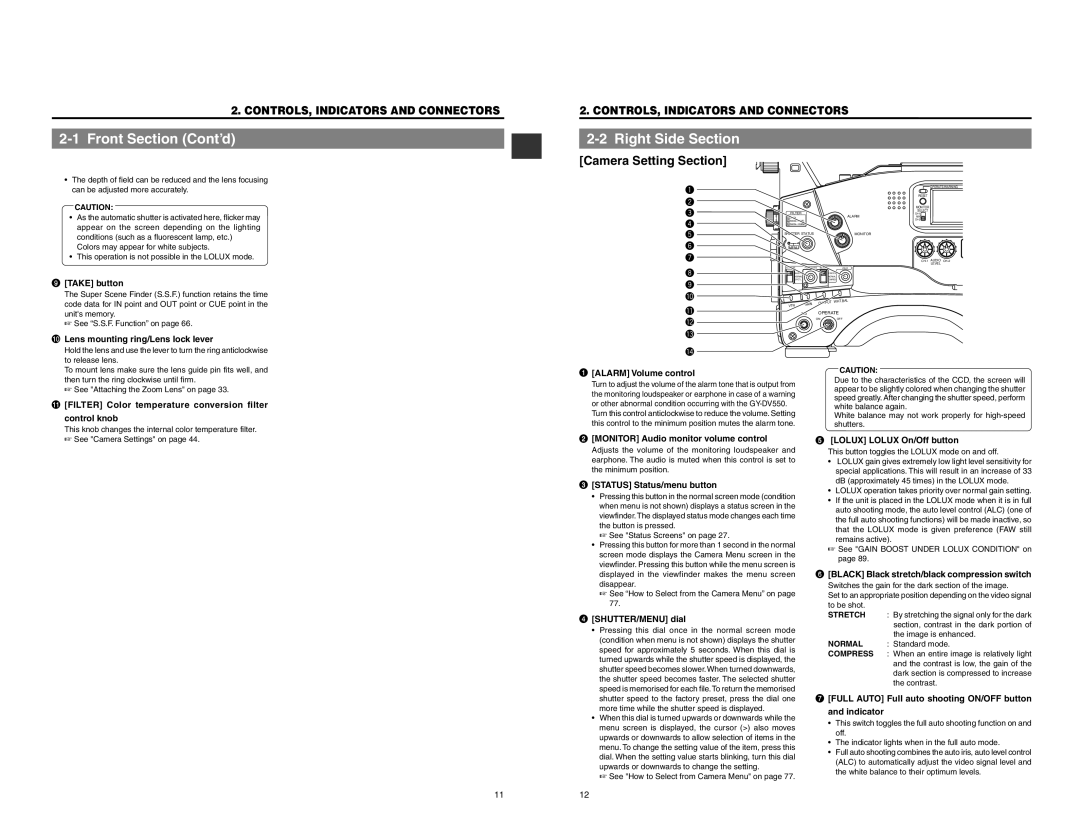
[Camera Setting Section] |
|
|
|
q |
|
| OPERATE/WARNING |
w |
|
| RESET |
|
| MONITOR | |
e |
|
| |
FILTER |
| SELECT | |
ALARM | |||
r | 1 3200k | MIX | |
2 5600k+1/8ND |
| ||
| 3 5600k+1/64ND |
|
|
t | SHUTTER STATUS | MONITOR |
|
y | MENU |
|
|
u |
|
| |
|
|
| LEVEL |
9 | [TAKE] button |
| The Super Scene Finder (S.S.F.) function retains the time |
| code data for IN point and OUT point or CUE point in the |
| unit's memory. |
| ☞ See “S.S.F. Function” on page 66. |
0 Lens mounting ring/Lens lock lever Hold the lens and use the lever to turn the ring anticlockwise to release lens. To mount lens make sure the lens guide pin fits well, and
1
i o !0
!1 !2 !3
!4 [ALARM] Volume control
AUTO IRIS | FULL AUTO BLACK | LOLUX |
BACK L |
| STRETCH |
NORMAL |
| NORMAL |
SPOT L |
|
|
NG OPERATE
ONOFF
CAUTION:
then turn the ring clockwise until firm.
☞See "Attaching the Zoom Lens" on page 33.
! [FILTER] Color temperature conversion filter control knob This knob changes the internal color temperature filter.
Turn to adjust the volume of the alarm tone that is output from | Due to the characteristics of the CCD, the screen will | |
appear to be slightly colored when changing the shutter | ||
the monitoring loudspeaker or earphone in case of a warning | ||
speed greatly. After changing the shutter speed, perform | ||
or other abnormal condition occurring with the | ||
white balance again. | ||
Turn this control anticlockwise to reduce the volume. Setting | ||
White balance may not work properly for | ||
this control to the minimum position mutes the alarm tone. | shutters. |
☞See "Camera Settings" on page 44.
2 | [MONITOR] Audio monitor volume control |
| Adjusts the volume of the monitoring loudspeaker and |
| earphone. The audio is muted when this control is set to |
| the minimum position. |
3 | [STATUS] Status/menu button | |
| • | Pressing this button in the normal screen mode (condition |
|
| when menu is not shown) displays a status screen in the |
|
| viewfinder.The displayed status mode changes each time |
|
| the button is pressed. |
|
| ☞ See "Status Screens" on page 27. |
| • | Pressing this button for more than 1 second in the normal |
|
| screen mode displays the Camera Menu screen in the |
|
| viewfinder. Pressing this button while the menu screen is |
|
| displayed in the viewfinder makes the menu screen |
|
| disappear. |
|
| ☞ See “How to Select from the Camera Menu” on page |
|
| 77. |
4 | [SHUTTER/MENU] dial | |
| • | Pressing this dial once in the normal screen mode |
|
| (condition when menu is not shown) displays the shutter |
|
| speed for approximately 5 seconds. When this dial is |
|
| turned upwards while the shutter speed is displayed, the |
|
| shutter speed becomes slower. When turned downwards, |
|
| the shutter speed becomes faster. The selected shutter |
|
| speed is memorised for each file.To return the memorised |
|
| shutter speed to the factory preset, press the dial one |
|
| more time while the shutter speed is displayed. |
| • | When this dial is turned upwards or downwards while the |
|
| menu screen is displayed, the cursor (>) also moves |
|
| upwards or downwards to allow selection of items in the |
|
| menu. To change the setting value of the item, press this |
|
| dial. When the setting value starts blinking, turn this dial |
|
| upwards or downwards to change the setting. |
|
| ☞ See "How to Select from Camera Menu" on page 77. |
5 | [LOLUX] LOLUX On/Off button | |
| This button toggles the LOLUX mode on and off. | |
| • | LOLUX gain gives extremely low light level sensitivity for |
|
| special applications. This will result in an increase of 33 |
|
| dB (approximately 45 times) in the LOLUX mode. |
| • | LOLUX operation takes priority over normal gain setting. |
| • | If the unit is placed in the LOLUX mode when it is in full |
|
| auto shooting mode, the auto level control (ALC) (one of |
|
| the full auto shooting functions) will be made inactive, so |
|
| that the LOLUX mode is given preference (FAW still |
|
| remains active). |
| ☞ See "GAIN BOOST UNDER LOLUX CONDITION" on | |
|
| page 89. |
6 | [BLACK] Black stretch/black compression switch | ||
| Switches the gain for the dark section of the image. | ||
| Set to an appropriate position depending on the video signal | ||
| to be shot. |
|
|
| STRETCH | : | By stretching the signal only for the dark |
|
|
| section, contrast in the dark portion of |
|
|
| the image is enhanced. |
| NORMAL | : | Standard mode. |
| COMPRESS | : | When an entire image is relatively light |
|
|
| and the contrast is low, the gain of the |
|
|
| dark section is compressed to increase |
|
|
| the contrast. |
7 | [FULL AUTO] Full auto shooting ON/OFF button | ||
| and indicator |
|
|
•This switch toggles the full auto shooting function on and off.
•The indicator lights when in the full auto mode.
•Full auto shooting combines the auto iris, auto level control (ALC) to automatically adjust the video signal level and the white balance to their optimum levels.
11 | 12 |