HDD & S-VHS Video Recorder English
Safety Precautions
Do not block the recorder’s ventilation openings or holes
For Italy
Before installing the recorder
Precaution for Hard Disk Drive
Before using the recorder
While using the recorder
Front View
Rear View
Front Display Panel
ON-SCREEN Display for HDD deck
ON-SCREEN Display for VHS deck
10 EN
Remote Control
Remote Control LCD
How To Use
12 EN
Check the contents
Situate the recorder
Connect the recorder to TV
Video Connection
8To connect to a TV with S-VIDEO/AUDIO in connectors
14 EN
Auto Set Up
Turn on the recorder
Select your country
Select the language
Perform Auto Set Up
Press rt to select your language code
Press rt to select Auto and press OK or e
16 EN
Perform Preset Download
Press rt to select CH - and press OK or e
Just Clock
Language for the on-screen display
18 EN
Language
Situate the Satellite Controller
Installing Satellite Controller
Attach the Satellite Controller
Make connections
20 EN
Setting satellite receivers brand and channel
VCR Auto Standby Direct Rec
TV Auto Power On
22 EN
Start playback
Basic Playback
Pause playback
Stop playback
Icons and their meanings
24 EN
Select the programmes
Access the Index screen
Press NAVIGATION. The HDD Navigation screen appears
Confirm that Index screen appears. Then, press t or OK
26 EN
Live Memory Playback
Start Live Memory Playback
Stop Live Memory Playback
Slow Motion
High-Speed Search
Pause during playback
Activate frame-by-frame playback
28 EN
Engage the ITR mode
Instant Timer Recording ITR
Receiving Stereo and Bilingual Programmes
Set the recording duration
Load a cassette
30 EN
Select the VHS deck
Set the tape speed
Usable cassettes
Find the programme start point
32 EN
Playback with VCR Navigation
Search for the programme
Access the VCR Navigation screen
Load the cassette
Select the programme
34 EN
Next Function Memory
Index Search
Activate Repeat Playback
Stop Repeat Playback
36 EN
Adjust the tracking manually
Manual Tracking
Override automatic tracking
Recording Resume Function
Watching Another
Accidental erasure prevention
View
Tape Remaining Time
38 EN
Retake
Press S-VHS ET on the recorder
Engage the S-VHS ET mode
On-screen Display
To Record Nicam Stereo and Bilingual Programmes
Recording
Playback
42 EN
Engage the recorder’s timer mode
Set the VPS/PDC mode
Set the category
Satellite Receiver Users
44 EN
Express Timer Programming
Classics Comedy Drama
VPS/PDC Recording
Return to the timer mode
Cancel or change a programme
Disengage the timer mode. VHS deck only
46 EN
Recording mode
Select the L-2 Select mode
Programme Recording
Before performing the following steps
Set the remote control code
Change the remote control code
48 EN
Display the code
TV PR +/-, TV %+/- Volume, TV Muting, number keys
TV Multi-Brand Remote Control
Set the TV brand code
Operate the TV
50 EN
Satellite Receiver Multi-Brand Remote Control
Set the satellite receiver brand code
Operate the satellite receiver
Display for modification or deletion
About Hybrid Navigation
Display for editing
Access the modify screen
Access the Navigation screen
Modify Information
52 EN
Enter new title
Modify Programme Title
Register new title
Return to the Navigation screen
Modify Category
54 EN
Select new category
Register new category
Delete Information
Access the delete screen
Confirm the deletion
Press w e to select DELETE, then press OK
56 EN
Dubbing
Easy Dubbing from HDD deck to VHS deck
Start dubbing
Insert a cassette with the record safety tab intact
Press HDD. The Easy Dubbing screen appears again
From HDD to VHS
58 EN
Prepare the HDD deck for dubbing
Prepare the VHS deck for dubbing
Press 8. Then press S-VHSand press
From VHS to HDD
Access the R.A.Edit screen
Access the edit screen
60 EN
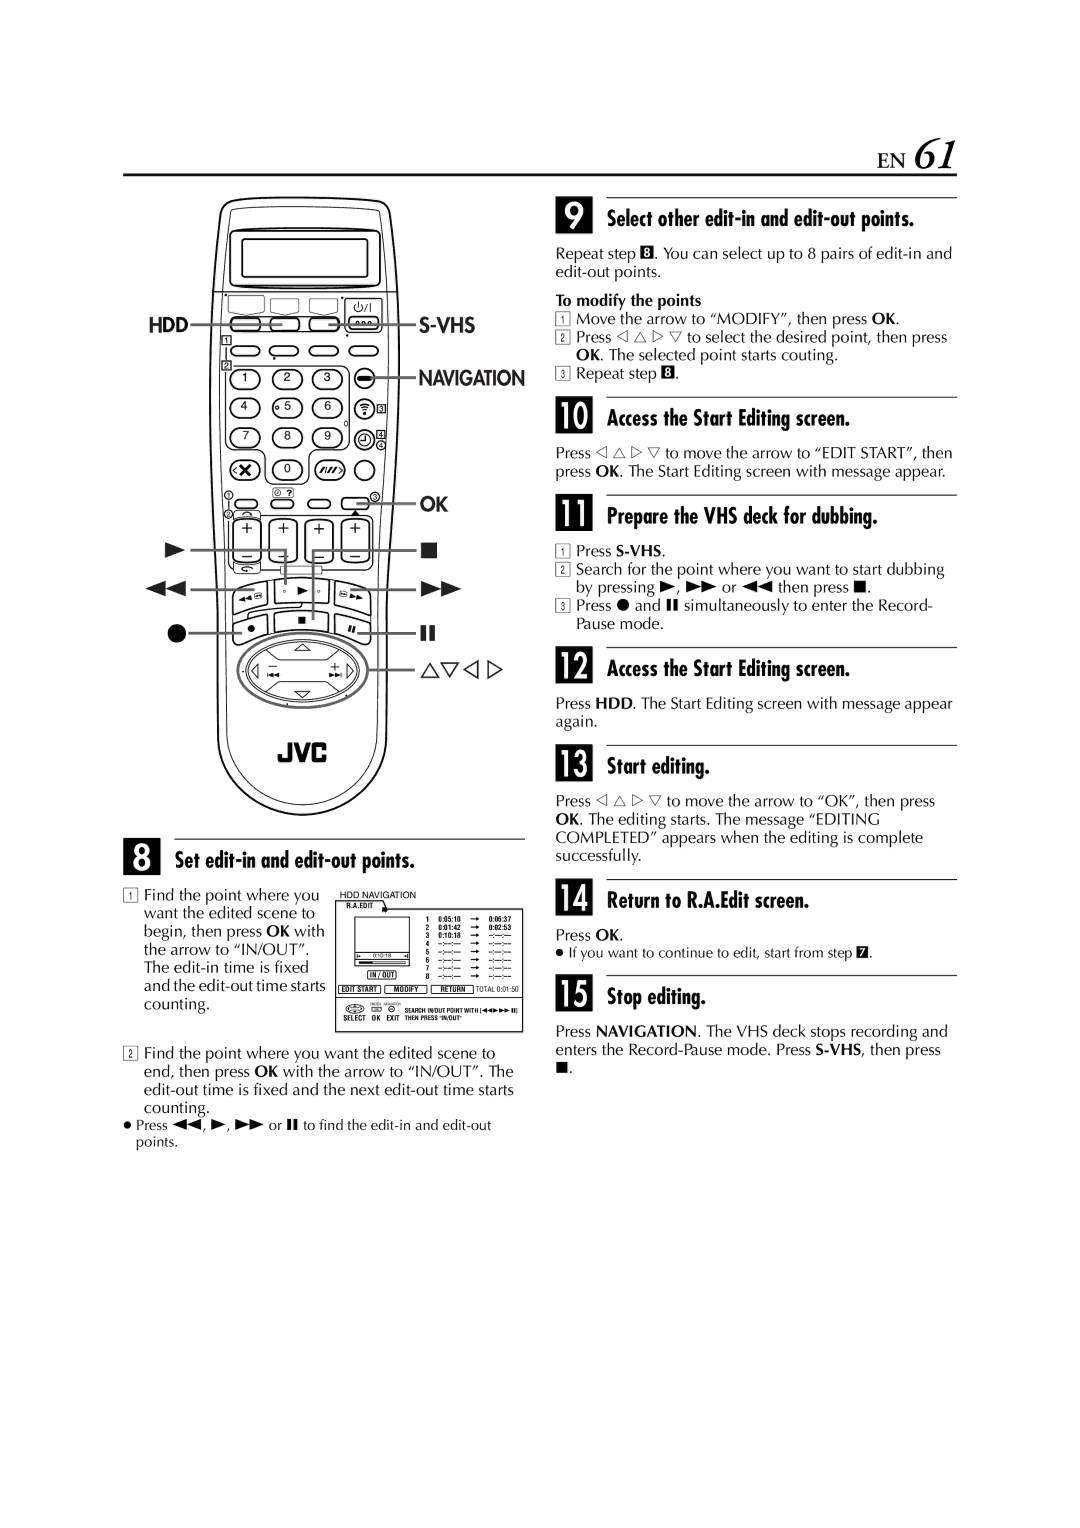
Select other edit-in and edit-out points
Access the Start Editing screen
Start editing
Return to R.A.Edit screen
Edit From a Camcorder
Audio and S-VIDEO input connectors
62 EN
Player
Select the recording deck
Set the recorder’s input mode
Set the edit mode. VHS deck only
Start the camcorder
64 EN
Access the Input/Output Set screen
Input Setting
Select Setting
Decoder connector
Select the input mode for the VIDEO/S Video connector
66 EN
Another Video Recorder
Recorder Player
68 EN
Audio Dubbing
Pre-recorded tape Audio-dubbed tape
CD player, etc
End Audio Dubbing
Engage the Audio Dubbing mode
Press A.DUB
Satellite receiver
Simple Connections
Decoder
Perfect Connections
72 EN
Select the input mode
Connect the decoder
Set the tuner
Make connections
Connecting/Using a Stereo System
Access the HDD Set Up screen
Mode Set
Select the mode
Select the mode setting
To record in S-VHS ET on a VHS cassette
To record in S-VHS
To record in VHS
To record in VHS on an S-VHS cassette
Entire programme while timer-recording in SP mode
VCR SET UP 1
76 EN
For Example
Using this video recorder as the source player for editing
Correction to the luminance signal to enhance detail
On or OFF � pg
Preference. Normally select Auto
78 EN
VCR SET UP 2
Guide Program Number Set
Showview System Setup
Guide Program Number
Enter the Guide Program number
Tuner Set
Access the Auto Channel Set screen
80 EN
Auto Channel Set
View the Confirmation screen
Perform Auto Channel Set
Press OK twice
Manual Channel Set
Access the Confirmation screen
Select the channel position
Select the band
Delete a Channel
Select the new position
84 EN
Set Stations B
Set Stations a
86 EN
When Receiving a Scrambled Broadcast
Station Name
TV Station And ID List
Clock Set
Access the Clock Set screen
88 EN
Set Just Clock
Set the date and time
Set the source channel position for clock data
Start the clock operation
90 EN
Tape, cover the hole where the tab
Insert a cassette, or using adhesive
Input mode is not correct Set the input mode to L-1, L-2 or
Recording cannot be started
Check the programmed data and re
92 EN
Recorder when Preset
Connect the fully-wired 21-pin
Perform Preset Download again
Remote control won’t operate
NAVIGATION. � pg
94 EN
To set the timer programme, the clock must be set
Cancel a timer programme already set. pg
Timer programme. pg
Appears when you stop setting timer programme
96 EN
What happens if the tape runs out during recording?
# remain lit on the front display panel. Is there a problem?
98 EN
Express Timer Programming
Audio Dubbing Auto Channel Set Auto Set Up
Tape Position Indicator Tape Remaining Time
S.T. Picture System
Country code
International telephone Language code