EDITING![]()
![]()
![]()
![]()
![]()
![]()
![]()
![]()
![]()
![]()
![]()
![]()
![]()
![]()
![]()
![]()
![]()
![]()
![]()
![]()
![]()
![]()
![]()
![]()
![]()
![]()
![]()
![]()
![]()
![]()
![]()
![]()
![]()
![]()
![]()
![]()
![]()
![]()
![]()
![]()
![]()
![]()
![]()
![]()
![]()
![]()
![]()
![]()
![]()
![]()
![]()
![]()
![]()
![]()
![]()
![]()
![]()
![]()
![]()
![]()
![]()
![]()
![]()
![]()
![]()
![]()
![]()
![]()
![]()
![]()
![]()
![]()
![]()
![]()
![]()
![]()
![]()
![]() EN
EN![]()
![]() 55
55![]()
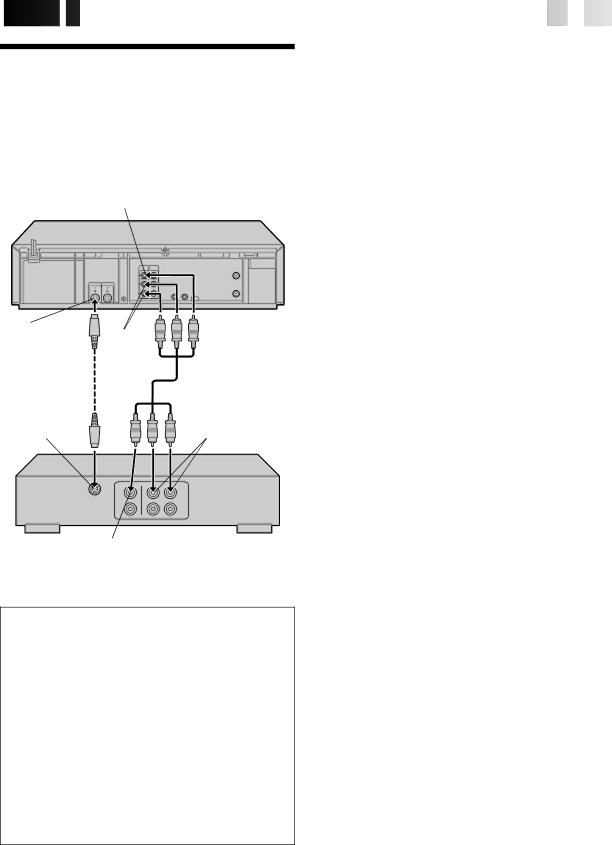
You can use your VCR as the player or the recorder.
Edit To Or
From Another
VCR
Player | VIDEO OUT |
Your VCR |
S VIDEO OUT | AUDIO |
| |
| OUT |
Audio/Video cable | |
(supplied) | (supplied) |
S VIDEO IN | AUDIO IN |
Recorder | VIDEO IN | Another VCR |
Advantages Of S-VHS Editing
You can edit from VHS to
●From VHS to
●From
●From
| 1 |
| MAKE CONNECTIONS |
|
| Connect an AV cable between the player’s VIDEO OUT | |
|
| and AUDIO OUT connectors and the recorder’s VIDEO | |
|
| IN and AUDIO IN connectors. | |
|
|
| ● If using another VCR with an |
|
|
| output connector, it is recommended to use the S- |
|
|
| VIDEO connection to minimize picture degradation |
|
|
| while editing. |
|
|
| ● When using your VCR as the recorder and a monaural |
|
|
| VCR as the player, connect the player’s AUDIO OUT |
|
|
| connector to the AUDIO IN L connector on the recorder. |
|
|
|
|
| 2 |
| LOAD CASSETTES |
|
| Insert the playback cassette into the player and the | |
|
| cassette to be recorded on into the recorder. | |
|
|
| SET RECORDER’S INPUT |
| 3 |
| MODE |
|
| Set to "AUX". With this VCR, press the NUMBER key "0" | |
|
| and/or CH to select depending on the connector being | |
|
| used – | |
|
|
| or |
|
|
| NOTE: |
|
|
| If you use your VCR as the recorder and have connected |
|
|
| another VCR to your VCR's |
|
|
| need to set "REAR AUX INPUT" to |
|
|
| Function screen. Follow steps 4 – 6 from the "Edit From |
|
|
| A Camcorder" section (☞ pg. 56 – 57). |
|
|
|
|
|
|
| ENGAGE TAPE DUBBING |
| 4 |
| MODE |
|
| Follow steps 12 – 14 from the "Edit From A Camcorder" | |
|
| section (☞ pg. 57). | |
| 5 |
| START PLAYER |
|
| Set to its play mode. | |
|
| NOTE: | |
|
|
| If the player is equipped with a superimpose/OSD |
|
|
| disable feature then set "SUPERIMPOSE" to OFF before |
|
|
| pressing PLAY (☞ pg. 28). |
|
|
|
|
| 6 |
| START RECORDER |
|
| Set to its record mode. |
NOTES:
●Be sure to set "TAPE DUB MODE" back to "OFF" when you finish editing.
●When "TAPE DUB MODE" is set to "ON" Active Video Calibration is deactivated in order to provide better picture quality edits.
●If you use an auxiliary input to connect a cable box or DBS receiver make sure that the correct input
