ENGLISH

РУССКИЙ

ELECTRICAL CONNECTIONS


ЭЛЕКТРИЧЕСКИЕ ПОДКЛЮЧЕНИЯ

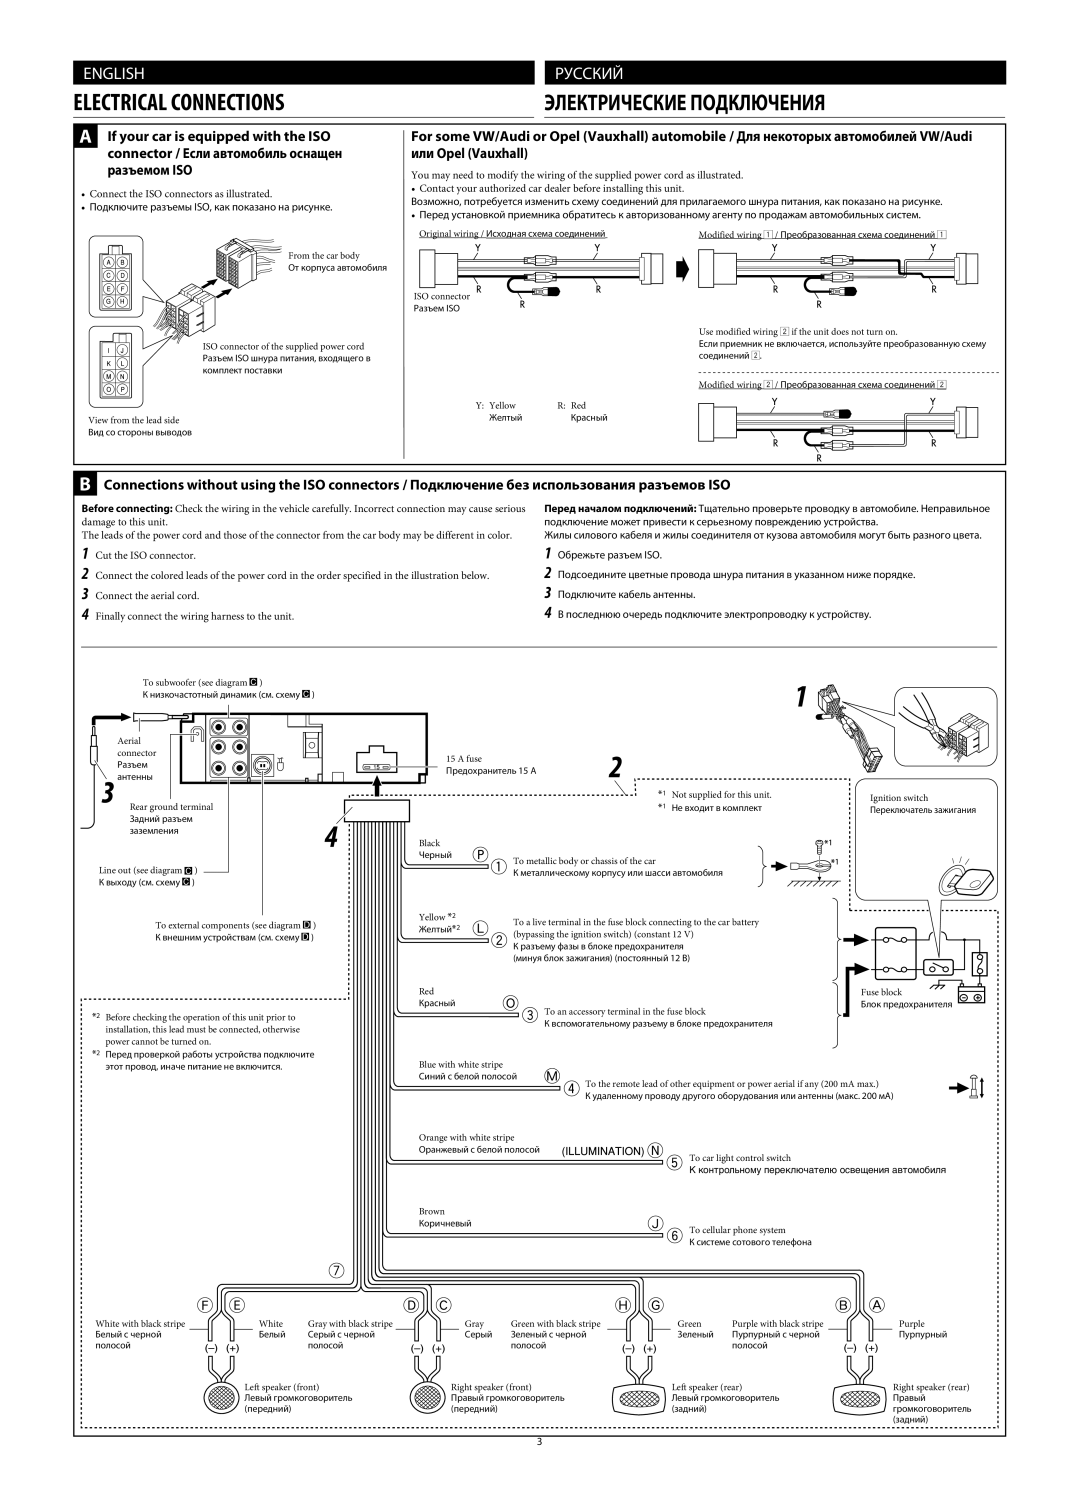
AIf your car is equipped with the ISO connector / Если автомобиль оснащен разъемом ISO

Connect the ISO connectors as illustrated.

Подключите разъемы ISO, как показано на рисунке.

For some VW/Audi or Opel (Vauxhall) automobile / Для некоторых автомобилей VW/Audi или Opel (Vauxhall)

You may need to modify the wiring of the supplied power cord as illustrated.

• Contact your authorized car dealer before installing this unit.

Возможно, потребуется изменить схему соединений для прилагаемого шнура питания, как показано на рисунке.

Перед установкой приемника обратитесь к авторизованному агенту по продажам автомобильных систем.

Original wiring / Исходная схема соединений

Modified wiring 1 / Преобразованная схема соединений 1

From the car body

От корпуса автомобиля

ISO connector

Разъем ISO


Use modified wiring 2 if the unit does not turn on.


ISO connector of the supplied power cord

Если приемник не включается, используйте преобразованную схему


Разъем ISO шнура питания, входящего в

соединений 2.


комплект поставки


Modified wiring 2 / Преобразованная схема соединений 2


Y: Yellow

R: Red

View from the lead side

Желтый

Красный

Вид со стороны выводов


BConnections without using the ISO connectors / Подключение без использования разъемов ISO

Before connecting: Check the wiring in the vehicle carefully. Incorrect connection may cause serious damage to this unit.

The leads of the power cord and those of the connector from the car body may be different in color.

1Cut the ISO connector.

2Connect the colored leads of the power cord in the order specified in the illustration below.

3Connect the aerial cord.

4Finally connect the wiring harness to the unit.

Перед началом подключений: Тщательно проверьте проводку в автомобиле. Неправильное подключение может привести к серьезному повреждению устройства.

Жилы силового кабеля и жилы соединителя от кузова автомобиля могут быть разного цвета.

1Обрежьте разъем ISO.

2Подсоедините цветные провода шнура питания в указанном ниже порядке.

3Подключите кабель антенны.

4В последнюю очередь подключите электропроводку к устройству.

To subwoofer (see diagram )

К низкочастотный динамик (см. схему )

Aerial connector

Разъем

антенны

15 A fuse

Предохранитель 15 A

Rear ground terminal

Задний разъем заземления

Line out (see diagram )

К выходу (см. схему )

Black

Черный

*1 Not supplied for this unit. *1 Не входит в комплект

To metallic body or chassis of the car

К металлическому корпусу или шасси автомобиля

Ignition switch

Переключатель зажигания

To external components (see diagram )

К внешним устройствам (см. схему )

Yellow *2

To a live terminal in the fuse block connecting to the car battery

Желтый*2

(bypassing the ignition switch) (constant 12 V)


Кразъему фазы в блоке предохранителя (минуя блок зажигания) (постоянный 12 В)

*2 Before checking the operation of this unit prior to installation, this lead must be connected, otherwise power cannot be turned on.

*2 Перед проверкой работы устройства подключите этот провод, иначе питание не включится.

Red

Красный

Blue with white stripe

Синий с белой полосой

Orange with white stripe

Оранжевый с белой полосой

Brown

Коричневый

Fuse block

Блок предохранителя

To an accessory terminal in the fuse block

К вспомогательному разъему в блоке предохранителя

To the remote lead of other equipment or power aerial if any (200 mA max.)

К удаленному проводу другого оборудования или антенны (макс. 200 мА)

To car light control switch

К контрольному переключателю освещения автомобиля

To cellular phone system

К системе сотового телефона

White with black stripe

White

Gray with black stripe

Gray

Green with black stripe

Green

Purple with black stripe

Purple

Белый с черной

Белый

Серый с черной

Серый

Зеленый с черной

Зеленый

Пурпурный с черной

Пурпурный

полосой


полосой


полосой


полосой


Left speaker (front)

Right speaker (front)

Left speaker (rear)

Right speaker (rear)


Левый громкоговоритель

Правый громкоговоритель

Левый громкоговоритель

Правый


(передний)


(передний)


(задний)


громкоговоритель


(задний)

3

Page 255
Image 255
JVC KD-G720, KD-AR770 manual Электрические Подключения

KD-G720, KD-AR770 specifications

The JVC KD-AR770 and KD-G720 are two prominent car audio receivers that exemplify JVC's commitment to delivering high-quality sound and advanced features for automotive enthusiasts. With their cutting-edge technology and user-friendly design, these models cater to a wide range of audio preferences and requirements.

The JVC KD-AR770 stands out with its sleek appearance and intuitive interface. One of its main features is the ability to connect to various audio sources, including USB ports for direct playback from flash drives, as well as Bluetooth connectivity for wireless streaming. This allows users to enjoy their favorite music from smartphones and other compatible devices effortlessly. Additionally, the built-in amplifier delivers a powerful output, ensuring that every note is crisp and clear.

Equipped with a comprehensive equalizer, the KD-AR770 allows users to customize their sound experience. This feature enables them to adjust frequency levels for bass, mid, and treble, creating a tailored audio profile that suits individual preferences. The receiver also supports various audio formats, including MP3 and WAV files, ensuring versatility for music lovers.

On the other hand, the JVC KD-G720 shares many similarities with the KD-AR770 but adds its own unique features. With a vibrant LCD display, the KD-G720 enhances usability with easy navigation through menus, making it accessible for all users. Like its counterpart, it supports multiple audio sources, including CD playback and iPod connectivity, enabling users to enjoy a variety of listening options.

Both models feature high-quality sound enhancement technologies, such as JVC's Digital Sound Processing (DSP), which enhances the overall audio output, providing an immersive listening experience. The receivers also include programmable presets, allowing users to store their favorite radio stations for quick access.

Another notable characteristic of both the KD-AR770 and KD-G720 is their user-friendly controls. The layout of buttons and knobs is designed for ease of use, ensuring that drivers can adjust settings safely while on the road. Furthermore, each model has compatibility with various vehicle systems, making installation straightforward.

In summary, the JVC KD-AR770 and KD-G720 are impressive car audio receivers designed for those who seek quality sound and convenience. Their array of features, from Bluetooth connectivity to customizable sound settings, combined with user-friendly interfaces, makes them ideal choices for enhancing any vehicle's audio system. With these receivers, drivers can enjoy a richer, more engaging listening experience miles down the road.