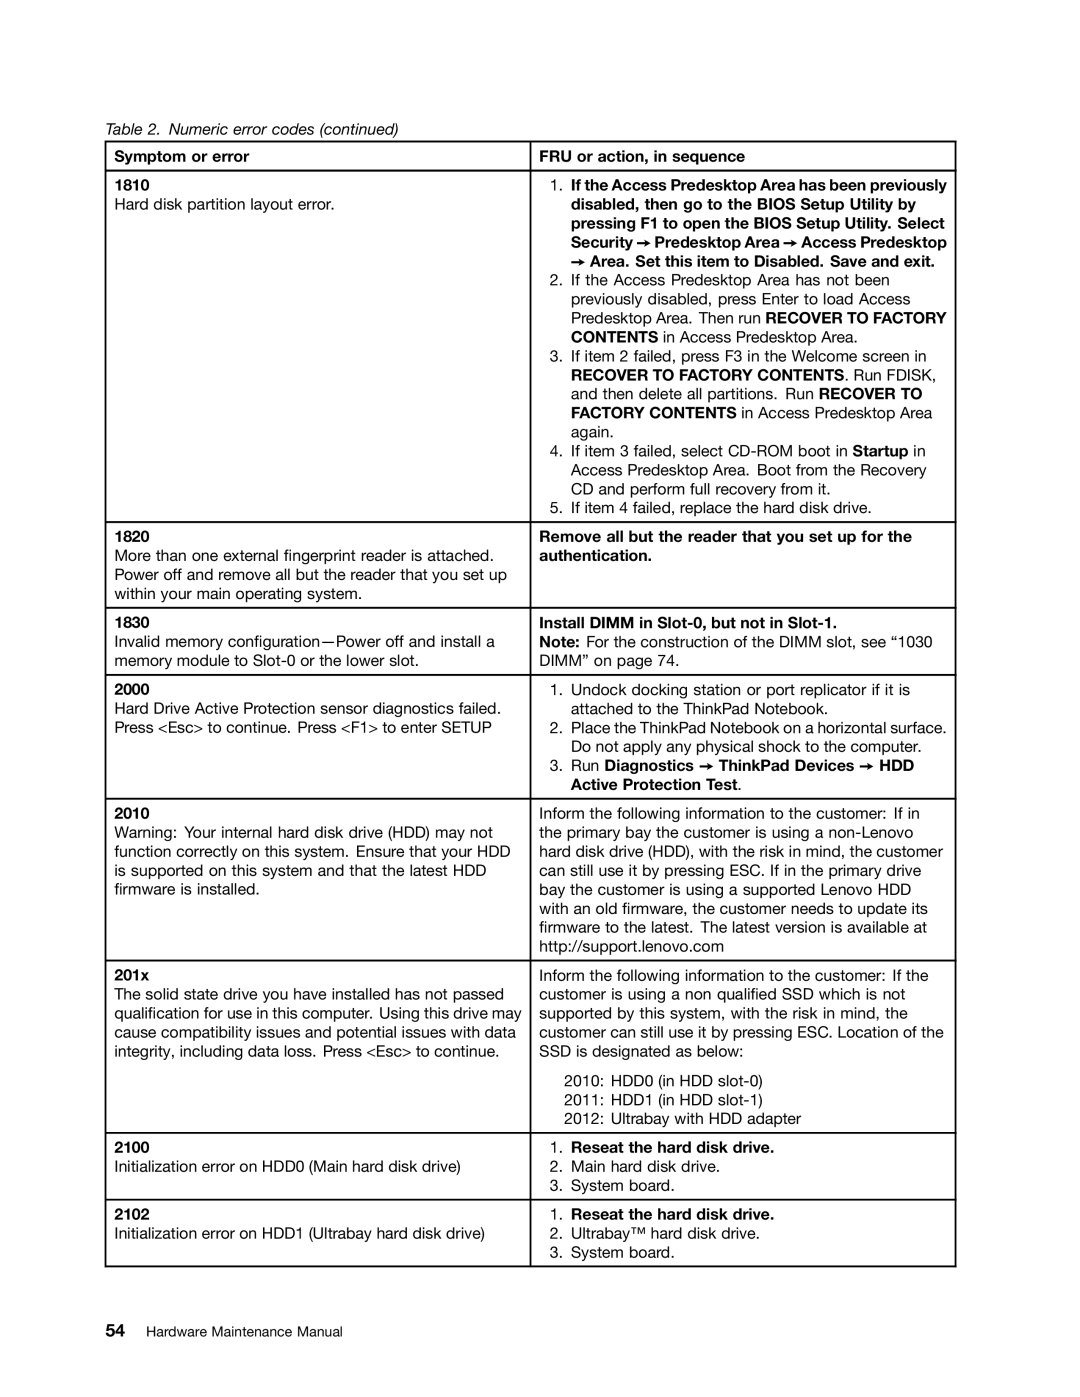
Table 2. Numeric error codes (continued)
Symptom or error | FRU or action, in sequence | |
|
|
|
1810 | 1. | If the Access Predesktop Area has been previously |
Hard disk partition layout error. |
| disabled, then go to the BIOS Setup Utility by |
|
| pressing F1 to open the BIOS Setup Utility. Select |
|
| Security ➙ Predesktop Area ➙ Access Predesktop |
|
| ➙ Area. Set this item to Disabled. Save and exit. |
| 2. | If the Access Predesktop Area has not been |
|
| previously disabled, press Enter to load Access |
|
| Predesktop Area. Then run RECOVER TO FACTORY |
|
| CONTENTS in Access Predesktop Area. |
| 3. | If item 2 failed, press F3 in the Welcome screen in |
|
| RECOVER TO FACTORY CONTENTS. Run FDISK, |
|
| and then delete all partitions. Run RECOVER TO |
|
| FACTORY CONTENTS in Access Predesktop Area |
|
| again. |
| 4. | If item 3 failed, select |
|
| Access Predesktop Area. Boot from the Recovery |
|
| CD and perform full recovery from it. |
| 5. | If item 4 failed, replace the hard disk drive. |
|
| |
1820 | Remove all but the reader that you set up for the | |
More than one external fingerprint reader is attached. | authentication. | |
Power off and remove all but the reader that you set up |
|
|
within your main operating system. |
|
|
|
| |
1830 | Install DIMM in | |
Invalid memory | Note: For the construction of the DIMM slot, see “1030 | |
memory module to | DIMM” on page 74. | |
|
|
|
2000 | 1. | Undock docking station or port replicator if it is |
Hard Drive Active Protection sensor diagnostics failed. |
| attached to the ThinkPad Notebook. |
Press <Esc> to continue. Press <F1> to enter SETUP | 2. | Place the ThinkPad Notebook on a horizontal surface. |
|
| Do not apply any physical shock to the computer. |
| 3. | Run Diagnostics ➙ ThinkPad Devices ➙ HDD |
|
| Active Protection Test. |
|
| |
2010 | Inform the following information to the customer: If in | |
Warning: Your internal hard disk drive (HDD) may not | the primary bay the customer is using a | |
function correctly on this system. Ensure that your HDD | hard disk drive (HDD), with the risk in mind, the customer | |
is supported on this system and that the latest HDD | can still use it by pressing ESC. If in the primary drive | |
firmware is installed. | bay the customer is using a supported Lenovo HDD | |
| with an old firmware, the customer needs to update its | |
| firmware to the latest. The latest version is available at | |
| http://support.lenovo.com | |
|
| |
201x | Inform the following information to the customer: If the | |
The solid state drive you have installed has not passed | customer is using a non qualified SSD which is not | |
qualification for use in this computer. Using this drive may | supported by this system, with the risk in mind, the | |
cause compatibility issues and potential issues with data | customer can still use it by pressing ESC. Location of the | |
integrity, including data loss. Press <Esc> to continue. | SSD is designated as below: | |
|
| 2010: HDD0 (in HDD |
|
| 2011: HDD1 (in HDD |
|
| 2012: Ultrabay with HDD adapter |
|
|
|
2100 | 1. | Reseat the hard disk drive. |
Initialization error on HDD0 (Main hard disk drive) | 2. | Main hard disk drive. |
| 3. | System board. |
|
|
|
2102 | 1. | Reseat the hard disk drive. |
Initialization error on HDD1 (Ultrabay hard disk drive) | 2. | Ultrabay™ hard disk drive. |
| 3. | System board. |
|
|
|