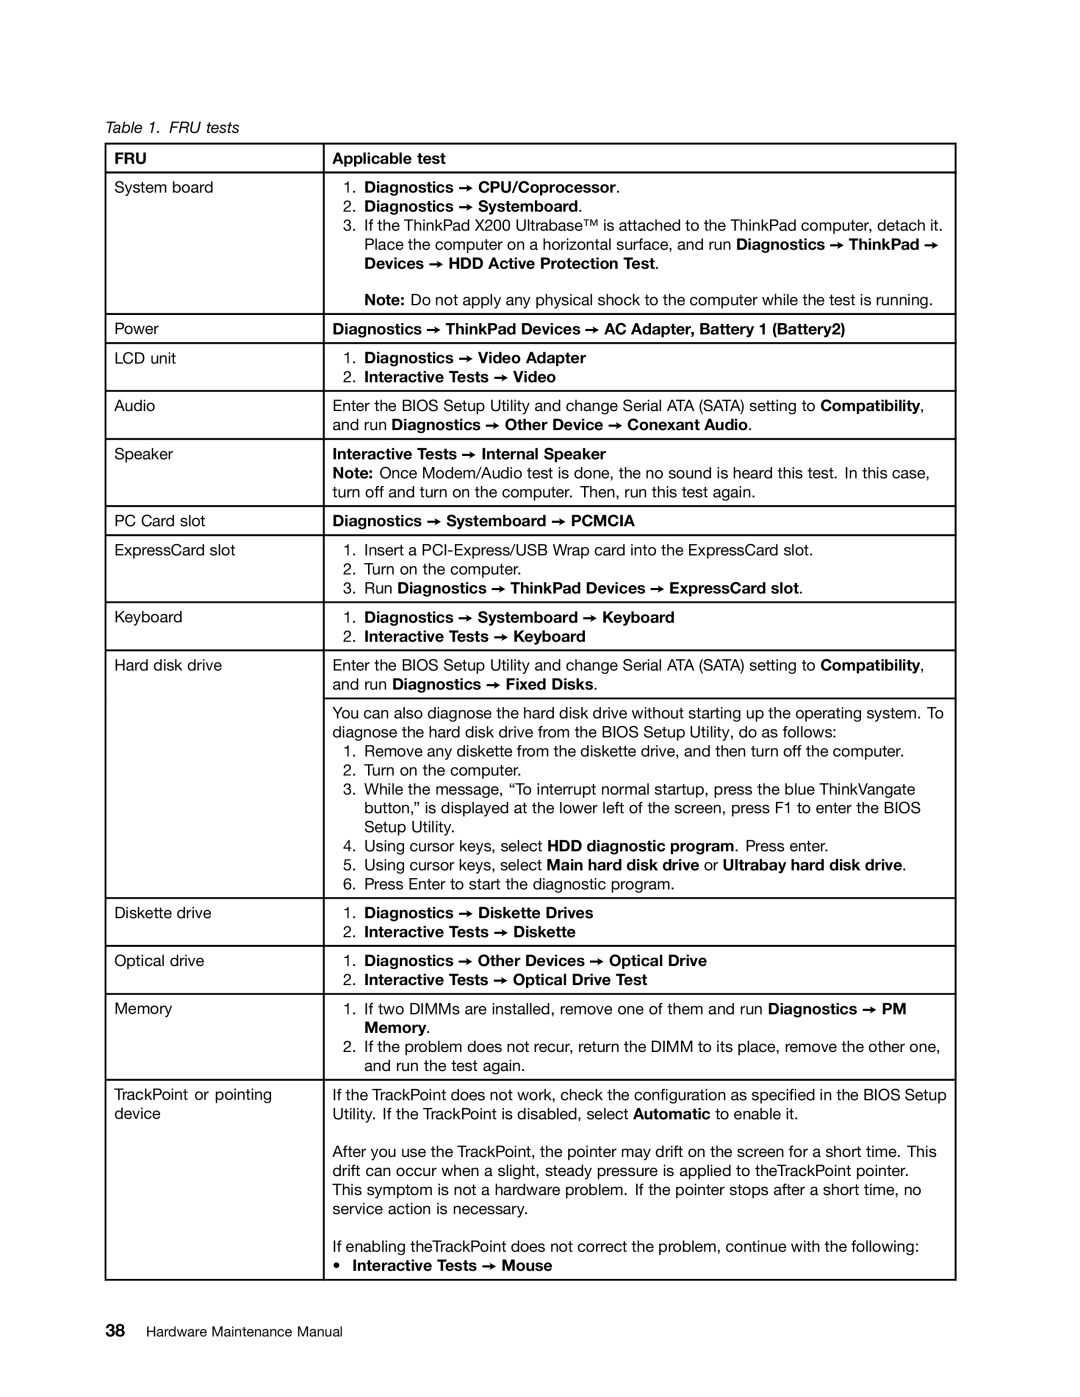
Table 1. FRU tests
FRU | Applicable test | |
|
| |
System board | 1. Diagnostics ➙ CPU/Coprocessor. | |
| 2. | Diagnostics ➙ Systemboard. |
| 3. | If the ThinkPad X200 Ultrabase™ is attached to the ThinkPad computer, detach it. |
|
| Place the computer on a horizontal surface, and run Diagnostics ➙ ThinkPad ➙ |
|
| Devices ➙ HDD Active Protection Test. |
|
| Note: Do not apply any physical shock to the computer while the test is running. |
|
| |
Power | Diagnostics ➙ ThinkPad Devices ➙ AC Adapter, Battery 1 (Battery2) | |
|
| |
LCD unit | 1. Diagnostics ➙ Video Adapter | |
| 2. | Interactive Tests ➙ Video |
Audio | Enter the BIOS Setup Utility and change Serial ATA (SATA) setting to Compatibility, | |
| and run Diagnostics ➙ Other Device ➙ Conexant Audio. | |
Speaker | Interactive Tests ➙ Internal Speaker | |
| Note: Once Modem/Audio test is done, the no sound is heard this test. In this case, | |
| turn off and turn on the computer. Then, run this test again. | |
|
| |
PC Card slot | Diagnostics ➙ Systemboard ➙ PCMCIA | |
|
| |
ExpressCard slot | 1. Insert a | |
| 2. | Turn on the computer. |
| 3. | Run Diagnostics ➙ ThinkPad Devices ➙ ExpressCard slot. |
Keyboard | 1. Diagnostics ➙ Systemboard ➙ Keyboard | |
| 2. | Interactive Tests ➙ Keyboard |
Hard disk drive | Enter the BIOS Setup Utility and change Serial ATA (SATA) setting to Compatibility, | |
| and run Diagnostics ➙ Fixed Disks. | |
| You can also diagnose the hard disk drive without starting up the operating system. To | |
| diagnose the hard disk drive from the BIOS Setup Utility, do as follows: | |
| 1. | Remove any diskette from the diskette drive, and then turn off the computer. |
| 2. | Turn on the computer. |
| 3. | While the message, “To interrupt normal startup, press the blue ThinkVangate |
|
| button,” is displayed at the lower left of the screen, press F1 to enter the BIOS |
|
| Setup Utility. |
| 4. | Using cursor keys, select HDD diagnostic program. Press enter. |
| 5. | Using cursor keys, select Main hard disk drive or Ultrabay hard disk drive. |
| 6. | Press Enter to start the diagnostic program. |
|
|
|
Diskette drive | 1. | Diagnostics ➙ Diskette Drives |
| 2. | Interactive Tests ➙ Diskette |
Optical drive | 1. | Diagnostics ➙ Other Devices ➙ Optical Drive |
| 2. | Interactive Tests ➙ Optical Drive Test |
Memory | 1. If two DIMMs are installed, remove one of them and run Diagnostics ➙ PM | |
|
| Memory. |
| 2. | If the problem does not recur, return the DIMM to its place, remove the other one, |
|
| and run the test again. |
|
| |
TrackPoint or pointing | If the TrackPoint does not work, check the configuration as specified in the BIOS Setup | |
device | Utility. If the TrackPoint is disabled, select Automatic to enable it. | |
| After you use the TrackPoint, the pointer may drift on the screen for a short time. This | |
| drift can occur when a slight, steady pressure is applied to theTrackPoint pointer. | |
| This symptom is not a hardware problem. If the pointer stops after a short time, no | |
| service action is necessary. | |
| If enabling theTrackPoint does not correct the problem, continue with the following: | |
| • Interactive Tests ➙ Mouse | |