ENGLISH

Caution:

Be sure to use speakers with the specified impedance as shown on the rear panel of this unit.

To prevent damage to circuitry, do not let the bare speaker wires touch each other and do not let them

touch any metal part of this unit.

• Do not touch the speaker terminals when the power is on. It may cause you to receive an

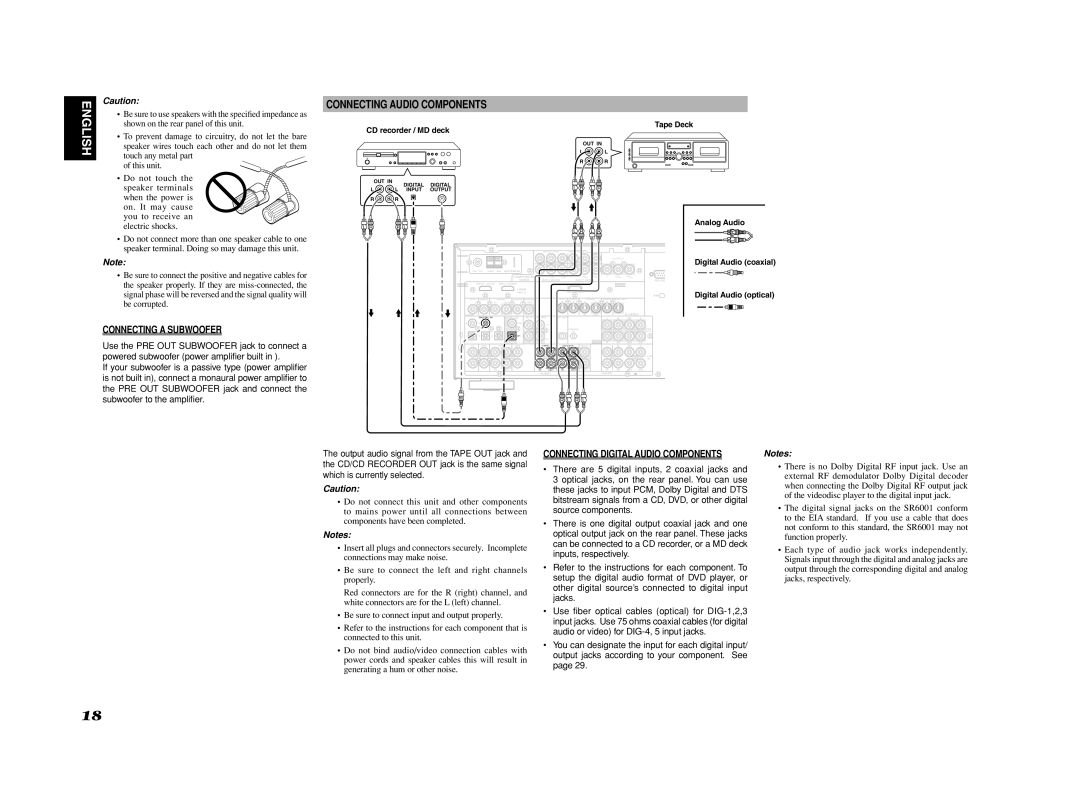
CONNECTING AUDIO COMPONENTS

CD recorder / MD deck


Tape Deck


OUT IN


L

L


R

R

OUT IN

DIGITAL

DIGITAL


L

L R

L R

L INPUT

OUTPUT

R

R


electric shocks.

Do not connect more than one speaker cable to one speaker terminal. Doing so may damage this unit.

Note:

Be sure to connect the positive and negative cables for the speaker properly. If they are miss-connected, the signal phase will be reversed and the signal quality will be corrupted.

CONNECTING A SUBWOOFER

Use the PRE OUT SUBWOOFER jack to connect a powered subwoofer (power amplifier built in ).

If your subwoofer is a passive type (power amplifier is not built in), connect a monaural power amplifier to the PRE OUT SUBWOOFER jack and connect the

L R R L

L R L R

INPUT 1(TV)

INPUT 2(DVD)


OUTPUT

FM (75)

GND

AM

ANTENNA


COMPONENT

Y

CB/PB CR/PR

Y

CB/PB CR/PR

Y

CB/PB CR/PR


VIDEO


INPUT 3(VCR)


INPUT 4(DSS)


RS-232


INPUT 1(DVD)

INPUT 2(DSS)


OUTPUT


HDMI


Ver1.2


XM

TV(1)


DVD(2)

VCR(3)

DSS(4)

MONITOR


TV(1)

DVD(2)

VCR(3)

DSS(4)

MONI. OUT


IN

OUT


OUT


VIDEO


IN

OUT


S-VIDEO


DIGITAL IN

DIGITAL OUT

RC-5 MULTI RC

DC OUT


L

SL

SBL

C

4

5


COAX.


IN


FLASHER


PRE


IN


OUT

1

2

3


OPT.


OUT


R

SR

SBR

SW

TV


DVD

VCR

DSS


TAPE

CD/CD-R

MULTI


L

SL

SBL

C

L


7.1CH


IN

R


IN

OUT


IN

OUT

IN

OUT

OUT


R

SR

SBR

SW


AUDIO


(AUX2)


Analog Audio

L R

Digital Audio (coaxial)

Digital Audio (optical)

subwoofer to the amplifier.

R L R L

The output audio signal from the TAPE OUT jack and the CD/CD RECORDER OUT jack is the same signal which is currently selected.

Caution:

Do not connect this unit and other components to mains power until all connections between components have been completed.

Notes:

Insert all plugs and connectors securely. Incomplete connections may make noise.

Be sure to connect the left and right channels properly.

Red connectors are for the R (right) channel, and white connectors are for the L (left) channel.

Be sure to connect input and output properly.

Refer to the instructions for each component that is connected to this unit.

Do not bind audio/video connection cables with power cords and speaker cables this will result in generating a hum or other noise.

CONNECTING DIGITAL AUDIO COMPONENTS

There are 5 digital inputs, 2 coaxial jacks and 3 optical jacks, on the rear panel. You can use these jacks to input PCM, Dolby Digital and DTS bitstream signals from a CD, DVD, or other digital source components.

There is one digital output coaxial jack and one optical output jack on the rear panel. These jacks can be connected to a CD recorder, or a MD deck inputs, respectively.

Refer to the instructions for each component. To setup the digital audio format of DVD player, or other digital source’s connected to digital input jacks.

Use fi ber optical cables (optical) for DIG-1,2,3 input jacks. Use 75 ohms coaxial cables (for digital audio or video) for DIG-4, 5 input jacks.

You can designate the input for each digital input/ output jacks according to your component. See page 29.

Notes:

There is no Dolby Digital RF input jack. Use an external RF demodulator Dolby Digital decoder when connecting the Dolby Digital RF output jack of the videodisc player to the digital input jack.

The digital signal jacks on the SR6001 conform to the EIA standard. If you use a cable that does not conform to this standard, the SR6001 may not function properly.

Each type of audio jack works independently. Signals input through the digital and analog jacks are output through the corresponding digital and analog jacks, respectively.

18

Page 21
Image 21
Marantz SR6001 manual Connecting Audio Components, Connecting a Subwoofer, Connecting Digital Audio Components

SR6001 specifications

The Marantz SR6001 is a high-performance audio/video receiver that was designed for home theater enthusiasts seeking an immersive cinematic experience. As part of Marantz's esteemed lineup, the SR6001 showcases a blend of advanced technologies and elegant design, making it an attractive choice for audio aficionados.

At the heart of the SR6001 is a robust amplifier section capable of delivering 90 watts per channel across seven channels, ensuring that your movies and music come to life with powerful clarity. This receiver supports a wide range of audio formats, including Dolby Digital, DTS, and PCM, allowing for a rich sound experience. The inclusion of Dolby Pro Logic II is a notable feature, offering enhanced sound staging and a more realistic audio environment.

One of the standout technologies in the SR6001 is its implementation of HDMI 1.1 ports, allowing for high-definition video and multi-channel audio transmission. This feature ensures that users can connect their latest Blu-ray players and gaming consoles to enjoy stunning visuals alongside breathtaking sound. The receiver also includes multiple inputs and outputs, enabling seamless integration with various components in your home theater setup.

Another key characteristic of the Marantz SR6001 is its advanced room calibration system, which helps to optimize audio performance based on your specific room acoustics. This technology, known as Audyssey MultEQ, analyzes the sound and makes adjustments to deliver the best possible listening experience regardless of your room's shape or furnishings.

Moreover, the SR6001 sports an elegant design, complemented by a front panel that features a sleek display and intuitive controls. Its user-friendly interface makes it easy to navigate through settings and options, ensuring that users can quickly access their favorite features without confusion.

In terms of connectivity, the Marantz SR6001 is equipped with a variety of inputs, including composite, component, and digital audio inputs, providing flexibility in connecting to different sources. Its built-in AM/FM tuner also allows users to enjoy radio broadcasts in high quality.

With its powerful performance, advanced technologies, and stylish design, the Marantz SR6001 finishes as a formidable choice for anyone looking to elevate their home entertainment experience.