Manuals
/
Marantz
/
Home Audio
/
Stereo System
Marantz
SR6003 English, 2-1AUTO SETUP Audyssey MultEQ, Function, Basic, Notes, Advanced, Others
Models:
SR6003
1
33
90
90
Download
90 pages
42.07 Kb
30
31
32
33
34
35
36
37
Troubleshooting
Install
Signals To Hdmi
Password
Connecting Speaker Wire
Dimension
Symptom
6-1PRESET G. EQ ADJ
Accessories Check
Setup
Page 33
Image 33
Page 32
Page 34
Page 33
Image 33
Page 32
Page 34
Contents
SR6003
AV Surround Receiver
ESPAÑOL FRANÇAIS ENGLISH
NOTE TO CATV SYSTEM INSTALLER
RISK OF ELECTRIC SHOCK DO NOT OPEN
DECLARATION OF CONFORMITY
Additional Safety Information
READ BEFORE OPERATING EQUIPMENT
IMPORTANT SAFETY INSTRUCTIONS
INTRODUCTION
ACCESSORIES CHECK
ENGLISH
Before use, check the below accessories were
TABLE OF CONTENTS
FEATURES
ENGLISH
EQUIPMENT MAINS WORKING SETTING
BEFORE USE
SETUP
ENGLISH
REMOTE CONTROL
OPERATION OF REMOTE CONTROLLER
ENGLISH
LOADING BATTERIES
er t y uio !0!1 !2
NAMES AND FUNCTION
9!8!7!6
5 !4
FL DISPLAY AND INDICATER
ENGLISH
Page
ENGLISH
‹4 ‹5
Page
SETUP
BASIC CONNECTIONS
ENGLISH
HEIGHT OF THE SPEAKER UNITS
CONNECTING A SUBWOOFER
CONNECTING SPEAKER WIRE
SETUP
ENGLISH
CONNECTING AUDIO COMPONENTS
CONNECTING DIGITAL AUDIO COMPONENTS
ENGLISH
OTHERS
ENGLISH
SETUP
VIDEO, S-VIDEO,COMPONENT JACKS
VIDEO jack
ENGLISH
CONNECTING HDMI COMPONENTS
HDMI JACKS
FUNCTION
CONNECTING THE SUPPLIED ANTENNAS
CONNECTING THE AC POWER CABLE
CONNECTING THE FM OUTDOOR ANTENNA
CONNECTING THE AM OUTDOOR ANTENNA
1.3. 1 3 2
BASIC OPERATION
ADJUSTING THE MAIN VOLUME
ADJUSTING THE TONE BASS & TREBLE CONTROL
MANUAL TUNING
1 2 3
FM TUNING MODE AUTO STEREO OR MONO
Using the remote controller
ENGLISH
REMOTE CONTROLLER OPERATION
BASIC
ADVANCED
SETUP
ADVANCED CONNECTIONS
ENGLISH
NAMES AND
Power
CONNECTING AN EXTERNAL POWER AMPLIFIER
Powered
CONNECTING FOR SPEAKER C USE BI-AMPCONNECTION
ENGLISH
SETUP
NAMES AND FUNCTION
BASIC
aRS-232C
ENGLISH
sDC OUT DC TRIGGER
dFLASHER IN
ENGLISH
CONNECTING THE SATELLITE RADIO
SIRIUS SATELLITE RADIO
BASIC
ENGLISH
SETUP
SYSTEM
RC003SR BUTTON CONTROL
ENGLISH
SETUP
NAMES AND
FUNCTION
FUNCTION
ENGLISH
BASIC
ADVANCED
1-27.1 CH INPUT SETUP
1-1FUNCTION INPUT SETUP ASSIGNABLE DIGITAL INPUT
SETUP
ENGLISH
1-3FUNCTION RENAME
ENGLISH
FUNCTION
BASIC
TROUBLESHOOTING
SETUP
ENGLISH
NAMES
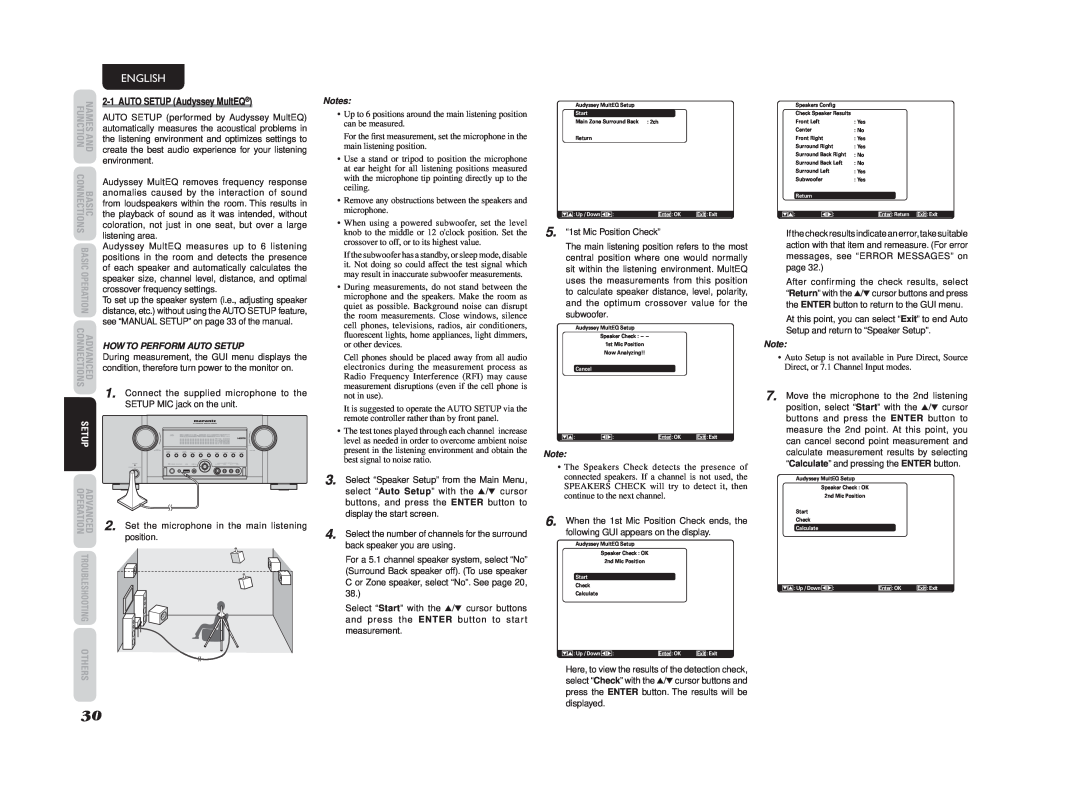
HOW TO PERFORM AUTO SETUP
2-1AUTO SETUP Audyssey MultEQ
ENGLISH
FUNCTION
ADVANCED
ENGLISH
OPERATION
Notes
FUNCTION
ENGLISH
BASIC
ADVANCED
SETUP
2-2MANUAL SETUP
ENGLISH
SPEAKER SIZE
<SPEAKERS LEVEL>
ENGLISH
FUNCTION
BASIC
ENGLISH
SETUP
3-1CHANNEL LEVEL
NAMES AND
3-2PLIIx PRO LOGIC IIx MUSIC PARAMETER
ENGLISH
3-3CSIIPARAMETER
3-4NEO 6 PARAMETER
ENGLISH
SETUP
NAMES AND
FUNCTION
ENGLISH
5 PREFERENCE
OTHERS
5-2DC TRIGGER SETUP
5-1ZONE SETUP
SETUP
ENGLISH
ENGLISH
OTHERS
Notes
SETUP
6-1PRESET G. EQ ADJ
ENGLISH
6-2CHECK AUTO
DISPLAY MODE
ADVANCED OPERATION
RECORDING AN ANALOG SOURCE
OTHERS
Using the unit
LISTENING THROUGH HEADPHONES
Using the remote controller
When headphones are used, the MENU button
ATTENUATION TO ANALOG INPUT SIGNAL
2 4.1 4 3
Using the remote controller
ENGLISH
AUTO POWER OFF
AUTO POWER ON
DUAL BACKUP MEMORY
BACKUP
HDMI RESOLUTION
SIGNALS TO HDMI
“VIDEO SETUP” menu to “DISABLE”
ENGLISH
Using the remote controller
Using the unit
SETUP
ENGLISH
REMOTE CONTROLLER
2.2 3. 2
ENGLISH
THE UNIT
ENGLISH
SETUP
PLAYING SPECIFIC PARTS SEARCH
NAMES AND
Unknown device
ENGLISH
No device
Unknown FS
4.2.1. 3. 2.
3.1 2 2
3.2
PRESET MEMORY
CLEARING STORED PRESET STATIONS
4.5. 2. 5. 4. 2 5.
SORTING PRESET STATIONS
NAME INPUT OF THE PRESET STATION
CHECKING THE XM SIGNAL STRENGTH AND RADIO ID
1. 1 2
Using the unit
Using the remote controller
SWITCHING XM INFORMATION IN THE FRONT
1 2 3.
Satellite signal status Terrestrial signal status
ENGLISH
1.3. 1
1.3.
1.3.6. 4. 5. 1
1 3.
CHECKING THE XM PRESET CHANNEL
3.2. 2 3
Using the unit
Using the remote controller
PRESET SCAN
1 5 2. 3.
CLEARING STORED PRESET CHANNELS
SETUP
Using the unit
CHECKING THE SIRIUS SIGNAL STRENGTH AND RADIO ID
Using the remote controller
NO SIGNAL display
ENGLISH
Satellite signal status Terrestrial signal status
PANEL DISPLAY
Channel number/name Artist name/Song title
PRESET SEARCH MODE
1.3.6. 4. 5. 1 5 4 2 3
Using the unit
Using the remote controller
ENGLISH
3. 2. 2 3
CHECKING THE SIRIUS PRESET CHANNEL
Using the unit
3. 5. 2. 3 5 2 3 5
2. 2 3
PRESET SCAN
CLEARING STORED PRESET CHANNELS
3. 4. 6.
3.2 3 2 3
CHANGING THE PASSWORD
SETUP
3.4 1 5 3. 4
3.4 1. 3. 4
ZONE PLAYBACK USING THE ZONE OUT TERMINALS
ZONE PLAYBACK USING THE ZONE SPEAKER A TERMINALS
CHANGE THE ZONE CONTROL COMMANDS RC101 FOR ZONE B
CHANGE THE ZONE CONTROL COMMANDS RC101 FOR ZONE A
WITH THE REMOTE CONTROL
ENGLISH
CONTROLLING MARANTZ COMPONENTS
ENGLISH
CONTROLLING A MARANTZ DSS DSS MODE
FUNCTION
NAMES AND
ENGLISH
FUNCTION
BASIC
PRESET MODE
2 3 2 3 5
BASIC OPERATION REMOTE CONTROLLER
When operating non-MarantzAV equipment products
LEARNING PROCEDURE
RESETTING THE CODE
SETUP
ENGLISH
ENGLISH
RETURNING TO INITIAL SETTINGS
ERASING PROGRAMMED CODES
Erasing the code by buttons
SETUP
1 3 4
ENGLISH
PROGRAMMING MACROS
USING MACROS
1 3 4 5. 6 7 1 5 4 7 2
ENGLISH
EDITING MACROS
SETUP
1.3 3 3 4
ENGLISH
Example
ENGLISH
1. 3 1
CLEARING MACRO PROGRAMS
FUNCTION
SYMPTOM
TROUBLESHOOTING
SYMPTOM
ENGLISH
FUNCTION
ENGLISH
BASIC
ADVANCED
PROTECTIVE FEATURE
HOW TO RESET THE UNIT
SETUP
ENGLISH
ENGLISH
OTHERS
FUNCTION
BASIC
ENGLISH
SETUP
AUTO
SOURCE DIRECT
2MODE
ENGLISH
CIRCLE SURROUND
CSII-CINEMA, CSII-MUSIC, CSII-MONO
ENGLISH
DESCRIPTION
• dts Digital Surround
• dts Neo:6
About Dolby Pro Logic
ENGLISH
ENGLISH
SETUP
x.v.Color
XM Satellite Radio Ready
DIMENSIONS
ACCESSORIES
ENGLISH
FM TUNER SECTION
SETUP CODES
Page
is a registered trademark
Top
Page
Image
Contents