USB OPERATION
Any USB media that complies with the USB Mass Storage Class standard can be used with this unit. The USB media fi le systems support FAT16 and FAT32.
MP3, WMA, AAC and WAV music fi les can be played back by the unit. (See page 50)
To operate the unit from the remote controller, press the DMP button on the remote controller so that the USB mode is engaged.
PREPARATIONS FOR USB OPERATION
Note:
Before proceeding with USB operation, check that the unit and monitor screen are connected properly.
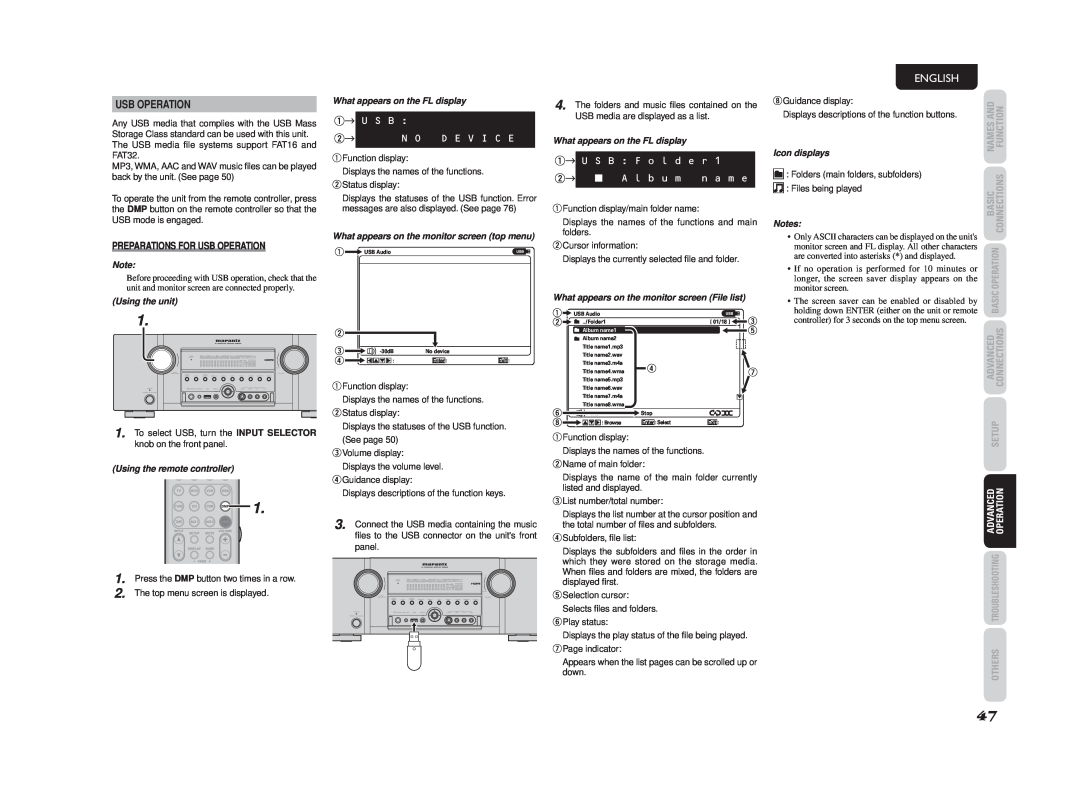
(Using the unit)
1.
1. To select USB, turn the INPUT SELECTOR knob on the front panel.
(Using the remote controller)
![]()
![]()
![]()
![]() 1.
1.
1. Press the DMP button two times in a row.
2. The top menu screen is displayed.
What appears on the FL display
q→ U S B :
w→ | N O D E V I C E |
|
|
qFunction display:
Displays the names of the functions. wStatus display:
Displays the statuses of the USB function. Error messages are also displayed. (See page 76)
What appears on the monitor screen (top menu)
q![]()
![]() USB Audio
USB Audio
w
e | No device |
| |
r | : | Enter : | Exit : |
qFunction display:
Displays the names of the functions. wStatus display:
Displays the statuses of the USB function.
(See page 50)
eVolume display:
Displays the volume level. rGuidance display:
Displays descriptions of the function keys.
3. Connect the USB media containing the music files to the USB connector on the unit's front panel.
4. The folders and music fi les contained on the USB media are displayed as a list.
What appears on the FL display
q→ U S B : F o l d e r 1 | |
w→ | A l b u m n a m e |
qFunction display/main folder name:
Displays the names of the functions and main folders.
wCursor information:
Displays the currently selected fi le and folder.
What appears on the monitor screen (File list)
q |
|
| USB Audio |
|
|
|
|
|
| e |
|
|
|
|
|
|
| ||||
w |
|
| ../Folder1 | [ 01/18 ] |
|
|
|
| ||
|
|
|
|
| ||||||
|
|
| Album name1 |
|
|
|
|
|
| t |
|
|
|
|
|
|
|
|
| ||
|
|
| Album name2 |
|
|
|
|
|
|
|
|
|
| Title name1.mp3 |
|
|
|
|
|
|
|
|
|
| Title name2.wav |
|
|
|
|
|
|
|
|
|
| Title name3.m4a | r |
|
|
|
| ||
|
|
| Title name4.wma |
|
|
| u | |||
|
|
|
|
|
|
|
|
| ||
|
|
| Title name5.mp3 |
|
|
|
|
|
|
|
|
|
| Title name6.wav |
|
|
|
|
|
|
|
|
|
| Title name7.m4a |
|
|
|
|
|
|
|
|
|
|
|
|
|
|
|
|
| |
|
|
| Title name8.wma |
|
|
|
|
|
|
|
y |
| Stop |
|
i | : Browse | Enter : Select | Exit : |
qFunction display:
Displays the names of the functions. wName of main folder:
Displays the name of the main folder currently listed and displayed.
eList number/total number:
Displays the list number at the cursor position and the total number of fi les and subfolders.
rSubfolders, file list:
Displays the subfolders and fi les in the order in which they were stored on the storage media. When fi les and folders are mixed, the folders are displayed first.
tSelection cursor:
Selects files and folders. yPlay status:
Displays the play status of the fi le being played. uPage indicator:
Appears when the list pages can be scrolled up or down.
ENGLISH |
|
| |
iGuidance display: | ANDNAMES | FUNCTION | |
Displays descriptions of the function buttons. | |||
|
| ||
Icon displays |
|
| |
: Folders (main folders, subfolders) | BASIC | CONNECTIONS | |
: Files being played | |||
|
| ||
Notes: |
|
| |
• Only ASCII characters can be displayed on the unit's |
|
| |
monitor screen and FL display. All other characters | OPERATION | ||
are converted into asterisks (*) and displayed. | |||
|
| ||
• If no operation is performed for 10 minutes or |
|
| |
longer, the screen saver display appears on the |
|
| |
monitor screen. | BASIC | ||
holding down ENTER (either on the unit or remote | |||
• The screen saver can be enabled or disabled by |
|
| |
controller) for 3 seconds on the top menu screen. |
|
| |
| ADVANCED | CONNECTIONS | |
| SETUP | ||
| ADVANCED | OPERATION | |
| TROUBLESHOOTING | ||
| OTHERS | ||
47