HOME AUTOMATION
INSTALLATION (ML-100A Only)
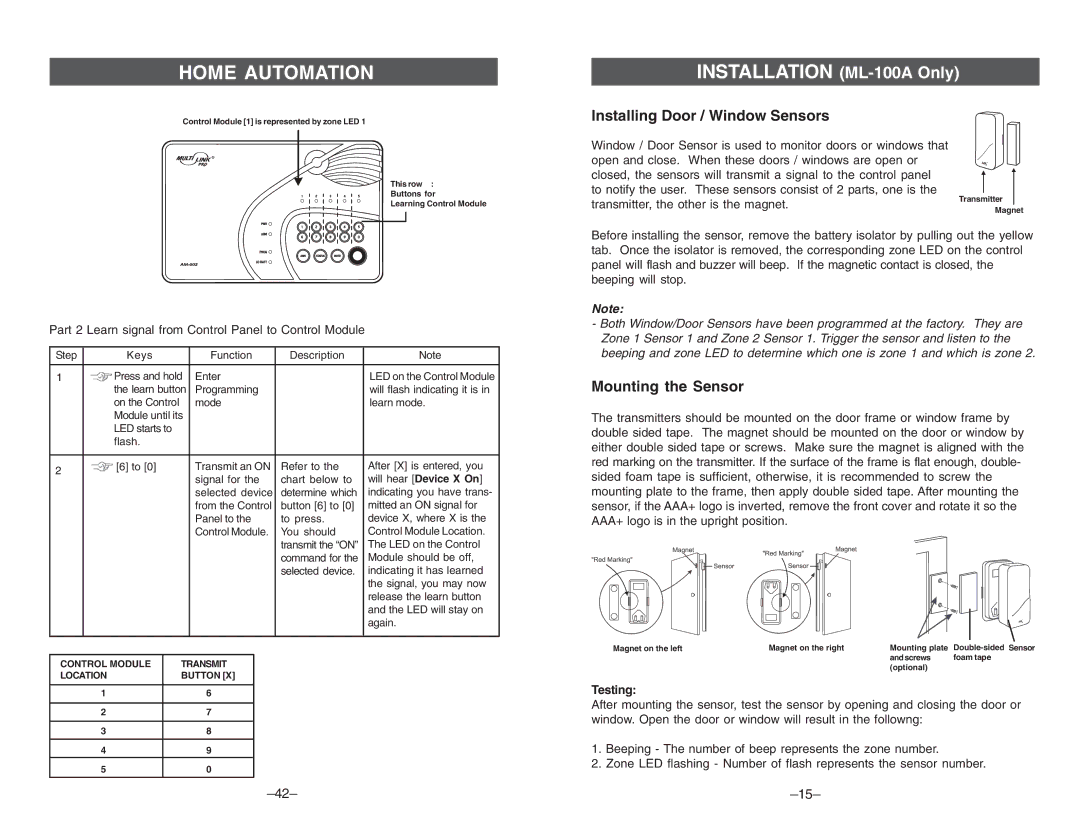
Control Module [1] is represented by zone LED 1
This row :
Buttons for
Learning Control Module
Installing Door / Window Sensors
Window / Door Sensor is used to monitor doors or windows that open and close. When these doors / windows are open or closed, the sensors will transmit a signal to the control panel to notify the user. These sensors consist of 2 parts, one is the transmitter, the other is the magnet.
Transmitter Magnet
Part 2 Learn signal from Control Panel to Control Module
Step |
| Keys |
| Function | Description | Note | ||
|
|
|
|
|
| |||
1 |
| Press and hold | Enter |
| LED on the Control Module | |||
|
| the learn button | Programming |
| will flash indicating it is in | |||
|
| on the Control |
| mode |
| learn mode. | ||
|
| Module until its |
|
|
|
| ||
|
| LED starts to |
|
|
|
|
| |
|
| flash. |
|
|
|
|
| |
|
|
|
|
|
|
| ||
2 |
| [6] to [0] |
| Transmit an ON | Refer to the | After [X] is entered, you | ||
|
|
|
| signal for the | chart below to | will hear [Device X On] | ||
|
|
|
|
| ||||
|
|
|
|
| selected device | determine which | indicating you have trans- | |
|
|
|
|
| from the Control | button [6] to [0] | mitted an ON signal for | |
|
|
|
|
| Panel to the | to press. | device X, where X is the | |
|
|
|
|
| Control Module. | You should | Control Module Location. | |
|
|
|
|
|
|
| transmit the “ON” | The LED on the Control |
|
|
|
|
|
|
| command for the | Module should be off, |
|
|
|
|
|
|
| selected device. | indicating it has learned |
|
|
|
|
|
|
|
| the signal, you may now |
|
|
|
|
|
|
|
| release the learn button |
|
|
|
|
|
|
|
| and the LED will stay on |
|
|
|
|
|
|
|
| again. |
|
|
|
|
|
|
|
| |
|
|
|
|
|
|
|
|
|
CONTROL MODULE |
| TRANSMIT |
|
|
| |||
LOCATION |
|
| BUTTON [X] |
|
|
| ||
|
|
|
|
|
|
|
|
|
1 |
|
|
| 6 |
|
|
| |
|
|
|
|
|
|
|
|
|
2 |
|
|
| 7 |
|
|
| |
|
|
|
|
|
|
|
|
|
3 |
|
|
| 8 |
|
|
| |
|
|
|
|
|
|
|
|
|
4 |
|
|
| 9 |
|
|
| |
5 |
|
|
| 0 |
|
|
| |
|
|
|
|
|
|
|
|
|
Before installing the sensor, remove the battery isolator by pulling out the yellow tab. Once the isolator is removed, the corresponding zone LED on the control panel will flash and buzzer will beep. If the magnetic contact is closed, the beeping will stop.
Note:
-Both Window/Door Sensors have been programmed at the factory. They are Zone 1 Sensor 1 and Zone 2 Sensor 1. Trigger the sensor and listen to the beeping and zone LED to determine which one is zone 1 and which is zone 2.
Mounting the Sensor
The transmitters should be mounted on the door frame or window frame by double sided tape. The magnet should be mounted on the door or window by either double sided tape or screws. Make sure the magnet is aligned with the red marking on the transmitter. If the surface of the frame is flat enough, double- sided foam tape is sufficient, otherwise, it is recommended to screw the mounting plate to the frame, then apply double sided tape. After mounting the sensor, if the AAA+ logo is inverted, remove the front cover and rotate it so the AAA+ logo is in the upright position.
Magnet on the left | Magnet on the right | Mounting plate | |
|
| and screws | foam tape |
|
| (optional) |
|
Testing:
After mounting the sensor, test the sensor by opening and closing the door or window. Open the door or window will result in the followng:
1.Beeping - The number of beep represents the zone number.
2.Zone LED flashing - Number of flash represents the sensor number.