Connecting the DV-CP802—Continued
Connecting an AV Receiver
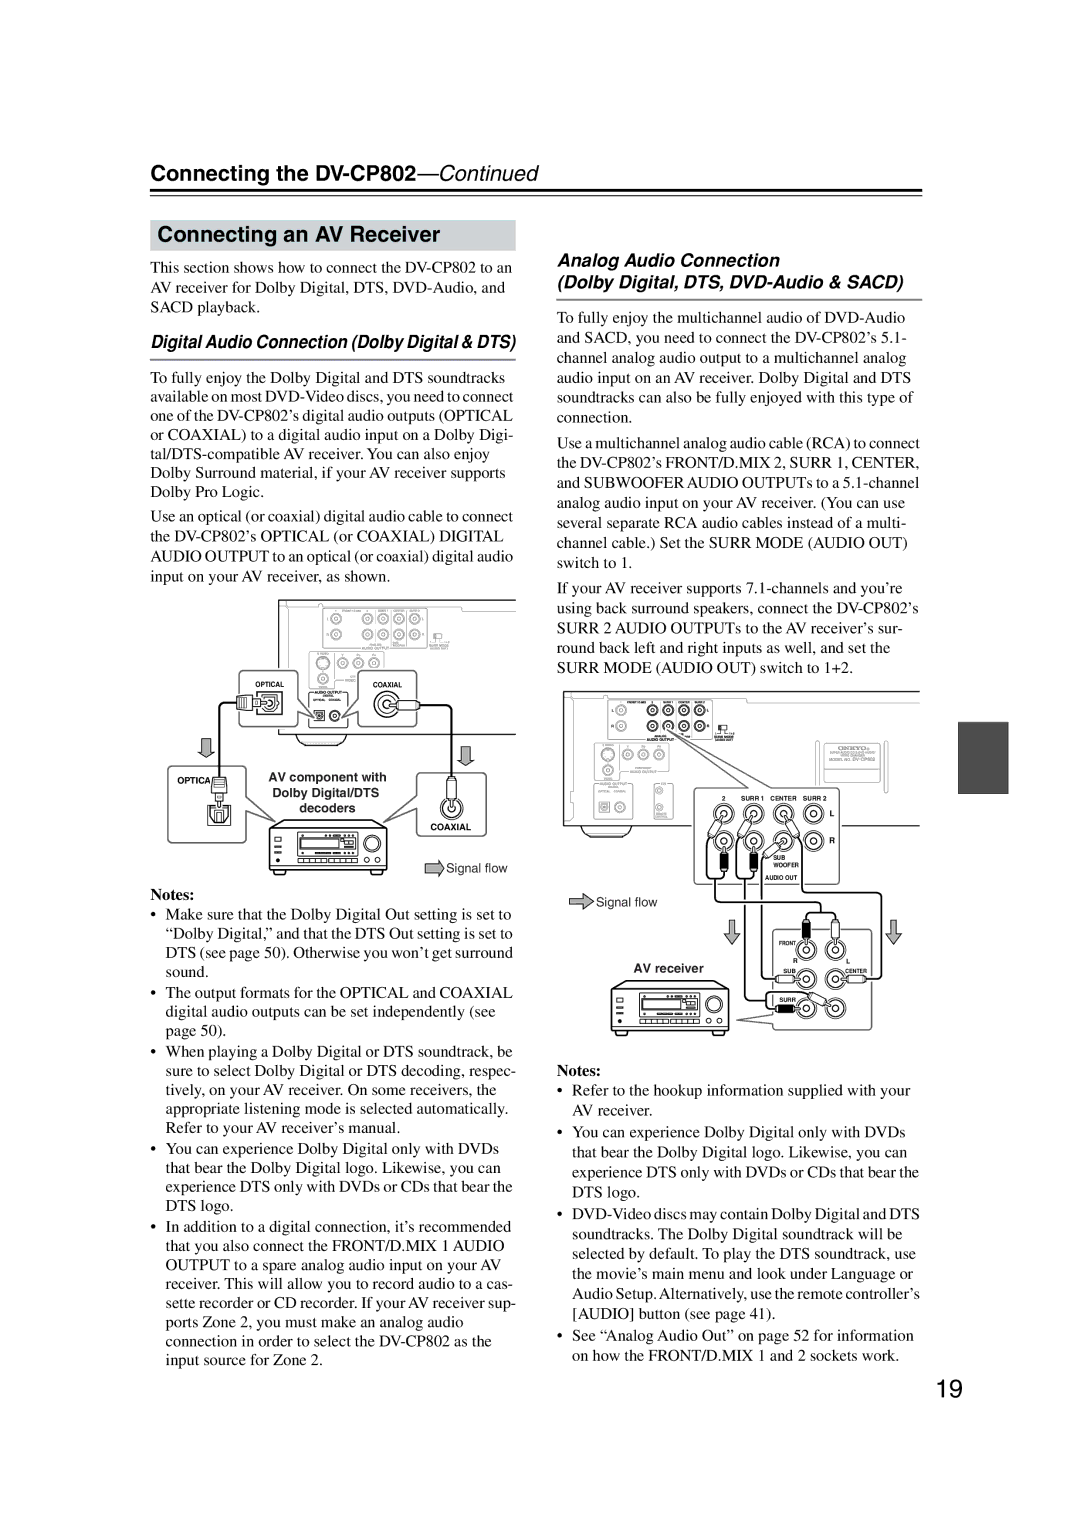
This section shows how to connect the |
| Analog Audio Connection |
| (Dolby Digital, DTS, | |
AV receiver for Dolby Digital, DTS, |
| |
SACD playback. |
|
|
| To fully enjoy the multichannel audio of | |
|
| |
Digital Audio Connection (Dolby Digital & DTS) |
| and SACD, you need to connect the |
|
| channel analog audio output to a multichannel analog |
| ||
To fully enjoy the Dolby Digital and DTS soundtracks |
| audio input on an AV receiver. Dolby Digital and DTS |
available on most |
| soundtracks can also be fully enjoyed with this type of |
one of the |
| connection. |
or COAXIAL) to a digital audio input on a Dolby Digi- |
| Use a multichannel analog audio cable (RCA) to connect |
| ||
| the | |
Dolby Surround material, if your AV receiver supports |
| |
| and SUBWOOFER AUDIO OUTPUTs to a | |
Dolby Pro Logic. |
| |
| analog audio input on your AV receiver. (You can use | |
Use an optical (or coaxial) digital audio cable to connect |
| |
| several separate RCA audio cables instead of a multi- | |
the |
| |
| channel cable.) Set the SURR MODE (AUDIO OUT) | |
AUDIO OUTPUT to an optical (or coaxial) digital audio |
| |
| switch to 1. | |
input on your AV receiver, as shown. |
| |
|
|
|
|
| If your AV receiver supports | |
|
|
| using back surround speakers, connect the | |
| L |
| SURR 2 AUDIO OUTPUTs to the AV receiver’s sur- | |
| R |
| ||
|
|
| round back left and right inputs as well, and set the | |
|
|
| SURR MODE (AUDIO OUT) switch to 1+2. | |
| OPTICAL | COAXIAL |
|
|
|
|
| L |
|
|
|
| R |
|
OPTICAL | AV component with |
|
| |
| Dolby Digital/DTS | 2 | SURR 1 CENTER SURR 2 | |
| decoders |
| ||
|
|
| L | |
|
|
|
| |
|
|
| COAXIAL |
|
|
|
|
| R |
|
|
| Signal flow | SUB |
|
|
| WOOFER | |
|
|
| AUDIO OUT | |
|
|
|
| |
Notes: | Signal flow |
|
| |
• Make sure that the Dolby Digital Out setting is set to |
|
| ||
|
|
| ||
“Dolby Digital,” and that the DTS Out setting is set to |
| FRONT |
| |
DTS (see page 50). Otherwise you won’t get surround |
|
| ||
AV receiver | R | L | ||
sound. | ||||
SUB | CENTER | |||
• The output formats for the OPTICAL and COAXIAL |
| SURR |
| |
digital audio outputs can be set independently (see |
|
|
| |
page 50). |
|
|
| |
• When playing a Dolby Digital or DTS soundtrack, be |
|
|
| |
sure to select Dolby Digital or DTS decoding, respec- | Notes: |
|
| |
tively, on your AV receiver. On some receivers, the | • Refer to the hookup information supplied with your | |||
appropriate listening mode is selected automatically. | AV receiver. |
|
| |
Refer to your AV receiver’s manual. | • You can experience Dolby Digital only with DVDs | |||
• You can experience Dolby Digital only with DVDs | that bear the Dolby Digital logo. Likewise, you can | |||
that bear the Dolby Digital logo. Likewise, you can | experience DTS only with DVDs or CDs that bear the | |||
experience DTS only with DVDs or CDs that bear the | DTS logo. |
|
| |
|
|
| ||
DTS logo. | • | |
• In addition to a digital connection, it’s recommended | ||
soundtracks. The Dolby Digital soundtrack will be | ||
that you also connect the FRONT/D.MIX 1 AUDIO | ||
selected by default. To play the DTS soundtrack, use | ||
OUTPUT to a spare analog audio input on your AV | ||
the movie’s main menu and look under Language or | ||
receiver. This will allow you to record audio to a cas- | ||
Audio Setup. Alternatively, use the remote controller’s | ||
sette recorder or CD recorder. If your AV receiver sup- | ||
[AUDIO] button (see page 41). | ||
ports Zone 2, you must make an analog audio | ||
• See “Analog Audio Out” on page 52 for information | ||
connection in order to select the | ||
on how the FRONT/D.MIX 1 and 2 sockets work. | ||
input source for Zone 2. | ||
|
19
