Audio dubbing (cont.)
$ Listening to sound that has been dubbed
You can switch between the sound that has been dubbed and the sound heard during shooting using the 32K (12bit) AUDIO item setting on the PLAYBACK FUNCTION screen. (P73)
ST1:
The sound heard during shooting is played back.
ST2:
The sound that has been dubbed on a recording is played back.
MIX:
Both the sound heard during shooting and that you have dubbed on a recording are played back at the same time.
$ Performing audio dubbing as you listen to it
You can monitor the sound by setting “ST2” while audio dubbing is temporarily suspended.
If you use headphones when performing audio dubbing on a recording using mic input, you can listen to the sound being dubbed.
When you perform audio dubbing using line input (from the audio component connected to the AV IN/OUT jack), you can listen to the sound being dubbed through the speakers.
$ Using the counter memory function to edit dubbed sound
1First reset the counter memory display at the position where the audio dubbing is to
end. (P53)
2Rewind the tape to the position where the audio dubbing is to start, and start the dubbing.
3The tape then stops automatically at the position on the tape where the counter memory display was reset.
$ Adjusting the audio input level
Use the procedure described for “Adjusting the mic input audio level” (P46) to adjust the audio level of mic input and line input (from the audio component connected to the AV IN/OUT jack).
$ Adjusting the audio output level
Use the procedure described for “Adjusting the headphone volume” (P47) to adjust the audio level output from the headphones and speakers.
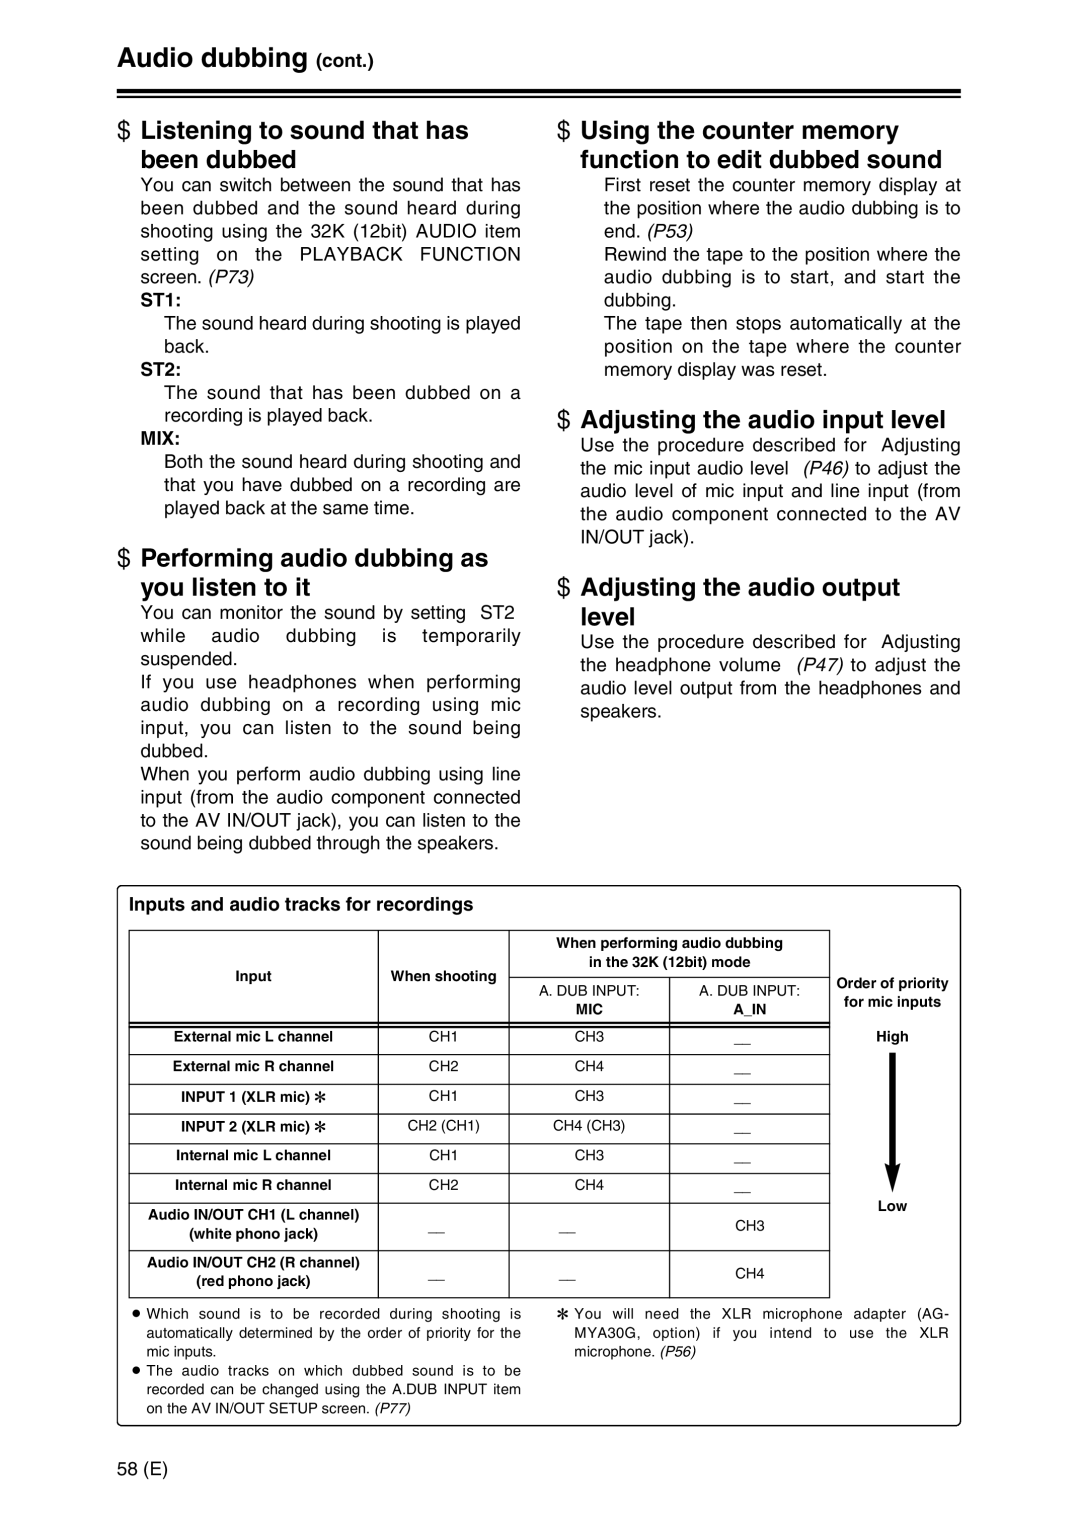
Inputs and audio tracks for recordings
|
| When performing audio dubbing | ||
Input | When shooting | in the 32K (12bit) mode | ||
|
| |||
|
| A. DUB INPUT: | A. DUB INPUT: | |
|
| MIC | A_IN | |
|
|
|
| |
|
|
|
| |
External mic L channel | CH1 | CH3 | __ | |
|
|
|
| |
External mic R channel | CH2 | CH4 | __ | |
|
|
|
| |
INPUT 1 (XLR mic) 2 | CH1 | CH3 | __ | |
|
|
|
| |
INPUT 2 (XLR mic) 2 | CH2 (CH1) | CH4 (CH3) | __ | |
|
|
|
| |
Internal mic L channel | CH1 | CH3 | __ | |
|
|
|
| |
Internal mic R channel | CH2 | CH4 | __ | |
|
|
|
| |
Audio IN/OUT CH1 (L channel) | __ | __ | CH3 | |
(white phono jack) | ||||
|
|
| ||
|
|
|
| |
Audio IN/OUT CH2 (R channel) | __ | __ | CH4 | |
(red phono jack) | ||||
|
|
| ||
|
|
|
| |
Order of priority
for mic inputs
High
Low
O Which sound is to be recorded during shooting is automatically determined by the order of priority for the mic inputs.
O The audio tracks on which dubbed sound is to be recorded can be changed using the A.DUB INPUT item on the AV IN/OUT SETUP screen. (P77)
2 You will need the XLR microphone adapter (AG- MYA30G, option) if you intend to use the XLR microphone. (P56)
58 (E)