Operating Instructions
Call
Introduction
Trademarks
Important Safety Instruction
Table of contents
Index 149
Section
Getting to know the KX-HGW600
Main Features
PPPoE Support
System Requirements
Included Accessories
Front View
Part Names
Rear View
Light Color Description
Indicators
Operating Instructions
Setup
Internet Configuration-Type 1
Configuration Types
LAN Intranet Configuration-Type 2
Connecting to the Internet Preparation
Internet Configuration
To collect information on the Internet access
IP address of KX-HGW600
Connecting the KX-HGW600 to a modem
Connecting a PC to the KX-HGW600
Turning on the Devices
Page
If the Camera Portal page does not appear
Click Setup
Page
Click Dhcp Connection
Setting up Internet Configuration
Click Restart Now
Click Static Connection
Next, confirm the Internet Setup
Click PPPoE Connection
Enter User Name and Password
Click PPPoE Connection IP unnumbered
IP address of KX-HGW600
If a WWW site does not appear
Confirming the Internet Configuration
To modem To PC Ethernet cable Ethernet jack
Camera Name Port No IP Address
Setting up your Network Camera manually
KX-HGW600
Network Camera
Viewing the Network Camera screen
If the image field on the Camera Portal page does not appear
Connecting to the LAN Intranet
LAN Intranet Configuration
Connecting the KX-HGW600 to an Ethernet hub
Connecting a PC to the KX-HGW600
Turning on the Devices
Page
Setting up the KX-HGW600 Confirming the KX-HGW600 Setup
Page
Setting up LAN Intranet Configuration
Enter IP Address, Subnet Mask, Gateway, DNS Server 1
Confirming the LAN Intranet Configuration
To modem To PC Ethernet cable Ethernet jack
Setting up your Network Camera manually
Viewing the Network Camera screen
If the image field on the Camera Portal page does not appear
Operating Instructions
Recording/Playback
Preparing for recording
Recording/Playback
Click Recording/Playback
SD Memory Card
Recording/Playback
Functions
Recording/Playback
Recording
Image Quality
Recording Setup
Image Resolution
Instructions for the data fields
Timer Recording Setup
Example
Select Enable or Disable
Playback
File Name
File name and the stored place
File Delete
SD Memory Card
Click Delete
Status
Format
Click SD Format
Operating Instructions
System Features
Setup
Information
Configuration
Advanced Features
System Commands
Camera Portal
Functions
System Features
Basic Setup
Configuration
To change the Camera Name
Camera Setup
Enter Camera Name and click Change
Password
User Name
Enter Camera Name, Port No. and IP Address and click Add
To set up your Network Camera manually
Enter the camera name up to 16 alphanumeric characters
Screen Assignment
Screen Assignment
Check None, Administrator Only or Restricted Access
Access Control
Check Administrator Only
Administrator Only
Restricted Access
To access the Camera Portal page from the WAN side
Click Restart Now
Operating Instructions
Operating Instructions
Set SSID, Blanked Ssid connection and Channel
Wireless Setup
Connection
Blanked Ssid
Channel
High performance for wireless communication
Encryption
When you select Enabled 4064 bit
When you select Enabled 128 bit
Select Passphrase
Default key
Encryption
WEP Key
WEP Key KX-HGW600
Check Use in the MAC Address Filtering
MAC Address Filtering
Click Add in the Current Status table
Address Translation
Advanced Features
Port Forwarding
Forwarding Port No
Instructions for the data fields Entry
Protocol
WAN side. TCP, UDP, TCP&UDP, Icmp or Pptp are
Static NAT
NAT IP unnumbered
Port Forwarding
IP Masquerade
WAN side. TCP, UDP, TCP&UDP, ICMP, Pptp or
IP Address WAN
IP Address LAN
100
To add new entries
Packet Filtering
102
Source Port
Type
Direction
Source IP
Click Restart Now To change the priority
To change or delete entries
Type Direction Port Protocol Log Address Output
Optional Setup
Dhcp Server
Subnet Mask
Port No. of WWW
Server
PPPoE
Enabled/Disabled
Static Dhcp
MAC Address
Disconnection on
Connection Always
Automatic
Manual
Dynamic Routing
MTU size
Change Password
System Commands
For assistance, please call 111
Update Firmware
Update it again
Error Messages
Error Messages Cause and Remedy File size is invalid
CRC error occurred
Click Restart Now!. The KX-HGW600 restarts
Factory Default Reset
Click Factory Default Reset Now
Restart
To initiate the PPPoE Connection
PPPoE Connection
To stop the PPPoE Connection
Keep Alive Option
Ping
Usage Data
Information
Packet Filtering Log
User Registration
Support
Help
Technical Guides
To initialize the KX-HGW600
Reset procedure-default settings
To restart the KX-HGW600
Wall mounting
Click Tools Internet Options... Connections tab
Proxy Server Setting
For assistance, please call 127
Filtering
Security on the Wireless Network
Advantage
Disadvantage
TCP/IP Properties Setup
Class Subnet Mask Private IP address
Confirmation of private IP address
Network Camera or
PPPoE Connection IP unnumbered
PPPoE Connection IP unnumbered
KX-HGW600 Network Address
Example Address Translation NAT IP unnumbered
When you build a web server on the LAN side, set the IP
Address in the Static Dhcp setting
Check box of the Dhcp Server and then enter the static IP
Specification and Troubleshooting
Default setting list
IP Address Port
Packet Filtering
Do Not Send
Timer Recording Setup
Send
Recording Duration Information
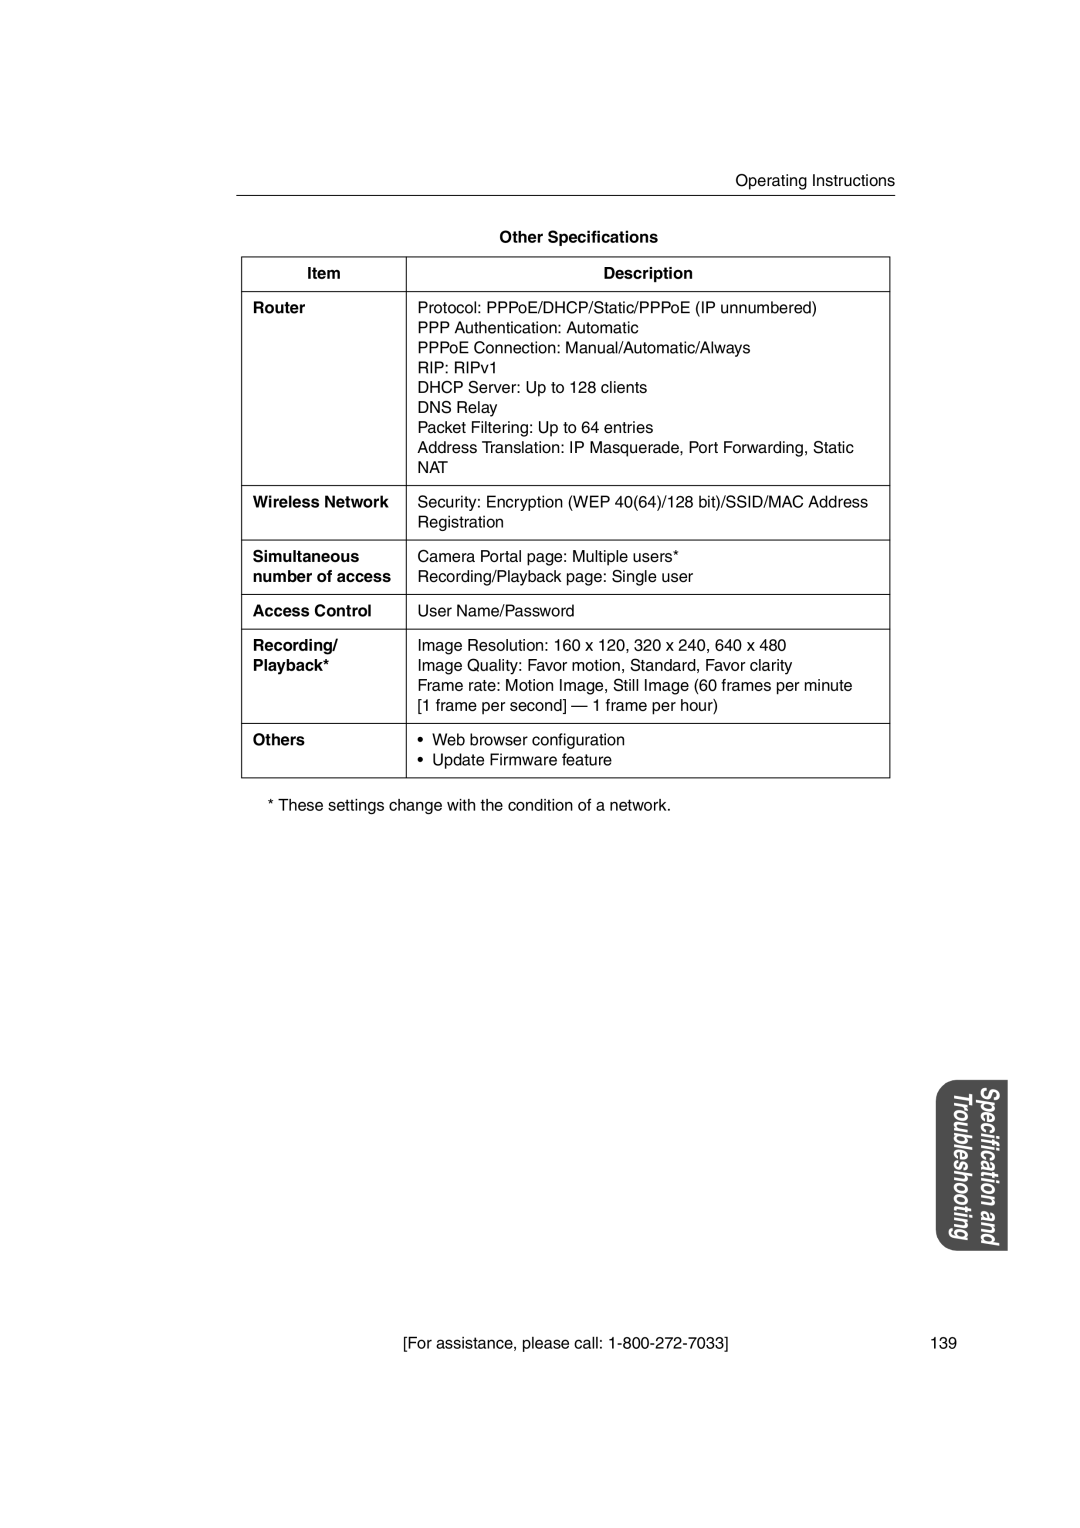
Specification
Description Router
Other Specifications
Wireless Network
Number of access
About KX-HGW600 Connection Problem Cause and Remedy
Troubleshooting
About WWW Site Problem Cause and Remedy
Click Tools menu Internet Options Security tab Custom Level
About Setup Problem Cause and Remedy
Enable in Active Scripting of JavaScript
IP address automatically is checked on the PC
KX-HGW600 Optional Setup
About Network Camera Setup Problem Cause and Remedy
Network Configuration from the Setup Program
Administrator and General User on the Security
Control window, check None or Administrator
About Network Camera Setup
Problem Cause and Remedy
Access
Security Administrator Authentication
About Recording/Playback function Problem Cause and Remedy
Timer
Make sure Obtain an IP address automatically is
About Other Troubles
FCC and Other Information
Medical
Operating Instructions 148
Index
Page
Page
When you ship the product
For product service