Connecting and Setting up (continued)
Connecting a Microphone
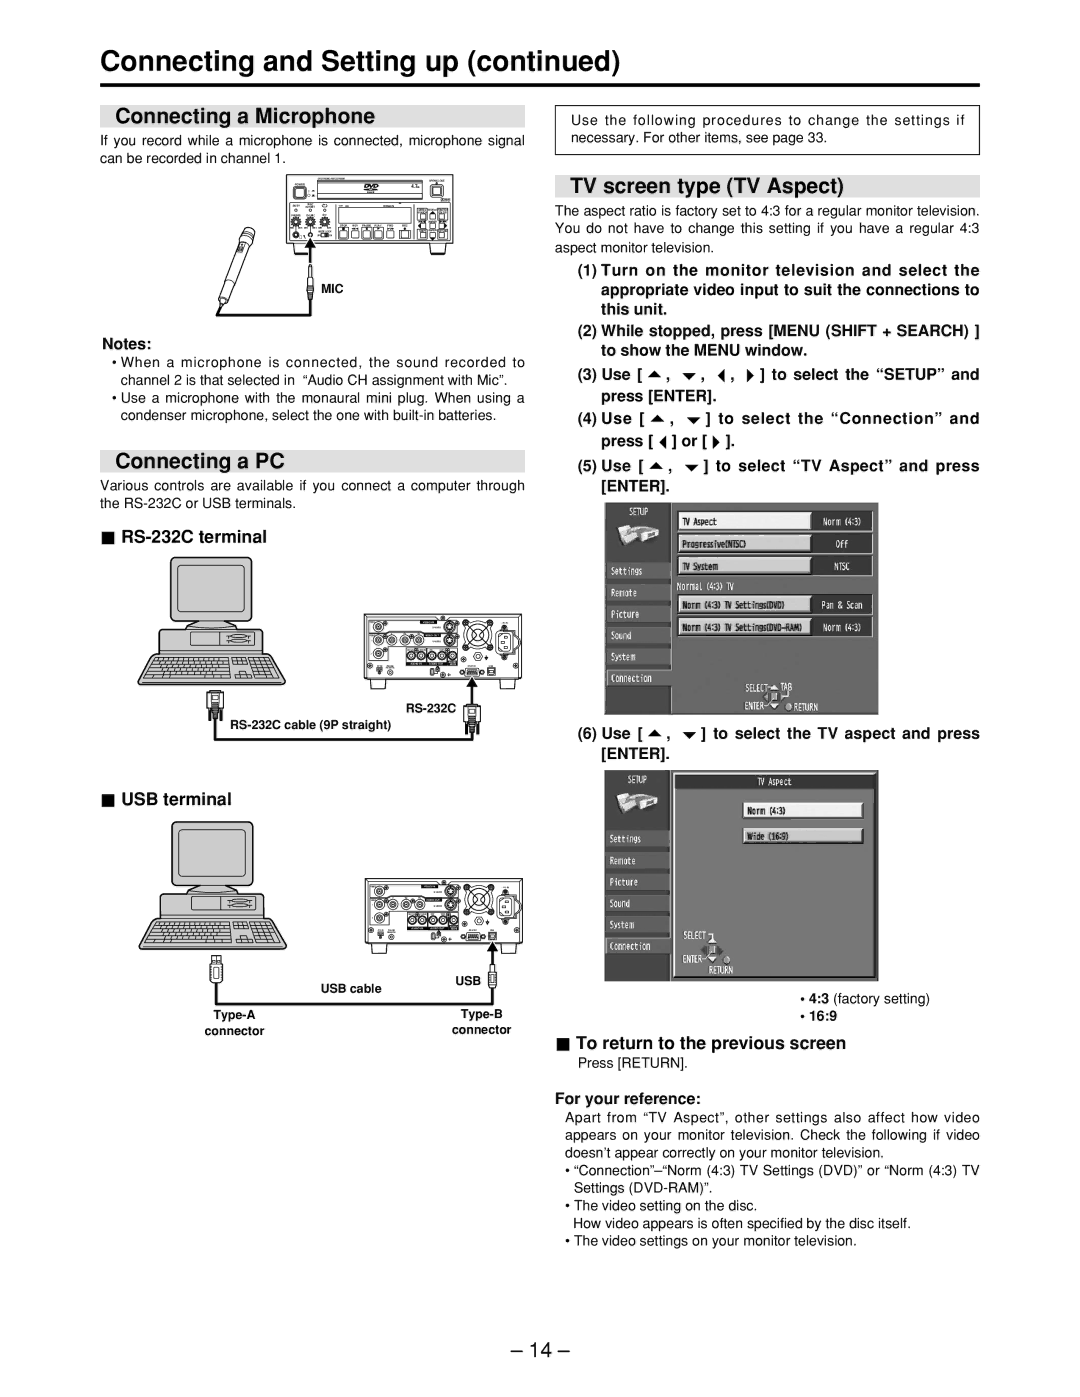
If you record while a microphone is connected, microphone signal can be recorded in channel 1.
|
|
|
| DVD VIDEO RECORDER |
|
|
|
|
|
| OPEN/CLOSE | |
|
|
|
|
|
|
|
|
|
|
|
| |
| POWER |
|
|
|
|
|
|
|
| 4.7GB |
| |
|
|
|
|
|
|
|
|
|
|
|
| |
BUSY |
| REC |
| CH1 | CH2 |
|
|
| REMAIN |
|
| |
INHIBIT |
|
|
|
|
|
| ||||||
|
|
|
|
|
|
|
|
|
|
| MENU | REPEAT FUNCTION |
PHONES | CH1/MIC |
| CH2 |
|
|
|
|
| SEARCH | STATUS | ||
|
|
|
|
|
|
|
| |||||
|
|
|
|
|
|
|
|
|
|
|
| MARKER |
MIN | MAX | MIN | MAX | MIN | STOP | REV | PAUSE | PLAY | FWD | REC |
| |
MAX |
|
|
|
|
|
| ENTER RETURN | |||||
|
|
|
| MODE LOCK |
|
|
|
|
| SHIFT | ||
|
|
|
| OFF | ON |
|
|
|
|
|
|
|
MIC
Notes:
•When a microphone is connected, the sound recorded to channel 2 is that selected in “Audio CH assignment with Mic”.
•Use a microphone with the monaural mini plug. When using a condenser microphone, select the one with
Connecting a PC
Various controls are available if you connect a computer through the

RS-232C terminal
VIDEO |
| VIDEO IN |
|
|
| ~ AC IN | |
|
|
|
|
|
| ||
Y | P | P |
|
|
|
|
|
VIDEO |
| VIDEO OUT |
|
|
|
| |
1 |
|
|
|
|
| ||
| CH1(A) | CH2(B) | CH1 | CH2 |
|
|
|
2 |
|
|
|
|
|
|
|
| AUDIO IN | AUDIO OUT | AUDIO |
|
| ||
DV IN PAUSE | MON | USB | |||||
REMOTE
Use the following procedures to change the settings if necessary. For other items, see page 33.
TV screen type (TV Aspect)
The aspect ratio is factory set to 4:3 for a regular monitor television. You do not have to change this setting if you have a regular 4:3 aspect monitor television.
(1)Turn on the monitor television and select the appropriate video input to suit the connections to this unit.
(2)While stopped, press [MENU (SHIFT + SEARCH) ] to show the MENU window.
(3)Use [ ![]() ,
, ![]() ,
, ![]() ,
, ![]() ] to select the “SETUP” and press [ENTER].
] to select the “SETUP” and press [ENTER].
(4)Use [ ![]() ,
, ![]() ] to select the “Connection” and press [
] to select the “Connection” and press [ ![]() ] or [
] or [ ![]() ].
].
(5)Use [ ![]() ,
, ![]() ] to select “TV Aspect” and press [ENTER].
] to select “TV Aspect” and press [ENTER].
(6)Use [ ![]() ,
, ![]() ] to select the TV aspect and press [ENTER].
] to select the TV aspect and press [ENTER].
 USB terminal
VIDEO |
| VIDEO IN |
|
|
| ~ AC IN | |
|
|
|
|
|
| ||
Y | P | P |
|
|
|
|
|
VIDEO |
| VIDEO OUT |
|
|
|
| |
1 |
|
|
|
|
| ||
| CH1(A) | CH2(B) | CH1 | CH2 |
|
|
|
2 |
|
|
|
|
|
|
|
| AUDIO IN | AUDIO OUT | AUDIO |
|
| ||
DV IN PAUSE | MON | USB | |||||
REMOTE
|
|
|
| USB cable | USB |
|
|
|
|
|
|
|
| ||
|
|
|
|
|
| ||
|
|
|
|
|
|
| |
|
|
|
|
|
|
|
|
|
| ||||||
connector |
| connector | |||||
• 4:3 (factory setting)
• 16:9
 To return to the previous screen
Press [RETURN].
For your reference:
Apart from “TV Aspect”, other settings also affect how video appears on your monitor television. Check the following if video doesn’t appear correctly on your monitor television.
•
•The video setting on the disc.
How video appears is often specified by the disc itself.
•The video settings on your monitor television.
– 14 –
