Page
Page
Contents
Favourite list editing
How do I reset my receiver if it
Edit a timer Remove a timer via the Menu
Reminder List of New channels Software download
Safety Instructions
Safety instructions
Please wait before connecting your receiver read on
Unpacking
Unpacking / Putting the receiver in your existing set up
Putting the receiver in your existing set up
Unpacking
Product Description
Product description
Front view
TV Selv
Rear view
VCR Selv
Aerial in Selv
E PA R I N G YO U R R E M O T E C O N T R O L
Preparing your remote control
Installing the batteries
Using the remote control
N N E C T I N G YO U R D I G I TA L R E C E I V E R
Connecting your Digital receiver
Connecting to a TV fitted with one Scart socket
English
Connecting Your Digital Receiver
U I C K S TA R T
Quick start up / First installation / Channel scan
Quick start
You already have an aerial
Quick Start
Scanning has failed again
For a proper diagnosis, call your electrical retailer
Change channel
Switch on / Switch OFF your receiver low power, standby
Select TV / Radio mode
Day to day operation
Zap list so called index list
Volume control Vol+ / Vol- / Mute
Zap banner / More programme info
Electronic channel guide
Select a favourite list
Temporarily change the Subtitle selection circular toggle
Delete a Running Timer
SET a Timer from the Banner
SET a Timer from the ZAP List
SET a Timer from the Guide
List of New channels
Recording / Timer
Recording Failure
Reminder
Enter you PIN code to unlock and watch the selected channel
Using the TV / STB button
How do I reset my receiver if it Freezes?
Watching locked channels
H a N G E T H E S E T T I N G S
Changing the settings on your receiver
Basics about Menu navigation
A N G E T H E S E T T I N G S
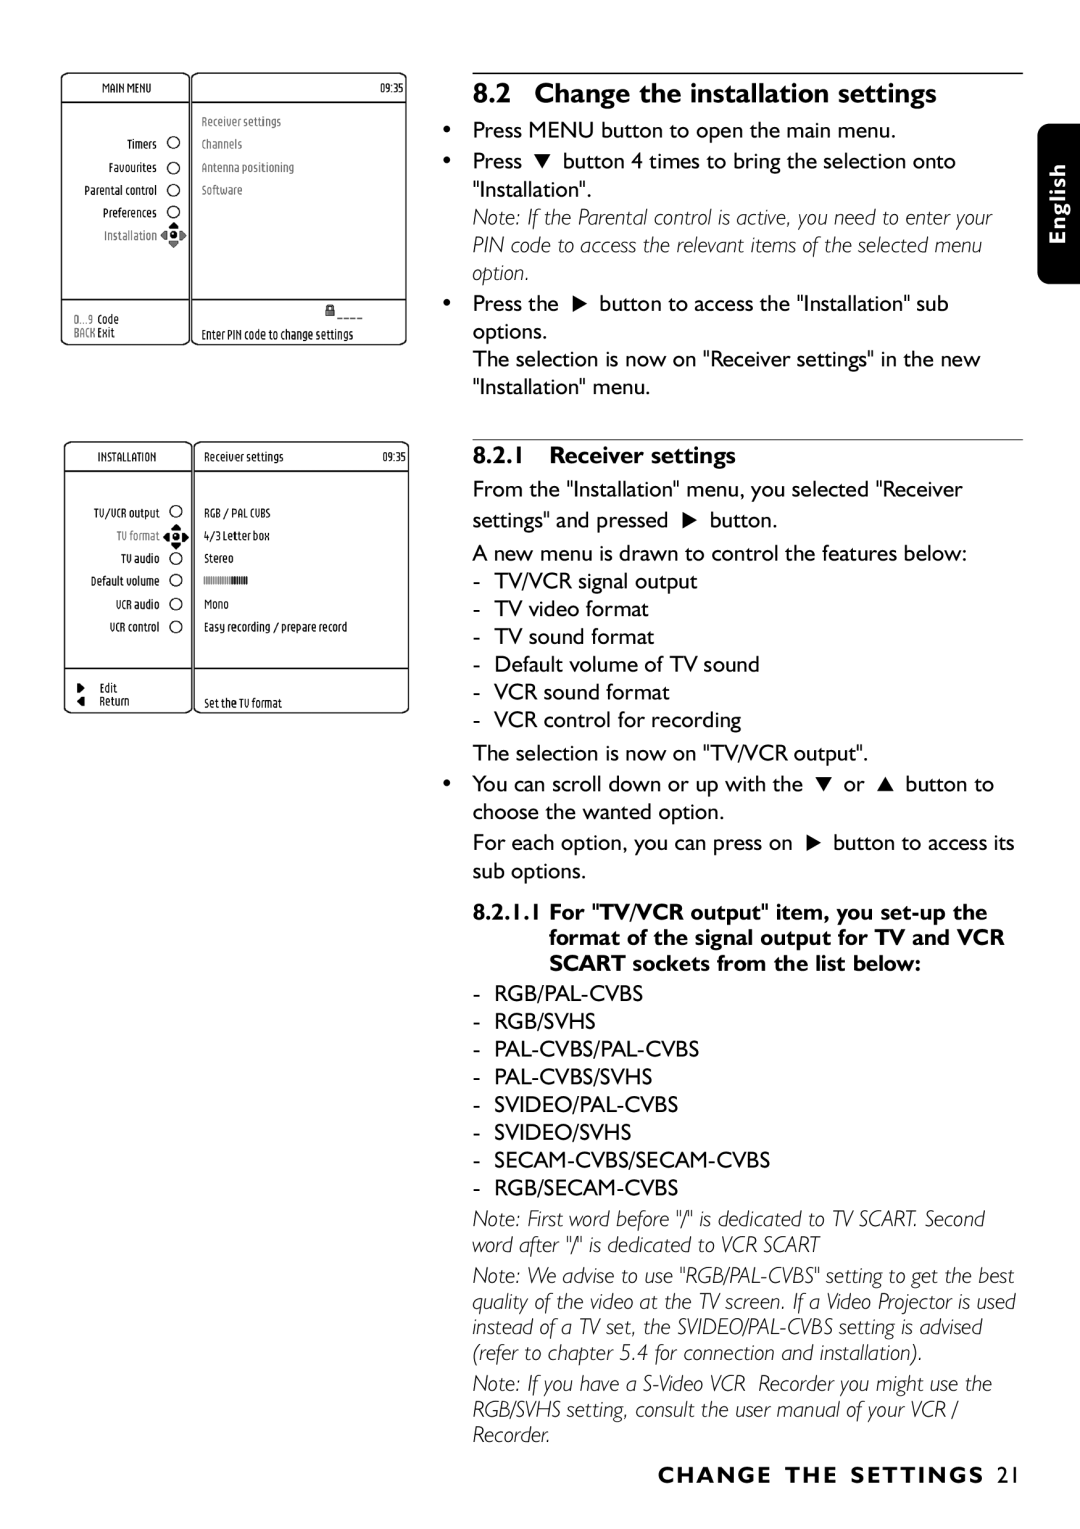
Change the installation settings
Receiver settings
Channel installation
Check signal quality / Check your aerial
Timers schedule, delete, edit, conflict…
Software update
Disable Recording Manage conflicts
Edit a timer
Remove a timer via the Menu
Favourite list editing
Edit preferred list
Press the * button to access the Re- order sub options
Maturity level
Parental control / pin Code lock Programme Parental Timer
Change PIN
Parental control
Preferences / language timer banner
E N U T R E E
Menu tree
Change Receiver Remote Control Configuration
Advanced settings
Restore virgin mode
Change remote control setting
Connection for Easy recording
Advanced Settings
More about Recording / Easy Recording VCR control
Cancel a running Timer
Digital receiver and VCR settings
How to make a recording with the VCR control feature?
Timer / Front panel indicator
Trouble Shooting Guide
Trouble shooting guide
Make sure they are all
Problem Possible cause Action
Pattern on the screen, your Problem
This is normally only a
VCR Scart
Technical specification
MP@ ML
TV Scart
Índice
Bienvenido a LA Televisión Digital
11.4
11.1
11.2
11.3
S T R U C C I O N E S D E S E G U R I DA D
Instrucciones de seguridad
Antes de utilizar el receptor
Para obtener los mejores resultados, instale
Integracíon del receptor en su sistema
Desembalaje / integración del receptor en su sistema
Desembalaje
Descripción DEL Producto
Descripción del producto
Vista frontal
Vista posterior
E PA R AC I Ó N D E L M a N D O a D I S TA N C I a
Preparación del mando a distancia
Inserción de las pilas
R E PA R AC I Ó N D E L M a N D O a D I S TA N C I a
ROJO, VERDE, AMARILLO, Azul
Subtitulo ?
Conexión a un TV provisto de terminal Scart Euroconector
Conexión del receptor digital
O N E X I Ó N D E L R E C E P T O R D I G I TA L
N E X I Ó N D E L R C E P T O R D I G I TA L
N I C I O R Á P I D O
Inicio rápido
Una vez completada la exploración
I C I O R Á P I D O
Exploración de nuevo infructuosa
Revisar el cable de antena
Con los botones numéricos
Operaciones cotidianas
Selección de modo TV / Radio
Cambio de canal
E R AC I O N E S C O T I D I a N a S
Control de volumen Vol+ / Vol- / Mute
Báner del directorio / más información del programa actual
Directorio de canales
Guía electrónica de canales
Selección de una lista de favoritos
Cambio temporal de la selección de subtítulos circular
Cambio temporal de la selección de idioma de audio circular
Programación DE UN Temporizador Desde LA Guía
Cancelación DE UN Temporizador Activado
Programación DE UN Temporizador Desde EL Báner
Programación DE UN Temporizador Desde EL Directorio
Lista de nuevos canales
Grabación / Temporizador
Fallo de grabación
Recordatorio
14 ¿Cómo reinicio el receptor si se queda bloqueado?
Uso del botón TV / STB
Visionado de canales bloqueados
Cambios
Cambio de configuración del receptor
Pulse el botón Menu para abrir el menú principal
Cambio de ajustes de instalación
Ajustes del receptor
Instalación de canales
M B I O D E C O N F I G U R AC I Ó N D E L R E C E P T O R
Compruebe la calidad de señal / Revise la antena
Temporizadores programar, borrar, edi- tar, conflictos…
Actualización de software
Desde el submenú seleccionado de Editar un temporizador
Editar un temporizador
Supresión de un temporizador desde el menú
Desactivación de grabación gestión de conflictos
Edición de listas de favoritos
Renumeración de canales favoritos
Edición de listas preferidas
Reordenación de canales en una lista de favoritos
Pulse una vez el botón 9 para seleccionar Reordenar
Bloqueo de canales de TV o radio
Cambio de PIN
Control infantil
Nivel de madurez
Preferencias / Idioma Temporizador Báner
30 Á R B O L D E M E N Ú
Árbol de menú
Si olvida el código PIN / Código PIN maestro
Configuración avanzada
Cambio de configuración del mando a distancia
Reinicio
O N F I G U R AC I Ó N AVA N Z a DA
Conexión para la grabación sencilla
Temporizador / Indicador del panel frontal
Cancelación de un temporiza- dor activo
Errores durante la grabación
Ajustes de receptor digital y
11 Guía de solución de problemas
RGB
Guía DE Solución DE Problemas
Scart TV
Especificaciones técnicas
DVD-RW
MFN /SFN
Inhaltsangabe
Inhaltsangabe
Willkommen in DER Welt DES Digitalen Fernsehens
Software-Update
Aufnahme / Timer
Ändern der Installations
Signalqualität prüfen / Antenne prüfen
SI C HE RH E I T S Anweisu N GEN
Sicherheitsanweisungen
AU S PAC K E N
Auspacken
Den Receiver an die vorhandene Anlage Anschließen
Produktbeschreibung
Produktbeschreibung
Ansicht der Vorderseite
LED
R O D Uktb ES C H RE I Bung
Ansicht der Rückseite
VOR be R E I TUN G D E R FE R N B E DI E NU NG
Vorbereitung der Fernbedienung
Einlegen der Batterien
VOR be R E I T UN G D E R FE R N be D I E NU NG
Benutzung der Fernbedienung zur Steuerung des Recievers
ROT, GRÜN, GELB, Blau
Untertitel ?
Anschluss an ein Fersehgerät mit einer SCART-Buchse
Anschließen des Digital-Receivers
VCR
Deutsch
KU R Z a N LE I T U N G
Kurzanleitung / erste Inbetriebnahme / Sendersuchlauf
Kurzanleitung
Prüfen Sie die in Ihrer Region verfügbaren Sender
Sendersuchlauf erneut fehlgeschlagen
Mit Hilfe der Zifferntasten
Normaler Betrieb
TV- / Radio-Modus wählen
Senderwahl
Zap-Liste sog. Indexliste
Zap-Banner / zusätzliche Informationen zu Fernsehsendern
Lautstärkeregelung Vol+ / Vol- / Mute
Or MA L E R be T R I E B
Eine Vorwahlsenderliste wählen
Untertitelwahl vorübergehend ändern Wechselschaltfunktion
Elektronischer Programmführer
Löschen Einer Laufenden TIMER-EINSTELLUNG
Timer Anhand DES Banners Einstellen
Timer Anhand DER ZAP-LISTE Einstellen
Timer Anhand DES Programmführers Banners Einstellen
Liste neuer Sender
Aufnahme / Timer
Aufnahme fehlgeschlagen
Hinweis
Wiedergabe von gesperrten Sendern
Benutzung der Taste TV / STB
Rückgängig machen
Ändern der Einstellungen des Receivers
NDE R N D E R E I N S TE L LU NGE N D E S R EC EI V E RS
Ändern der Installations-Einstellungen
Receiver-Einstellungen
Drücken Sie die Taste MENU, um das Hauptmenü aufzurufen
Einstellen 16/9 Letterbox Pan & Scan
Senderprogrammierung
Signalqualität prüfen / Antenne prüfen
Timer einstellen, löschen, bearbeiten, Konflikt…
Software-Update
Aufnahme ausschalten Konfliktbehebung
Timereinstellung bearbeiten
Eine Timereinstellung über das Menü löschen
Bearbeiten Vorwahlsender Listen
28 Ändern DER Einstellungen DES Receivers
Umnumerieren zu stellen
PIN-Code ändern
Bevorzugte Liste bearbeiten
Altersstufe
Kindersicherungstimer bearbeiten
Kindersicherungstimer-Einstellung löschen
Kindersicherung
Banner-Vorzugseinstellungen
Vorzugseinstellungen / Sprache Timer Banner
Timer-Vorzugseinstellungen
Sprachen-Vorzugseinstellungen
E N Ü S T R U KT U R
Menüstruktur
Sie haben Ihren PIN-Code / Master-PIN-Code Vergessen
Erweiterte Einstellungen
Wiederherstellen der Ausgangseinstellungen
10.2 Ändern der Fernbedienungseinstellung
ER WE IT ER T E Einst E L LUN GE N
Anschluss für Easy Recording
Rückmeldung über die LEDs auf der Geratevorderseite
Timer / Anzeige auf der Gerätevorderseite
Einstellungen des Digital- Receivers und des Videorecorders
Ausgeführt wurde. Hinweis Mit dieser Verbindung
Fehler während der Aufnahme
Einen laufenden Timer abbrechen
Fehl ER B Eheb UNG
Fehlerbehebung
RGB/CVBS
Technische Daten
Page
Sisällys
Tervetuloa Digitaalisen Television Maailmaan
Aikaikkunan muuttaminen Aikaikkunan poistaminen
Ajastuksen peruminen valikon kautta
Suosikkilistojen muokkaaminen
Tunnuksen muuttaminen Lapsilukko 3 Ikäraja
R VA L L I S U U S
Turvallisuus
Vastaanotinta
U R KA M I N E N PA K KAU K S E S TA
Purkaminen pakkauksesta
Vastaanottimen sijoittaminen muun laitteiston yhteyteen
Vastaanotinta voidaan nyt käyttää pystyasennossa
Etupaneeli
Laitteen esittely
Vasen/oikea RCA-audiolähtö hifi- tai
Takapaneeli
Digitaalinen koaksiaaliaudiolähtö hifi- tai
SSarjaliitäntä Selv
KAU KO O H L a I M E N K Ä Y T T Ö Ö N O T T O
Kauko-ohlaimen käyttöönotto
Paristojen asettaminen
Tekstitys ?
PUNAINEN, Vihreä KELTAINEN, Sininen
G I VA S TA a N O T T I M E N KY T K E N N Ä T
Digivastaanottimen kytkennät
Yhdistäminen televisioon, jossa on yksi SCART-liitäntä
I G I VA S TA a N O T T I M E N KY T K E N N Ä T
G I VA S TA a N O T T I M E N KY T K E N N Ä T
O P E a K Ä Y T T Ö Ö N O T T O
Nopea käyttöönotto / ensiasennus / kanavahaku
Nopea käyttöönotto
P E a K Ä Y T T Ö Ö N O T T O
Jos kanavahaku epäonnistuu jälleen
Numeronäppäimillä
Pävittäinen käyttö
Tv- tai radiotilan valitseminen
Kanavan vaihtaminen
Voit sulkea tietopalkin BACK-näppäimellä
Tietopalkki / lisätietoja ohjelmasta
Äänenvoimakkuuden säätäminen Vol+ / Vol- / mykistys
Hakemistoluettelo
Paina I/II-näppäintä Valitse haluamasi kielivaihtoehto
Suosikkilistan valitseminen
Sähköinen kanavaopas
Käynnissä Olevan Ajastetun Tallennuksen Peruminen
Timer Ajastaminen Hakemistolistasta
Ajastaminen Tietopalkista
Ajastaminen Oppaasta
Uusien kanavien lista
Tallennus / Ajastin
Tallennusvirhe
Muistutus
Jos vastaanotin jumiutuu
12 TV/STB-näppäimen käyttö
Lukittujen kanavien katseleminen
Huomautus Nappula näkyy aina vasemmassa valikkoikkunassa
Vastaanottimen asetusten muuttaminen
Valikoissa liikkuminen pääpiirteissään
Asetuksen muuttaminen
Vastaanottimen asetukset
Laiteasetusten muuttaminen
Kanavien asentaminen
Antennin suuntaaminen
Signaalin laadun tarkastaminen / Antennin tarkastaminen
Ohjelmiston päivitys
Siirry ajastusten alivalikkoon Muuta
Ajastimen ohjelmoiminen
Ajastuksen peruminen valikon kautta
Tallennuksen estäminen päällekkäiset ajastukset
Katso suosikkilistojen aktivointi kappaleesta
Suosikkilistojen muokkaaminen
Siirry näppäimellä * Uusi numerointi- alivalikkoon
Etusijalistan muokkaus
Valitse kanava siirrettäväksi painamalla OK-näppäintä
Tallenna kanava uuteen paikkaan Painamalla OK-painiketta
Lapsilukko / Tunnus Ohjelman lukitseminen Aikaikkuna
Tietokentän asetukset
Omat asetukset / Kieli Ajastin Tietopalkki
Kieliasetukset
Ajastinasetukset
VA L I K KO R a K E N N E
Valikkorakenne
Jos olet unohtanut tunnuksesi / Supertunnus
10 Lisäasetukset
Ensiasennustilan palauttaminen
Kauko-ohjaimen asetuksen muuttaminen
I S Ä a S E T U K S E T
Helpon tallennuksen mahdollistava kytkentä
10.4.5 Käynnissä olevan ajastetun tal- lennuksen peruminen
Digivastaanottimen ja kuva- nauhurin asetukset
Tallentaminen Nauhurin ohjaus-toiminnolla
Ajastin / Etupaneelin merkki- valot
Ongelmatilanteet
Ongelmatilanteet
Tekniset tiedot
Page
DTR 1000/00 3111 176 07/03