Benutzerhandbuch100
For Customer Use
How to connect a plug
Mains plug
Copyright in the U.K
Klass 1 laseraparat
MW DVD read
Laser
MW CD read
Beam divergence Degrees DVD Degrees CD
Deutsch
Index
Deutsch English
English
Table of Contents
Table of Contents
Setup precautions
Care and Safety Information
Cleaning discs
Hard Disk Drive HDD handling care
Product Information
Accessories supplied
Introduction
Region codes
Special features
Sockets behind the flap
Main Unit
Remote Control
Guide
Colour coded buttons
TV VOL +
Alphanumeric keypad
Selected source mode
Using the remote control to
Using the alphanumeric keypad to enter the characters
Operate the system
Additional control functions for most of the Philips TV
If the code entered is valid, the TV LED will blink twice
Series equipment
Buttons Operations
Option 1 Connecting to the analogue antenna
Connecting the antenna cables
Basic Recorder Connections
Before you start
Option 2 Connecting to the analogue and terrestrial antennas
Option 1 Using the Scart socket
Connecting the video cable
Option 2 Using the S-Video socket
Option 3 Using the Video Cvbs socket
Basic Recorder Connections
Option 2 Using the digital audio socket Optical or Coaxial
Connecting the audio cables
Option 1 Using the analogue audio sockets
AV amplifier/receiver
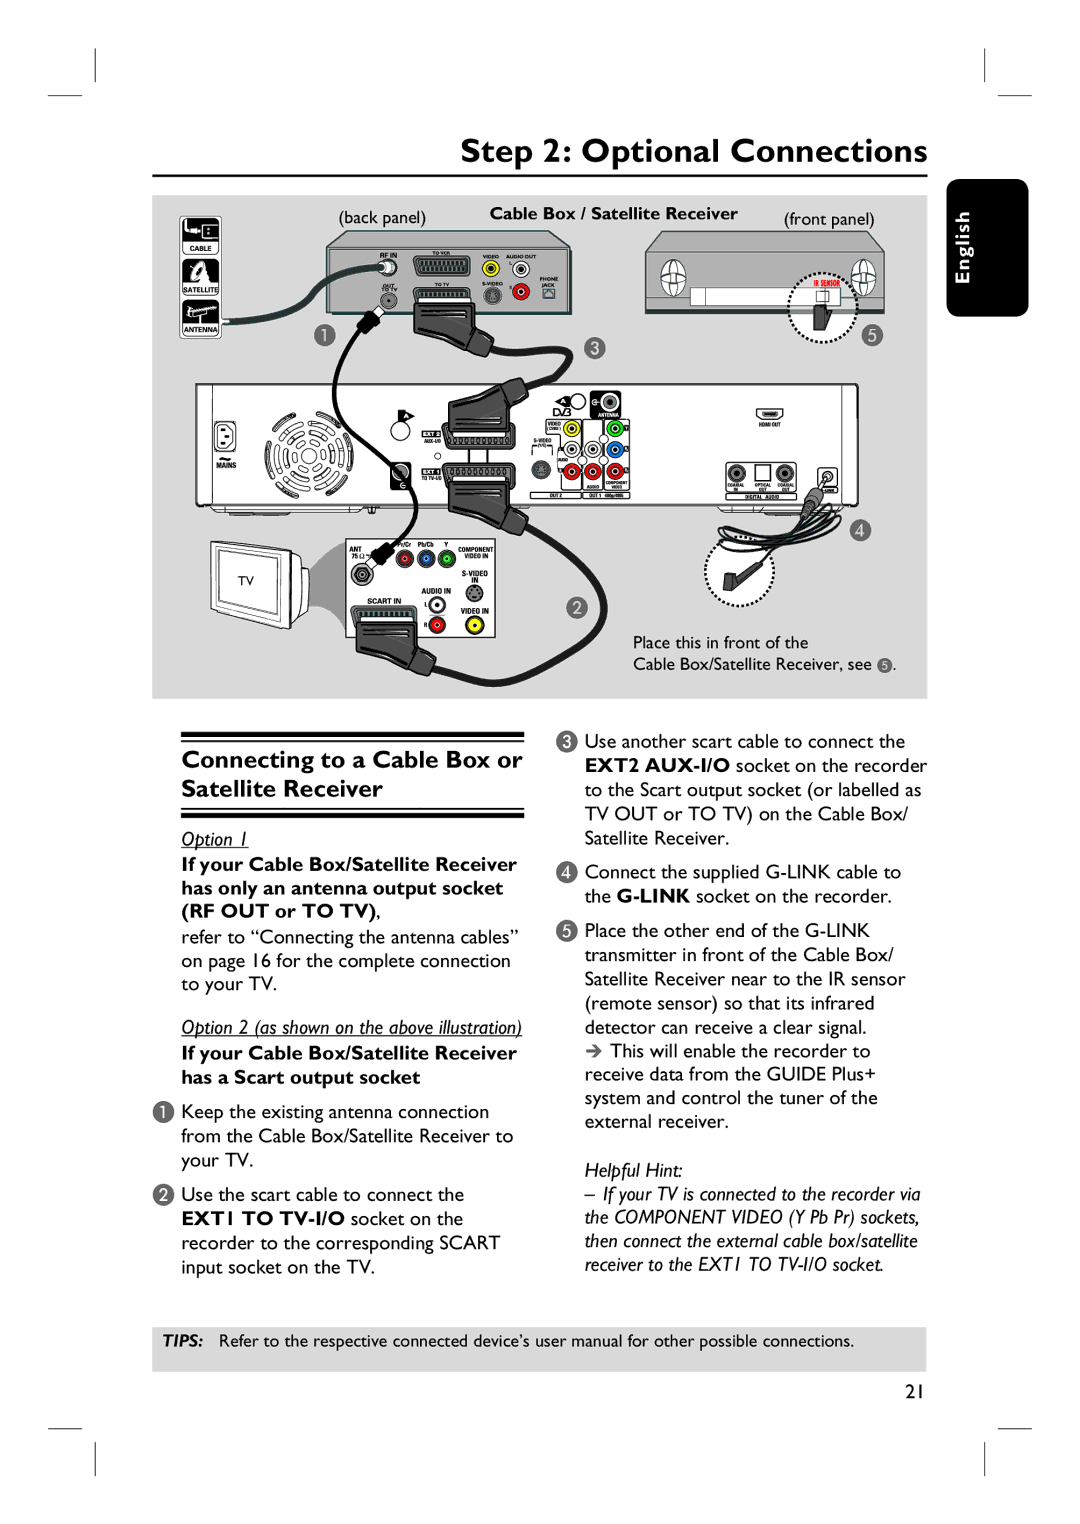
Optional Connections
Connecting to a Cable Box or Satellite Receiver
Back panel Cable Box / Satellite Receiver front panel
Place this in front Cable Box/Satellite Receiver, see E
Back of a VCR example only
Connecting to a VCR or other similar device
Example only
Connecting to a VCR and Cable Box/Satellite Receiver
Connecting to a camcorder
Option 2 Using the S-VIDEO In or Video In socket
Option 1 Using the DV in socket
Back of a Satellite Box example only
Before you start the 5.1-channel recording
Installation and Set-up
169 Letterbox PanScan
Select the desired menu language and press W to confirm
You may now enjoy using this recorder
It takes a few minutes to complete
Time and date menu appears
Postal code
Set-up the Guide Plus+ system
Use keys to move to previous or next entry field
External Receiver 1/2/3
‘ON’ overnight
Receiver’s remote control to
Quick access functions
Using the Guide Plus+ system
Guide Plus+ system introduction
Schedule recordings
‘Search’ screen
Guide Plus+ menu bar
‘Grid’ screen
Movies, Sport, Children, Others or My Choice
‘Info’ screen
‘My TV’ screen ‘Schedule’ screen English
‘Editor’ screen ‘Setup’ screen
Control TV Programmes
Switching on to TV programme
Pause live TV function
Instant replay function
Watching digital TV/radio broadcast
Viewing digital text service Mheg
Changing the subtitle/audio language
Showing the programme information
Before Recording
Marking the contents for recording
Press to select Preferences Press Nexté to select Recording
Default recording settings
Language
Record mode
Lang
Auto protect
Record to Hard Disk
Unrecordable contents
Recording TV programmes
Record the current TV programme
Simultaneous record and play function
Automatic recording from Satellite Receiver
Direct recording from TV
Start recording
After 6 six hours of recording
Timer recording Guide Plus+ system
About timer recording
There are three ways to programme a timer recording
About ‘VPS/PDC’
Press Timer to confirm and exit the menu
Timer recording ShowView / Video Plus+ system
Frequency
Timing
Keys or alphanumeric
Timer recording manually
To delete the timer programme
Changing/Deleting a timer recording
Press the Red button on the remote Control for
To edit the timer programme
Recording from a DV Camcorder
Record to Hard Disk or recordable DVD
To copy the entire DV tape
To copy the newly recorded contents from the DV tape
Recording from camcorder
Recording from an external device VCR/DVD player
About copying
Copy from Hard Disk to recordable DVD
Discs for recording
Recordable DVD
Erase Disc
Copying to a recordable DVD
To start recording, press the Green button again for Start
Otherwise, press the Yellow button for
Storing the recorded DVD data in the Disc Library
Using the Disc Library
Finding a recorded title
GET Title
Basic operation
Playback from Hard Disk
Viewing the hard disk information
Replay / Next
Delete/Protect a title
Sorting the titles display order
Delete
Childlock / Chld Unlck
Playable discs
Playback from Disc
Starting disc playback
Open Close
Playing a DVD video disc Playing a Super Video CDs English
To access the disc menu
To select the previous or next chapter/title
Playing a DVD recordable disc
Albums and Tracks menus appear
Playing an MP3 CD
Playing a Jpeg image file slide show
Photo Rolls and Info menus appear
Repeat
Zoom
Speed Down / Speed UP
Supported Jpeg picture formats File format
Creating a slideshow playlist album
Additional Playback Features
Adding photos to an album
About Photo Roll/Photo Album
To delete the album
English Edit the album
To change the album name and date
To rotate a photo
Selecting another title/ chapter/ track
Pausing playback / slow motion play
Repeat play
Shuffle play
Repeating a specific segment A-B
Using the Toolbar options
Changing subtitle language
Changing audio soundtrack language
To confirm
English Switching camera angles
Searching by time
Playback skips to the time entered
Changing the title name
Edit Recordings Hard Disk
Selecting the genre
Clear
No Chapter
Video editing
Chapter
Divide
Merge
Merge/split a specific chapter within a recording
Select this to return to the previous screen
Split
Dividing titles Hiding unwanted scenes English
Once a title has been divided, it cannot be reversed
For example, title 1 is being selected
Showing the hidden scene Deleting all chapter markers
Edit Recordings Recordable DVD
About editing recordable DVDs
Index Picture screen
Deleting recordings/titles
Press the Red button on the remote control for Delete
Protecting the recorded titles DVD±RW
Menu
Making the edited DVD±RW compatible
Changing the disc/title name
Finalising the DVD±R for playback
Or Title name in the menu
Hold down Keys or use
Play to start playback
Back
Select this to return to the previous screen
Title
Yellow button Select this to access title editing menu
Hide / Show
Blue button Select this to hide or show the current chapter
System Menu Options
Access
Recorder Preferences
Press Nexté repeatedly to view
Disc settings
DV Specials settings
Auto resume
Childlock
Setup
Recorder Setup
Display
Second RC
Bright
Dimmed
Clock preset
PXX
31-01-2006
Analogue Channel settings
Auto search Follow TV Sort
Favourites
Entry Mode Preset Preset name Decoder TV system
Analogue Channel settings manual search
Finetune
Store
Digital Channel settings
Press OK to swap the TV/radio channel with the TV/radio
Channel at the current position
TV Shape
Video settings for Hdmi connection only
Letterbox
PanScan
Disable
Digital output
PCM
Language settings
General Information
Setting up Progressive Scan feature
Copyright notice
To exit the menu, press System
Frequently Asked Questions
What is HDMI?
What is Pixel Plus?
What is video upscalling?
What is DVB?
Installing the latest software
Software Upgrade
System Version Info in the menu
Open Close again
Problem General Solution
Troubleshooting
No TV signal received from the recorder
Message ‘NO SIGNAL’ appears
No sound
Problem Playback Solution
Problem Recording Solution English
Message ‘Collision’ appears
DVD+RW/-RW cannot be used for recording on this recorder
No Hdmi audio output
Problem HDMI/EPG Solution
No Hdmi video output
EPG Guide Plus+ data is
Specifications
Glossary
0000
Display panel symbols/messages
Information on the inserted DVD is displayed on the TV
No signal or poor signal strength
Recorder has been turned on
Title is copy-protected and cannot be recorded