Page
Page
Card right away guarantees youll receive
Warranty Owner Model Verification Confirmation Registration
Dear Philips product owner
Safety Information
Important Safety Instructions
Remote control
Additional TV functions
Front of the Recorder
Behind the door at the lower right front corner
Input jacks
Back of the Recorder
Output jacks OUT
Output jacks OUT 480p/480i
Symbols on your DVD Recorder display
Output jacks Digital Audio OUT
Messages on your DVD Recorder display
Clean the disc or use a new one
But the error will be skipped
DVD-Recorder has been switched on
DVD-Recorder has been switched off
Table of contents
IRecording
100
Question? Tip Problem
AIntroduction
Phil
Dear Philips customer
Welcome to the large family of Philips DVD owners
Thank you for buying a Dvdr 77/17
Recording and Playback
Compatible discs
Playback only
Accessories
Technical data
Region codes
Important notes regarding operation
There is a risk of an electrical shock
Can I use a cleaning disc intended for DVD players?
Cleaning discs
Therefore, refrain from using a cleaning CD
Special functions of your new DVD Recorder
DCDi is a trademark of Faroudja, a division of Sage Inc
BConnecting the DVD Recorder
Preparing the remote control for operation
Connecting your DVD Recorder to the TV
Tip
Interlaced
Connecting with a Component Video Y PB PR cable
Progressive scan
Switching TV and DVD Recorder to Progressive scan
Switching the TV
Switching the DVD Recorder
Please note the color order
Connecting with a S Y/C cable
Connecting with Video Cvbs cable
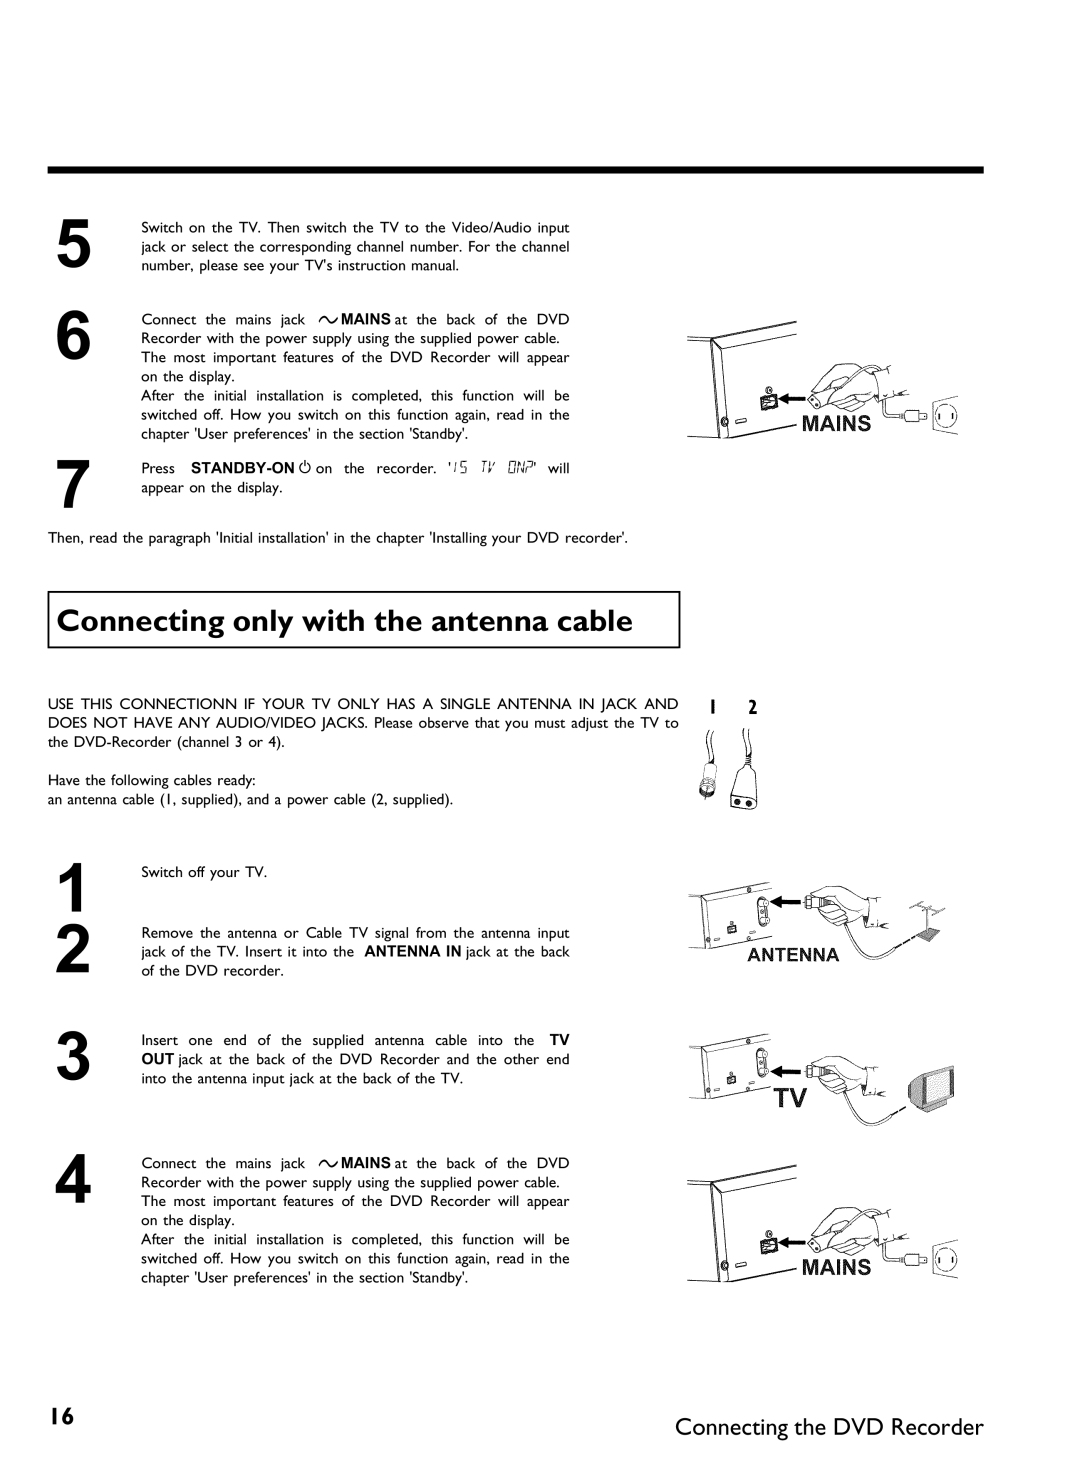
Connecting only with the antenna cable
How do I switch the Recorder between channel 3 and 4?
Problem
AI dont see a menu for language selection
CConnecting additional devices
Connecting an additional video recorder, DVD player
AWhen copying video cassettes appears DVD Recorder display
Please be aware
Connecting additional devices only via aerial cable
Connecting a camcorder to the front jacks
Connecting audio devices to analog audio jacks
Best Picture Quality
Very good Picture Quality
Digital multi sound
Connecting audio devices to the digital audio jacks
AA loud distorted sound is coming from my speakers
Initial installation
DInstalling your DVD recorder
Confirm with OK
Which screen formats can I choose?
AThe DVD Recorder finds very few/no channels during Search
Automatic TV channel search
AVery few TV channels were found
SYSTEM-MENU repeatedly
To remove all the menus
Adding and deleting TV channels manually
Setting the language
Which settings can I choose?
To end, press
Switching audio recording Stereo, SAP
Stereo
Assigning the VCR Plus+ Guide channel numbers
Setting the time/date automatically
Clock not set, check channel will appear on the TV screen
Manually setting the time & date
EInformation on the TV screen
Menu bar icons
Menu bar
Field for temporary messages
Video No disc Disc error
Status box
Disc type icons
Disc status icons
Tuner info box
Timer info box
Live picture in the Tuner information box
FPlayback
General information regarding playback
Appears on the display
AI see an X in the menu bar on the screen
Inserting a disc
Play G or OPEN/CLOSE J
Playing a DVD video disc
Playing a DVD+RW or DVD+R
When creating MP3 CDs, keep the following in mind
Playing audio CDs
Playing MP3 CDs
Important information regarding playback
MP3 CD display
Playback of a Super Video CD
Other playback functions
Using the T/C title/chapter button
GOther playback functions
Changing to a different chapter track/title
Disc search
Still picture
Slow motion
Pause 9 to stop playback and display a Still picture
To continue playback, press Play G
Search with time entry
To continue playback, press Play G twice
Playback will now start at the time you entered
Slow motion via menu bar
Repeating/Shuffle
Repeat a specific segment a
Repeat chapter DVD only Repeat track/title
Disappear
Camera angle
Scan function
AThe F icon cannot be selected
Zoom function
Changing audio language
Subtitles
HThe Digital Photo Manager
Inserting the PC Card
PC Pcmcia Card
Removing the PC Card
Please observe the following
Showing Jpeg pictures from a roll
Fast browsing trough the pictures
Editing Jpeg pictures
Slide show
Tip
Starting the slide show
Changing the slide show settings
Advanced editing of the Jpeg pictures
Closing the slide show
Press Stop h . The picture overview will appear
Overview
Rotate
Flip
Zoom
Color
Reset
Save
Making a DVD compatible slide show
Making a slide show from a roll
Making a slide show from an album
Creating an album
Adding pictures to an album
Album
Select all pictures
Changing the picture order within an album
Do not remove the medium from the device
Using of the buttons on the remote
Editing pictures in an album
Changing album settings
Changing the cover picture
Changing the album name
To end, press OK
Changing the album date
Calling the album overview directly
Copying an album
AIt is not possible to select Copy album
Changing roll settings
Erasing an album
Changing the rolls name
Enter the characters with the buttons
Calling roll overview directly
Changing the rolls date
Deleting a roll
Storing rolls/albums on a DVD+RW/+R
What is the difference?
Preparing a DVD+RW/+R
Transfer the photos to a DVD+RW/+R
Changing the media settings
Problem solving for Digital Photo Manager
Error message Media does not contain photos
Messages instead of the thumbnails
Image is too large to be viewed in its thumbnail format
IRecording
General information
What kind of discs can be used for recording?
End of disc is reached
Recording without automatic switch
Display
You can stop recording by pressing Stop h on the remote or
Inserting chapter markers
AIf display reads
Making recordings on DVD+R discs compatible
Pausing recording
Recording with automatic switch OTR one
Ending recording
How can I delete the recording time I just entered?
Preventing accidental erasing of discs
What happens with DVD+R discs?
Lining up recordings within a title assemble cut
Selecting the recording mode picture quality
Can I also change the recording mode via a menu?
General
JManaging disc content
Can markings also be made on DVD+Rs?
Favorite Scene Selection
Inserting chapter marker
Hiding chapters
To remove the menu, press Edit
Switching quickly
Press T/C twice to change the chapter number C
Changing the index picture
Deleting chapter markers
How can I select other chapters?
Splitting titles
Changing the menu background
Can I also divide titles on DVD+Rs?
Editing recording titles name
Playing the entire title
Deleting recordings/titles
Can titles also be deleted on DVD+Rs?
Using Select Position Where
Disc settings
Changing disc name
Finalize editing
AThe line Make edits compatible does not appear
AThe Settings for menu does not appear
Finalizing DVD+R discs
Erasing DVD+RWs
AFinalize disc does not appear in the display
KProgramming a recording Timer
Recording mode M1/M2/M2x/M3/M4/M6
Programming a recording with the VCR Plus+ system
Fit to space Recording
Changing the recording mode
Change the information with a , B or the number buttons
AThe following message appears on the screen Please enter
AThe following message appears on the screen PlusCode
Programming a recording without the VCR Plus+ system
Selecting daily/weekly recordings
Program numbers of the EXT1 and EXT2 cinch socket
, Video in EXT1 or Component Video in EXT2 Change AM/PM
Changing the recording quality
How to change or delete a programmed recording Timer
Delete programmed recording
Recordable disc
Problem solving for programmed recordings
Full
Disc settings Recording settings Installation
LUser preferences
Picture settings
Digital output
Sound settings
Analog output
Language settings
Additional settings
Live source view
Auto standby
Standby
Display
Remote control settings
Disc feature menu
Access control
Auto resume
Using your DVD remote control with your TV set
AHow can I reset the remote code?
AMy TV set will not react
Previous channel number
Child lock DVD and VCD
MAccess control Child lock
Activating/Deactivating the child lock
Authorizing discs
Locking authorized discs
Activating/Deactivating the parental control
Parental control DVD video only
What do the parental levels mean?
Changing the country
Confirm with OK . To end, press repeatedly D and then
Changing the PIN
Forgot my code
NBefore you call technical support
BWarning
Recording using the VCR
No playback on DVD recorder Cannot playback Super Video CDs
Programmed recording does not work
Wrong TV channel was Decoded recorded after
Other disc errors
103
Other disc errors DVD+R, Disc contains unknown data
Index screen flickers when a DVD+R is inserted
DVD Recorder
Limited Warranty
Philips, P.O. Box 520890, Miami, FL 33152, 402
Code numbers of the remote control
Baird
107
WwnnNNNwwnnwWNnwNwnNnNwWnNnnwW Dvdr 77/17
3354/000
Factory Service Locations
1279 W. Hamilton Pkwy
Dvdr 77/17
Bensalem, PA